<?xml version="1.0" encoding="utf-8"?>
<feed xmlns="http://www.w3.org/2005/Atom">

  <title><![CDATA[P. Taylor Goetz]]></title>
  <link href="http://ptgoetz.github.io/atom.xml" rel="self"/>
  <link href="http://ptgoetz.github.io/"/>
  <updated>2013-12-18T23:42:54-05:00</updated>
  <id>http://ptgoetz.github.io/</id>
  <author>
    <name><![CDATA[P. Taylor Goetz]]></name>
    <email><![CDATA[ptgoetz@gmail.com]]></email>
  </author>
  <generator uri="http://octopress.org/">Octopress</generator>

  
  <entry>
    <title type="html"><![CDATA[Running Apache Storm on Windows]]></title>
    <link href="http://ptgoetz.github.io/blog/2013/12/18/running-apache-storm-on-windows/"/>
    <updated>2013-12-18T17:12:00-05:00</updated>
    <id>http://ptgoetz.github.io/blog/2013/12/18/running-apache-storm-on-windows</id>
    <content type="html"><![CDATA[<p>In the past, running Storm on Windows has been a challenge. While possible, it often involved hacking Storm&#8217;s source, hunting down (or building from source) native dependencies, and mucking around with various ways to trick Windows into thinking it&#8217;s like UNIX/POSIX.</p>

<p>That alienated a large number of potential adopters who stand to gain from integrating Storm into their big data strategy.</p>

<p>Thanks in large part to contributions from Storm committer <a href="https://github.com/davidlao2k">David Lao</a>, as well as <a href="http://yahooeng.tumblr.com/post/64758709722/making-storm-fly-with-netty">contributions from Yahoo!</a>, the next release of Storm (0.9.1-incubating) will make life much easier for users who want or need to deploy Storm in an environment where Windows is necessary.</p>

<p>Below I&#8217;ve listed the steps necessary to get storm up and running with a sample topology on Windows. It walks through the process of creating a single-node cluster (pseudo-cluster) and deploying a sample &#8220;Word Count&#8221; topology.</p>

<p><img src="http://ptgoetz.github.io/images/storm_ui.png" alt="" /></p>

<h3>Install Java</h3>

<p>Download and install a JDK (Storm works with both Oracle and OpenJDK 6/7). For this setup I used <a href="http://download.oracle.com/otn-pub/java/jdk/7u45-b18/jdk-7u45-windows-x64.exe">JDK 7 from Oracle</a>.</p>

<p>I installed Java in:</p>

<pre><code>C:\Java\jdk1.7.0_45\
</code></pre>

<h3>Install Python</h3>

<p>To test the installation, we&#8217;ll be deploying the &#8220;word count&#8221; sample from the <a href="https://github.com/nathanmarz/storm-starter">storm-starter project</a> which uses a <a href="https://github.com/nathanmarz/storm/wiki/Multilang-protocol">multi-lang</a> bolt written in python. I used python 2.7.6 which can be downloaded <a href="http://www.python.org/download/">here</a>.</p>

<p>I installed python in:</p>

<pre><code>C:\Python27\
</code></pre>

<h3>Install and Run Zookeeper</h3>

<p><a href="http://download.nextag.com/apache/zookeeper/zookeeper-3.3.6/">Download Apache Zookeeper 3.3.6</a> and extract it. Configure and run Zookeeper with the following commands:</p>

<pre><code>&gt; cd zookeeper-3.3.6
&gt; copy conf\zoo_sample.cfg conf\zoo.cfg
&gt; .\bin\zkServer.cmd
</code></pre>

<h3>Install Storm</h3>

<p>The changes that allow Storm to run seamlessly on Windows have not been officially released yet, but you can download a build with those changes incorporated <a href="https://dl.dropboxusercontent.com/s/iglqz73chkul1tu/storm-0.9.1-incubating-SNAPSHOT-12182013.zip">here</a>.</p>

<p>(Source branch for that build can be found <a href="https://github.com/ptgoetz/incubator-storm/tree/windows-test">here</a>).</p>

<p>Extract that file to the location of your choice. I chose <code>C:\</code>.</p>

<h3>Configure Environment Variables</h3>

<p>On Windows Storm requires the <code>STORM_HOME</code> and <code>JAVA_HOME</code> environment variables to be set, as well as some additions to the <code>PATH</code> variable:</p>

<p><code>JAVA_HOME</code></p>

<pre><code>C:\Java\jdk1.7.0_45\
</code></pre>

<p><code>STORM_HOME</code></p>

<pre><code>C:\storm-0.9.1-incubating-SNAPSHOT-12182013\
</code></pre>

<p><code>PATH</code> Add:</p>

<pre><code>%STORM_HOME%\bin;%JAVA_HOME%\bin;C:\Python27;C:\Python27\Lib\site-packages\;C:\Python27\Scripts\;
</code></pre>

<p><code>PATHEXT</code> Add:</p>

<pre><code>.PY
</code></pre>

<h3>Start Nimbus, Supervisor, and Storm UI Daemons</h3>

<p>For each deamon, open a separate command prompt.</p>

<p><strong>Nimbus</strong></p>

<pre><code>&gt; cd %STORM_HOME%
&gt; storm nimbus
</code></pre>

<p><strong>Supervisor</strong></p>

<pre><code>&gt; cd %STORM_HOME%
&gt; storm supervisor
</code></pre>

<p><strong>Storm UI</strong></p>

<pre><code>&gt; cd %STORM_HOME%
&gt; storm ui
</code></pre>

<p>Verify that Storm is running by opening <a href="http://localhost:8080/">http://localhost:8080/</a> in a browser.</p>

<h3>Deploy the &#8220;Word Count&#8221; Topology</h3>

<p>Either build the <a href="https://github.com/nathanmarz/storm-starter">storm-starter</a> project from source, or <a href="https://dl.dropboxusercontent.com/s/kc933u6vz2crqkb/storm-starter-0.0.1-SNAPSHOT-jar-with-dependencies.jar">download a pre-built jar</a></p>

<p>
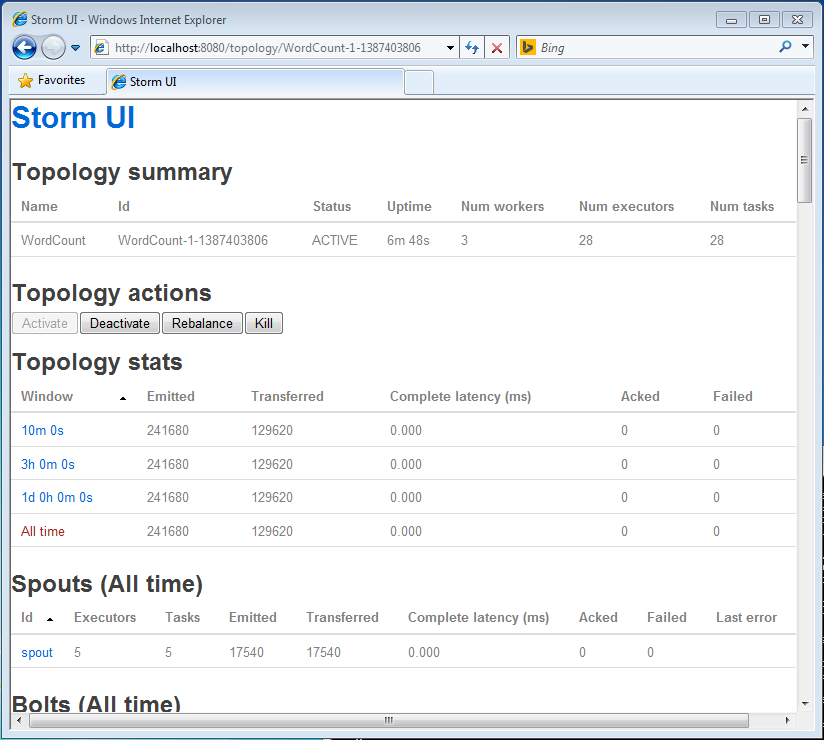
Deploy the Word Count topology to your local cluster with the <code>storm jar</code> command:</p>

<pre><code>&gt; storm jar storm-starter-0.0.1-SNAPSHOT-jar-with-dependencies.jar storm.starter.WordCountTopology WordCount -c nimbus.host=localhost
</code></pre>

<p>If you reload the Storm UI page, you should now see the &#8220;WordCount&#8221; topology listed and can click on the link to verify that the topology is processing data.</p>
]]></content>
  </entry>
  
  <entry>
    <title type="html"><![CDATA[Building Storm On OSX 10.9 (Mavericks)]]></title>
    <link href="http://ptgoetz.github.io/blog/2013/11/26/building-storm-on-osx-mavericks/"/>
    <updated>2013-11-26T16:11:00-05:00</updated>
    <id>http://ptgoetz.github.io/blog/2013/11/26/building-storm-on-osx-mavericks</id>
    <content type="html"><![CDATA[<p>Nearly a year ago to the day, my freind and coleague Brian O&#8217;Neill <a href="http://brianoneill.blogspot.com/2012/11/compiling-storm-and-jzmq-on-mac-osx.html">blogged about building storm on OSX</a>. I had been through that pain two years ago, and largely forgot about it (once you get 0mq and JZMQ installed you&#8217;re largely in the clear). That is until today, when I had to set up a storm development environment on a new laptop&#8230;</p>

<p>Things have changed since then. Apple has released OSX 10.9 (Mavericks) and turned over development of the OSX JDK to Oracle, adding a little more salt to the wound.</p>

<p>Hopefully this will spare a few others from that pain.</p>

<h3>JDK 6/7</h3>

<p>On a fresh install of OSX 10.9 (no JDK installed), when you <code>java -version</code> from the command line you will get a prompt to <a href="http://www.java.com/en/download/index.jsp">download Java 7 from Oracle</a>. But what if you need JDK 6?</p>

<p>Some Java applications can trigger the install of JDK 6 via software update. In my case it was Intellij IDEA. But one utility that Apple added to OSX was the  <code>/usr/libexec/java_home</code> executable, which will output a path suitable for use as <code>JAVA_HOME</code> value. Without arguments, it will output the path for the default JDK:</p>

<figure class='code'><div class="highlight"><table><tr><td class="gutter"><pre class="line-numbers"><span class='line-number'>1</span>
<span class='line-number'>2</span>
<span class='line-number'>3</span>
<span class='line-number'>4</span>
<span class='line-number'>5</span>
<span class='line-number'>6</span>
<span class='line-number'>7</span>
</pre></td><td class='code'><pre><code class=''><span class='line'>$ export JAVA_HOME=$(/usr/libexec/java_home)
</span><span class='line'>$ echo $JAVA_HOME
</span><span class='line'>/Library/Java/JavaVirtualMachines/jdk1.7.0_45.jdk/Contents/Home
</span><span class='line'>$ java -version
</span><span class='line'>java version "1.7.0_45"
</span><span class='line'>Java(TM) SE Runtime Environment (build 1.7.0_45-b18)
</span><span class='line'>Java HotSpot(TM) 64-Bit Server VM (build 24.45-b08, mixed mode)</span></code></pre></td></tr></table></div></figure>


<p>You can also specify a certain version (running this <em>should</em> trigger an install of JDK 6 via software update &#8211; I&#8217;m not sure because Intellij had already triggered it in my situation):</p>

<figure class='code'><div class="highlight"><table><tr><td class="gutter"><pre class="line-numbers"><span class='line-number'>1</span>
<span class='line-number'>2</span>
<span class='line-number'>3</span>
<span class='line-number'>4</span>
<span class='line-number'>5</span>
<span class='line-number'>6</span>
<span class='line-number'>7</span>
</pre></td><td class='code'><pre><code class=''><span class='line'>$ export JAVA_HOME=$(/usr/libexec/java_home -v1.6)
</span><span class='line'>$ echo $JAVA_HOME
</span><span class='line'>/System/Library/Java/JavaVirtualMachines/1.6.0.jdk/Contents/Home
</span><span class='line'>$ java -version
</span><span class='line'>java version "1.6.0_65"
</span><span class='line'>Java(TM) SE Runtime Environment (build 1.6.0_65-b14-462-11M4609)
</span><span class='line'>Java HotSpot(TM) 64-Bit Server VM (build 20.65-b04-462, mixed mode)</span></code></pre></td></tr></table></div></figure>


<p>So now we have a way to easily switch between JDK 6 and 7.</p>

<p>If you need to download Java 6 manually, there is a <code>.dmg</code> file <a href="http://support.apple.com/kb/DL1572">available from Apple</a>.</p>

<h3>Install Xcode and Command Line Tools</h3>

<p>Xcode is easy to install via the App Store. You will also need the command line tools for compiling various things. You can trigger the install of the command line tools by invoking one of the stubs of the tools included, e.g.:</p>

<figure class='code'><div class="highlight"><table><tr><td class="gutter"><pre class="line-numbers"><span class='line-number'>1</span>
</pre></td><td class='code'><pre><code class=''><span class='line'>/usr/bin/strings</span></code></pre></td></tr></table></div></figure>


<h3>Install <a href="http://brew.sh/">Homebrew</a></h3>

<p>Homebrew is like a package manager for OSX that handles download, compilation, and installation of various tools and libraries. We will use it later to install dependencies.</p>

<figure class='code'><div class="highlight"><table><tr><td class="gutter"><pre class="line-numbers"><span class='line-number'>1</span>
<span class='line-number'>2</span>
</pre></td><td class='code'><pre><code class=''><span class='line'>ruby -e "$(curl -fsSL https://raw.github.com/mxcl/homebrew/go/install)"
</span><span class='line'>brew doctor</span></code></pre></td></tr></table></div></figure>


<p>If the <code>brew doctor</code> command completes without error, you&#8217;re ready to move on.</p>

<h3>Install 0mq</h3>

<p>The <a href="https://github.com/nathanmarz/storm/wiki/Setting-up-a-Storm-cluster">Storm documentation</a> recommends using 0mq version 2.1.7, however I&#8217;ve found that 2.1.7 will not build on OS X 10.9 (Mavericks). The closest version I&#8217;ve found that will build under Mavericks is 2.1.9.</p>

<p>The new/preferred method is to use <code>brew tap homebrew/versions</code>, however that repository does not have 0mq 2.1.9. The fallback method is to use the <code>brew versions</code> command to find and checkout a specific version:</p>

<figure class='code'><div class="highlight"><table><tr><td class="gutter"><pre class="line-numbers"><span class='line-number'>1</span>
<span class='line-number'>2</span>
<span class='line-number'>3</span>
<span class='line-number'>4</span>
</pre></td><td class='code'><pre><code class=''><span class='line'>brew versions zeromq
</span><span class='line'>cd /usr/local
</span><span class='line'>git checkout 381c97f Library/Formula/zeromq.rb
</span><span class='line'>brew install zeromq</span></code></pre></td></tr></table></div></figure>


<h3>Install JZMQ (Java bindings for 0mq)</h3>

<p>Compiling and instlling JZMQ is where most of pain comes in, and most of the errors that come out of the build process are cryptic.</p>

<p>Follow the steps below exactly and you should be spared that pain:</p>

<figure class='code'><div class="highlight"><table><tr><td class="gutter"><pre class="line-numbers"><span class='line-number'>1</span>
<span class='line-number'>2</span>
<span class='line-number'>3</span>
<span class='line-number'>4</span>
<span class='line-number'>5</span>
<span class='line-number'>6</span>
<span class='line-number'>7</span>
<span class='line-number'>8</span>
<span class='line-number'>9</span>
<span class='line-number'>10</span>
<span class='line-number'>11</span>
<span class='line-number'>12</span>
<span class='line-number'>13</span>
<span class='line-number'>14</span>
<span class='line-number'>15</span>
<span class='line-number'>16</span>
<span class='line-number'>17</span>
<span class='line-number'>18</span>
</pre></td><td class='code'><pre><code class=''><span class='line'>git clone https://github.com/nathanmarz/jzmq.git
</span><span class='line'>
</span><span class='line'>brew install pkg-config
</span><span class='line'>brew install automake
</span><span class='line'>brew install libtool
</span><span class='line'>
</span><span class='line'>export JAVA_HOME=$(/usr/libexec/java_home -v1.6)
</span><span class='line'>sudo ln -s /System/Library/Frameworks/JavaVM.framework/Versions/Current/Headers/ /Library/Java/Home/include
</span><span class='line'>
</span><span class='line'>cd jzmq
</span><span class='line'>./autogen.sh
</span><span class='line'>./configure
</span><span class='line'>touch src/classdist_noinst.stamp
</span><span class='line'>cd src
</span><span class='line'>javac -d . org/zeromq/*.java
</span><span class='line'>cd ../
</span><span class='line'>make
</span><span class='line'>sudo make install</span></code></pre></td></tr></table></div></figure>


<p>The <code>pkg-config</code>, <code>automake</code>, and <code>libtool</code> are dependencies of the JZMQ build process. After installing those, we switch to JDK 6. Next we symlink the JDK 6 header directory where the JZMQ build process will be able to find it. Without it you will get an error like:</p>

<figure class='code'><div class="highlight"><table><tr><td class="gutter"><pre class="line-numbers"><span class='line-number'>1</span>
</pre></td><td class='code'><pre><code class=''><span class='line'>cannot find jni_md.h in /Library/Java/Home/include</span></code></pre></td></tr></table></div></figure>


<p>The <code>touch src/classdist_noinst.stamp</code> command prevents the following error:</p>

<figure class='code'><div class="highlight"><table><tr><td class="gutter"><pre class="line-numbers"><span class='line-number'>1</span>
</pre></td><td class='code'><pre><code class=''><span class='line'>No rule to make target `classdist_noinst.stamp'</span></code></pre></td></tr></table></div></figure>


<p>Next, we manually compile the JZMQ java sources. Without that step, you will get the following error:</p>

<figure class='code'><div class="highlight"><table><tr><td class="gutter"><pre class="line-numbers"><span class='line-number'>1</span>
<span class='line-number'>2</span>
<span class='line-number'>3</span>
<span class='line-number'>4</span>
<span class='line-number'>5</span>
<span class='line-number'>6</span>
</pre></td><td class='code'><pre><code class=''><span class='line'>error: cannot access org.zeromq.ZMQ
</span><span class='line'>class file for org.zeromq.ZMQ not found
</span><span class='line'>javadoc: error - Class org.zeromq.ZMQ not found.
</span><span class='line'>Error: No classes were specified on the command line.  Try -help.
</span><span class='line'>make[1]: *** [org_zeromq_ZMQ.h] Error 15
</span><span class='line'>make: *** [all-recursive] Error 1</span></code></pre></td></tr></table></div></figure>


<p>Finally, we compile and install JZMQ.</p>

<h3>Install <a href="http://leiningen.org/">Leiningen</a></h3>

<p>Leiningen is the build tool used by storm. It is similar to Maven and Gradle, but much more suited to clojure development.</p>

<p>Installing Leiningen is just a matter of downloading the script and making it executable:</p>

<figure class='code'><div class="highlight"><table><tr><td class="gutter"><pre class="line-numbers"><span class='line-number'>1</span>
<span class='line-number'>2</span>
</pre></td><td class='code'><pre><code class=''><span class='line'>curl https://raw.github.com/technomancy/leiningen/stable/bin/lein -o ~/bin/lein
</span><span class='line'>chmod +x ~/bin/lein</span></code></pre></td></tr></table></div></figure>


<p>The above commands assume you have a <code>~/bin</code> directory and it is added to your <code>PATH</code>. The easiest way to do that is in a <code>.bash_profile</code> file:</p>

<figure class='code'><div class="highlight"><table><tr><td class="gutter"><pre class="line-numbers"><span class='line-number'>1</span>
<span class='line-number'>2</span>
</pre></td><td class='code'><pre><code class=''><span class='line'>mkdir ~/bin
</span><span class='line'>echo PATH=\$PATH:~/bin &gt;&gt; ~/.bash_profile</span></code></pre></td></tr></table></div></figure>


<h3>Build Storm</h3>

<p>Now we&#8217;re finally ready to build storm:</p>

<figure class='code'><div class="highlight"><table><tr><td class="gutter"><pre class="line-numbers"><span class='line-number'>1</span>
<span class='line-number'>2</span>
<span class='line-number'>3</span>
</pre></td><td class='code'><pre><code class=''><span class='line'>git clone https://github.com/nathanmarz/storm.git
</span><span class='line'>cd storm
</span><span class='line'>lein sub install</span></code></pre></td></tr></table></div></figure>


<p>This will build and install the storm jars so they can be used as dependencies in other Leiningen/Maven/Gradle/etc. projects. If you want to create a distribution ZIP archive, run the following script:</p>

<figure class='code'><div class="highlight"><table><tr><td class="gutter"><pre class="line-numbers"><span class='line-number'>1</span>
</pre></td><td class='code'><pre><code class=''><span class='line'>sh ./bin/build_release.sh</span></code></pre></td></tr></table></div></figure>


<p>Hopefully this will save some future storm contributors some time Googling cryptic errors.</p>
]]></content>
  </entry>
  
  <entry>
    <title type="html"><![CDATA[Why Sample Code Matters]]></title>
    <link href="http://ptgoetz.github.io/blog/2013/05/01/why-sample-code-matters/"/>
    <updated>2013-05-01T15:52:00-04:00</updated>
    <id>http://ptgoetz.github.io/blog/2013/05/01/why-sample-code-matters</id>
    <content type="html"><![CDATA[<p>Whenever you write code samples for an API or library &#8211; or even a blog post &#8211; you should treat it as though you are writing the production guidance system for the space shuttle. Okay, that may be a little extreme, but you should at least make your best effort to ensure the code is error free and follows best practices. Why? Any bugs, vulnerabilities, anti-patterns, or cruft of any kind <strong><em>will replicate like drunken bunnies.</em></strong></p>

<p><img src="http://ptgoetz.github.io/images/lots-of-bunnies.gif" title="Can't hold their liquor." alt="Bunnies" /></p>

<p>In a blog post titled <a href="http://www.viva64.com/en/b/0199/">Why Windows 8 drivers are buggy</a> Andrey Karpov discusses what he found when performing static analysis on Windows 8 driver examples published by Microsoft. In short, those examples aren&#8217;t exactly stellar. But they&#8217;re just examples and aren&#8217;t that important, right? I beg to differ.</p>

<p>In my opinion, the salient point of the article is best summarized in the following paragraph (emphasis mine):</p>

<blockquote><p>&#8220;<del>Bugs in samples are not that critical as bugs in real-life software.</del> Nevertheless, bugs can migrate from samples to real-life projects and cause developers a lot of troubles. Even within the Windows 8 Driver Samples pack we found identical bugs. The reason is obvious: copying-and-pasting a code fragment from a nearby sample. In the same way these errors will get into real-life drivers.&#8221;</p></blockquote>

<p>In fact, I would rearrange that first sentence to read: <em>&#8220;Bugs in samples will become critical bugs in real-life software.&#8221;</em></p>

<p>The evils of <em>copying-and-pasting</em> aside, the truth is that developers reading your sample code will likely (perhaps blindly) trust that a given example is the right way to do things. Like it or not, when writing examples you are acting as a teacher and can&#8217;t make any assumptions about your pupils.</p>

<p>To illustrate how sample code can proliferate, consider <a href="https://github.com/nathanmarz/storm-starter/commit/91550313b5288e9c059165e6ce8bad180fb764cb#diff-e9057e0def4e5aa863bdc4a6fdb98fe3R42">this commit</a> to the <a href="">storm-starter project</a>. That was from two years ago, shortly after storm had been open-sourced. The impetus was to help people more familiar with java/Maven than clojure/Leiningen get started with storm. Since then, that code/comment has proliferated fairly far and wide, as can be seen from a <a href="https://www.google.com/#filter=0&amp;q=%22keep+storm+out+of+the+jar-with-dependencies%22">google search for &#8220;keep storm out of the jar-with-dependencies&#8221;</a>. In retrospect, I should have used the <a href="http://maven.apache.org/plugins/maven-shade-plugin/">maven shade plugin</a> instead, since it plays better with certain frameworks like Spring. Not a big deal, but the <del>cat</del> drunken bunny is out of the bag and on a love mission.</p>

<p>I&#8217;ll admit that I&#8217;m in no way perfect in this respect. But I strive toward that goal and believe that all serious developers should as well.</p>

<p>Let&#8217;s keep the drunken bunnies at bay. ;)</p>
]]></content>
  </entry>
  
  <entry>
    <title type="html"><![CDATA[Storm at NYC* Big Data Tech Day]]></title>
    <link href="http://ptgoetz.github.io/blog/2013/04/08/storm-at-nyc-star-big-data-tech-day/"/>
    <updated>2013-04-08T22:42:00-04:00</updated>
    <id>http://ptgoetz.github.io/blog/2013/04/08/storm-at-nyc-star-big-data-tech-day</id>
    <content type="html"><![CDATA[<p>I recently had the opportunity to present at <a href="http://www.datastax.com/nycassandra2013/">NYC* Big Data Tech Day</a> with <a href="http://brianoneill.blogspot.com">Brian O&#8217;Neill</a> to speak about some of the work we&#8217;ve been doing at <a href="http://www.healthmarketscience.com">HMS</a>, developing our platform for real-time Master Data Management.</p>

<p>Our approach leverages <a href="http://storm-project.net">Storm</a>, <a href="http://cassandra.apache.org">Cassandra</a>, <a href="http://kafka.apache.org">Kafka</a>, and <a href="http://www.elasticsearch.org">Elastic Search</a> to gather data from thousands of data sources, and meld them together in near real time, to produce a single high quality health care practitioner database.</p>

<p>Our talk was titled &#8220;A Big Data Quadfecta: Cassandra, Storm, Elastic Search and Kafka&#8221; and should resonate with any beer enthusiasts!</p>

<p>Slides and video below. Unfortunately the slides are not visible in the video, but you can hopefully follow along (somewhat) with the embedded slides.</p>

<iframe width="560" height="315" src="http://www.youtube.com/embed/jBauMkzSgRQ" frameborder="0" allowfullscreen></iframe>


<iframe src="http://www.slideshare.net/slideshow/embed_code/17516652" width="427" height="356" frameborder="0" marginwidth="0" marginheight="0" scrolling="no" style="border:1px solid #CCC;border-width:1px 1px 0;margin-bottom:5px" allowfullscreen webkitallowfullscreen mozallowfullscreen> </iframe>


]]></content>
  </entry>
  
  <entry>
    <title type="html"><![CDATA[Philadelphia Cassandra User Group]]></title>
    <link href="http://ptgoetz.github.io/blog/2013/03/07/philadelphia-cassandra-user-group/"/>
    <updated>2013-03-07T00:02:00-05:00</updated>
    <id>http://ptgoetz.github.io/blog/2013/03/07/philadelphia-cassandra-user-group</id>
    <content type="html"><![CDATA[<p>Last night we kicked off the first meeting of the <a href="http://www.meetup.com/Philadelphia-Cassandra-Users/">Philadelphia Cassandra Users Group</a> hosted at <a href="http://www.healthmarketscience.com">HMS</a>.</p>

<p>We had a really good turnout, with a broad range of C* users and admins. I presented on our use of storm and cassandra at <a href="http://www.healthmarketscience.com">HMS</a>.</p>

<p>Thanks to Brady Gentile from DataStax, and my HMS colleagues Alex Collautt and Brian O&#8217;Neill for making the arrangements.</p>

<iframe src="http://www.slideshare.net/slideshow/embed_code/17067371" width="427" height="356" frameborder="0" marginwidth="0" marginheight="0" scrolling="no" style="border:1px solid #CCC;border-width:1px 1px 0;margin-bottom:5px" allowfullscreen webkitallowfullscreen mozallowfullscreen> </iframe>

]]></content>
  </entry>
  
  <entry>
    <title type="html"><![CDATA[Upgrading RVM on OSX]]></title>
    <link href="http://ptgoetz.github.io/blog/2013/03/01/upgrading-rvm-on-osx/"/>
    <updated>2013-03-01T01:10:00-05:00</updated>
    <id>http://ptgoetz.github.io/blog/2013/03/01/upgrading-rvm-on-osx</id>
    <content type="html"><![CDATA[<p>I recently had the need to install a newer version of ruby, since I hadn&#8217;t updated in ages (I was on ruby-1.9.2-p290). For something I was working on I needed <code>ruby-1.9.3-rc1</code>.</p>

<p>Simple right? Just run</p>

<figure class='code'><figcaption><span></span></figcaption><div class="highlight"><table><tr><td class="gutter"><pre class="line-numbers"><span class='line-number'>1</span>
</pre></td><td class='code'><pre><code class='bash'><span class='line'>rvm install ruby-1.9.3-rc1
</span></code></pre></td></tr></table></div></figure>


<p>Well, not so much&#8230; Running that with an old rvm install led to nothing but cryptic hurt.</p>

<p>As it turns out, RVM has undergone some serious updates as well as a move to the .io TLD. I&#8217;m running OSX and using homebrew, so the first order of business was to update homebrew:</p>

<figure class='code'><figcaption><span></span></figcaption><div class="highlight"><table><tr><td class="gutter"><pre class="line-numbers"><span class='line-number'>1</span>
</pre></td><td class='code'><pre><code class='bash'><span class='line'>brew update
</span></code></pre></td></tr></table></div></figure>


<p>The next step is to install the new/latest version of RVM:</p>

<figure class='code'><figcaption><span></span></figcaption><div class="highlight"><table><tr><td class="gutter"><pre class="line-numbers"><span class='line-number'>1</span>
</pre></td><td class='code'><pre><code class='bash'><span class='line'>curl -L https://get.rvm.io | bash -s stable
</span></code></pre></td></tr></table></div></figure>


<p>That got me a bit closer, but running <code>rvm install ruby-1.9.3-rc1</code> failed, but RVM was kind enough to let me know what was missing. So the next step was:</p>

<figure class='code'><figcaption><span></span></figcaption><div class="highlight"><table><tr><td class="gutter"><pre class="line-numbers"><span class='line-number'>1</span>
</pre></td><td class='code'><pre><code class='bash'><span class='line'>brew install libyaml libxml2 libxslt libksba openssl sqlite
</span></code></pre></td></tr></table></div></figure>


<p>Even closer&#8230; but still no love. The next step was to tell RVM to take care of any dependencies it needs, including installing homebrew if necessary (https://rvm.io/rvm/autolibs/)</p>

<figure class='code'><figcaption><span></span></figcaption><div class="highlight"><table><tr><td class="gutter"><pre class="line-numbers"><span class='line-number'>1</span>
</pre></td><td class='code'><pre><code class='bash'><span class='line'>rvm autolibs <span class="nb">enable</span>
</span></code></pre></td></tr></table></div></figure>


<p>Success! Now I was able to install <code>ruby-1.9.3-rc1</code>, migrate the gems I had installed under <code>ruby-1.9.2-p290</code>, and tell RVM to use <code>ruby-1.9.3-rc1</code>:</p>

<figure class='code'><figcaption><span></span></figcaption><div class="highlight"><table><tr><td class="gutter"><pre class="line-numbers"><span class='line-number'>1</span>
<span class='line-number'>2</span>
<span class='line-number'>3</span>
</pre></td><td class='code'><pre><code class='bash'><span class='line'>rvm install ruby-1.9.3-rc1
</span><span class='line'>rvm migrate ruby-1.9.2-p290 ruby-1.9.3-rc1
</span><span class='line'>rvm use ruby-1.9.3-rc1
</span></code></pre></td></tr></table></div></figure>


]]></content>
  </entry>
  
</feed>
