前言延时消息是项目中经常用到的一种解决方案, 本篇文章我们就来尝试探探它到底是如何实现的?以及有哪些方案。
面试看了回家等通知版
为了更能直观的感受,我们还是通过案例来进行表述。
万年不变老案例:下单5分钟后,支付超时取消订单。
public void order(){ // 假设这里已经下单并得到了订单id String orderId = UUID.randomUUID().toString(); new Thread(() -> { try { // 延时5分钟 TimeUnit.MINUTES.sleep(5L); // 查询订单是否支付,未支付则取消 boolean isPay = checkOrderPayState(orderId); } catch (InterruptedException e) { e.printStackTrace(); } }).start(); }
咱先不论回不回家等通知,你就说能不能用?
诶,它还真能用,但不多。
主要有两个问题:
1、性能很差,一个订单就开个线程等5分钟,好家伙,多来点订单直接内存溢出了。
老板:业务上不去原来就是你小子啊
2、服务停机,5分钟内的订单取消逻辑全部消失了。
用户:咦,咋昨天的订单还能支付勒?
回家复盘
我们先想想第一个问题咋解决。
既然问题主要在于一个订单就会开一个线程,那我能不能把线程省着点用?
省线程?线程复用?这不直接触发了关键字:线程池。
试试?
private static final ExecutorService executor = new ThreadPoolExecutor(5, 20, 1, TimeUnit.MINUTES, new LinkedBlockingQueue<>(60)); @Test public void orderPro() throws IOException { // 假设这里已经下单并得到了订单id String orderId = UUID.randomUUID().toString(); executor.execute(() -> { try { // 延时5分钟 TimeUnit.MINUTES.sleep(5L); // 查询订单是否支付,未支付则取消 boolean isPay = checkOrderPayState(orderId); log.info("订单支付状态:{}", isPay); } catch (InterruptedException e) { e.printStackTrace(); } }); }
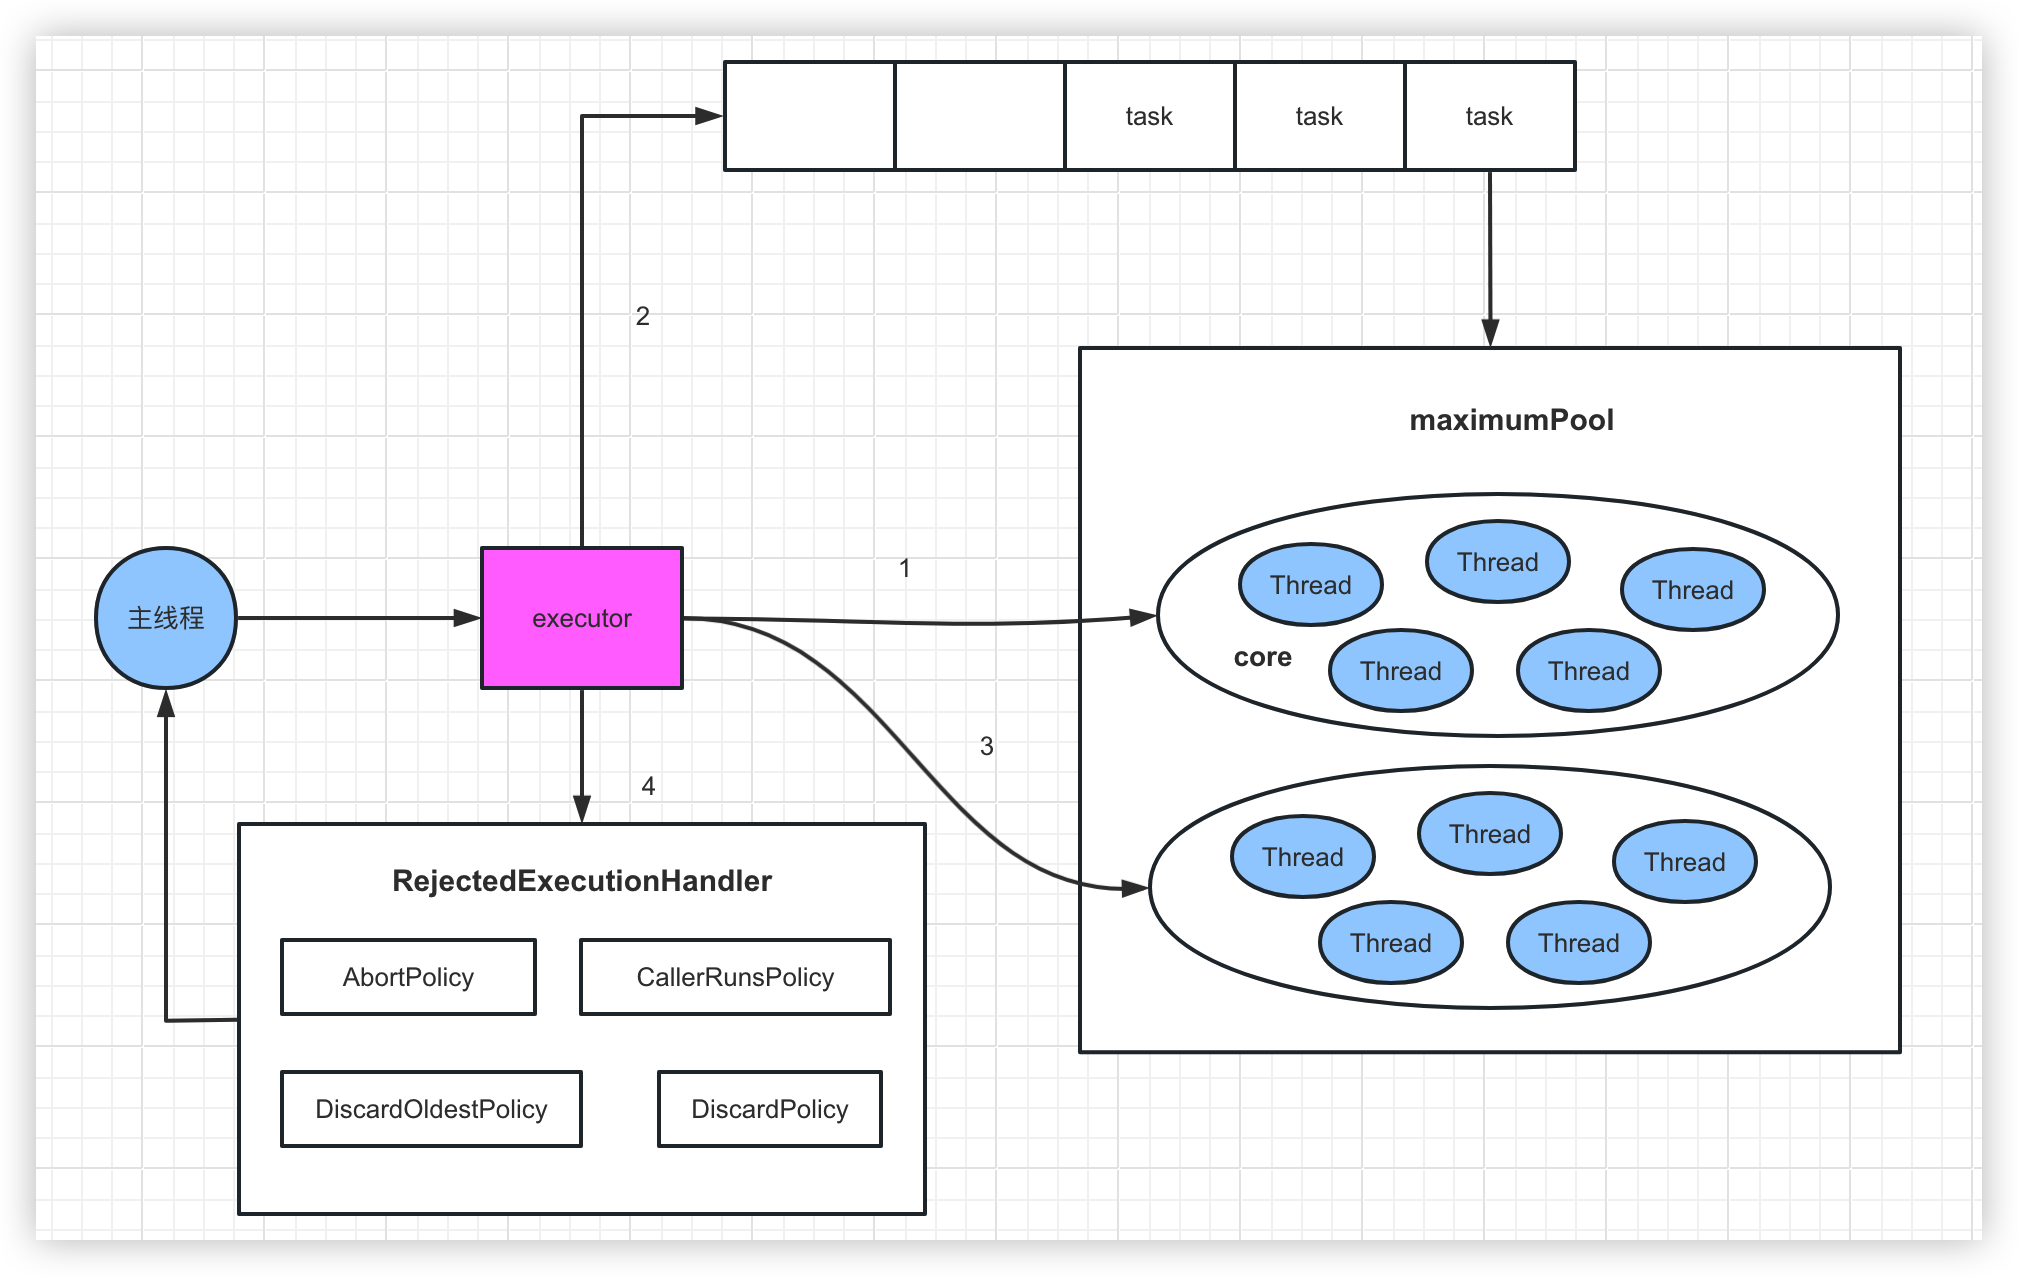
这里阿紫先补充一下线程池的执行机制,以防有小伙伴吃懵逼果。
以上代码的线程池参数分别为:核心线程数5,最大线程数20,线程空闲超时时间1分钟,任务队列容量60.
执行机制是这样的:
1、线程池收到任务,先判断核心线程数是否已满(达到5)
2、未满则创建线程执行任务
3、已满则将任务放入任务队列
4、如果任务队列也满了,任务放不进,则继续创建线程(非核心线程)
5、如果非核心线程也满了(达到20),则拒绝该任务
线程空闲超时时间作用:如果非核心线程在空闲超时时间(一分钟)内没收到任务,则回收该线程
核心线程和非核心线程只是线程池的一个概念,用来区分哪些线程可以回收,实际上没有区别。
叠个甲:核心线程实际也可以被回收,给个允许核心线程超时的参数就行。
好,现在就来看看这个改造可不可行?
假设现有6个任务
| 订单创建时间 | 期望检查时间 |
|---|
| 订单1 | 10:00:00 | 10:05:00 |
| 订单2 | 10:00:30 | 10:05:30 |
| 订单3 | 10:01:00 | 10:06:00 |
| 订单4 | 10:01:30 | 10:06:30 |
| 订单5 | 10:02:00 | 10:07:00 |
| 订单6 | 10:02:30 | 10:07:30 |
由于线程池有5个核心线程,所以前5个订单都正常交给了线程执行。
到第6个订单时,由于核心线程数已满,所以第6个订单放入队列。直到第一个订单的线程执行完毕,也就是在10:05:00. 这时候线程开始执行第6个订单的检查任务,检查时间为10:05:00 + 5分钟 = 10:10:00
程序出错,问题原因在于我们期望创建订单后马上执行任务,但是由于线程数不足,任务在队列中等待了一段时间后才执行。
程序的逻辑应该从等待5分钟改为等待至订单支付超时的时间点
public void orderPlus() throws IOException { // 假设这里已经下单并得到了订单id String orderId = UUID.randomUUID().toString(); // 计算订单检查是否支付超时时间点 long checkTime = System.currentTimeMillis() + TimeUnit.MINUTES.toMillis(5); executor.execute(() -> { // 延时等待至订单超时时间 Thread.sleep(checkTime - System.currentTimeMillis()); // 查询订单是否支付,未支付则取消 boolean isPay = checkOrderPayState(orderId); log.info("订单支付状态:{}", isPay); }); }
到这里好像问题已经解决了,程序的线程数可控,程序执行也没有问题。
但如果细想一下,我们就会发现:先创建的订单总是先执行任务,这好像是句废话,因为订单的延时时间是固定的5分钟,所以任务天然是按照订单创建顺序排好队等待执行的。
但这句废话会让我们得出一个结论:一般情况下,有且只有一个线程会执行任务。我们不妨把线程池的线程数改为1进行验证一下,就会发现确实如此。
不知道为什么,说起废话总会让我想起鸽巢原理
继续优化
既然一个线程就能解决的事情,那我们就尝试回归一下,用最开始的单线程试试。
// 定义阻塞队列 private static final LinkedBlockingQueue<Order> checkQueue = new LinkedBlockingQueue<>(100); @Test public void orderProMax() { // 假设这里已经下单并得到了订单id String orderId = UUID.randomUUID().toString(); // 计算订单检查是否支付超时时间点 long checkTime = System.currentTimeMillis() + TimeUnit.MINUTES.toMillis(5); // 将任务放入队列 checkQueue.offer(new Order(orderId, checkTime)); } static { // 开启线程从队列中获取任务 new Thread(() -> { try { while (true) { Order order = checkQueue.take(); // 延时等待至订单超时时间 Thread.sleep(order.checkTime - System.currentTimeMillis()); // 查询订单是否支付,未支付则取消 boolean isPay = checkOrderPayState(order.orderId); log.info("订单支付状态:{}", isPay); } } catch (InterruptedException e) { e.printStackTrace(); } }).start(); }
可能有小伙伴好奇为什么线程里面Order order = checkQueue.take();不会出现order为null的情况
因为Order order = checkQueue.take(); take方法原理是当队列有元素时取出,无元素时阻塞等待。
现在的方案是不是又更优雅了一些?只用了一个线程,程序执行正常。
难度提高
案例中的检查时间固定是5分钟后,这时候业务发生变更,有一类特殊的订单,检查时间是2分钟后,程序还能hold住吗?
假设:
订单1创建时间为10:00:00,5分钟后10:05:00检查.
订单2创建时间为10:01:00,2分钟后10:03:00检查.
这时候在10:04:00时,订单1还在等待至超时时间,但是订单2已经超时了。
GG!
分析一下,一般情况下,有且只有一个线程会执行任务这个结论在此案例中仍然是起效的。
问题在于任务的执行顺序出现了异常。我们应该让订单2的任务排在订单1前面?
所以这个队列应该是可以排序的,并且排序方式是按照订单检查时间顺序从早到晚。
又更进一步分析,由于程序每次只取第一个任务执行,所以我们只需要保证队列中第一个任务是最先执行的就可以了。
恰好就有个这样的数据结构:堆!
我们待会再来论证为什么用堆而不是纯粹的排序列表
堆
定义:
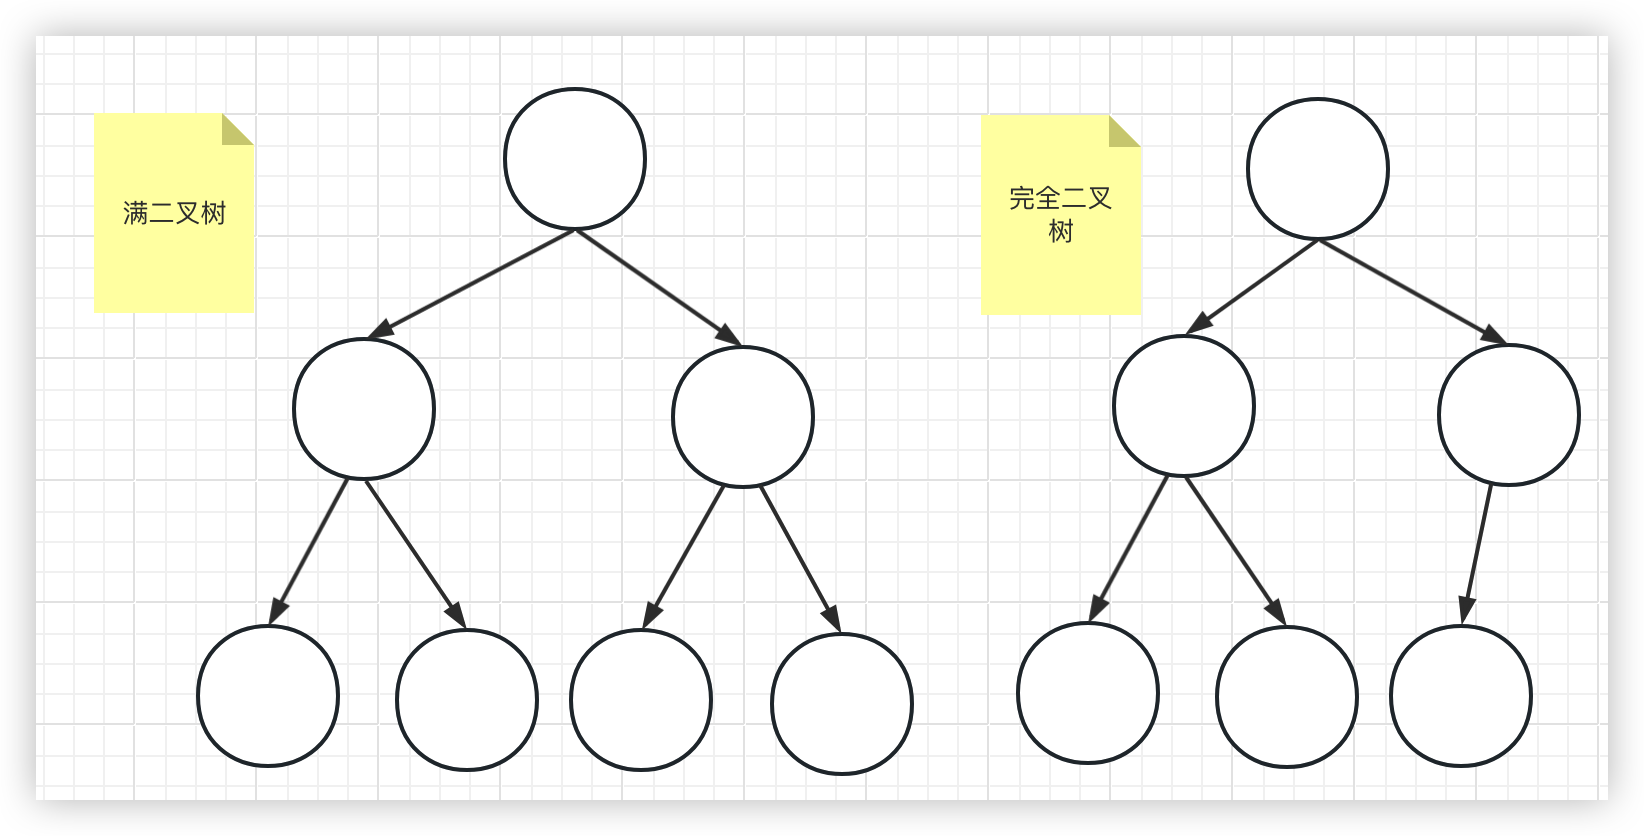
- 是一颗完全二叉树
- 每一个结点都大于等于它的子结点(大顶堆),或者小于等于它的子结点(小顶堆)
完全二叉树: 除去最后一层外,其余层为满二叉树状态,并且最后一层的叶子结点都往左排列
满二叉树: 除叶子结点外,其他的结点都有两个子结点

拿上图的大顶堆举例,要注意的是:堆的结构是每个结点比它的子结点大,而不是每一层比下一层大。上图第二层的17就比18要小,完全可能出现最后一层的结点比根的另一分叉都要大的情况。
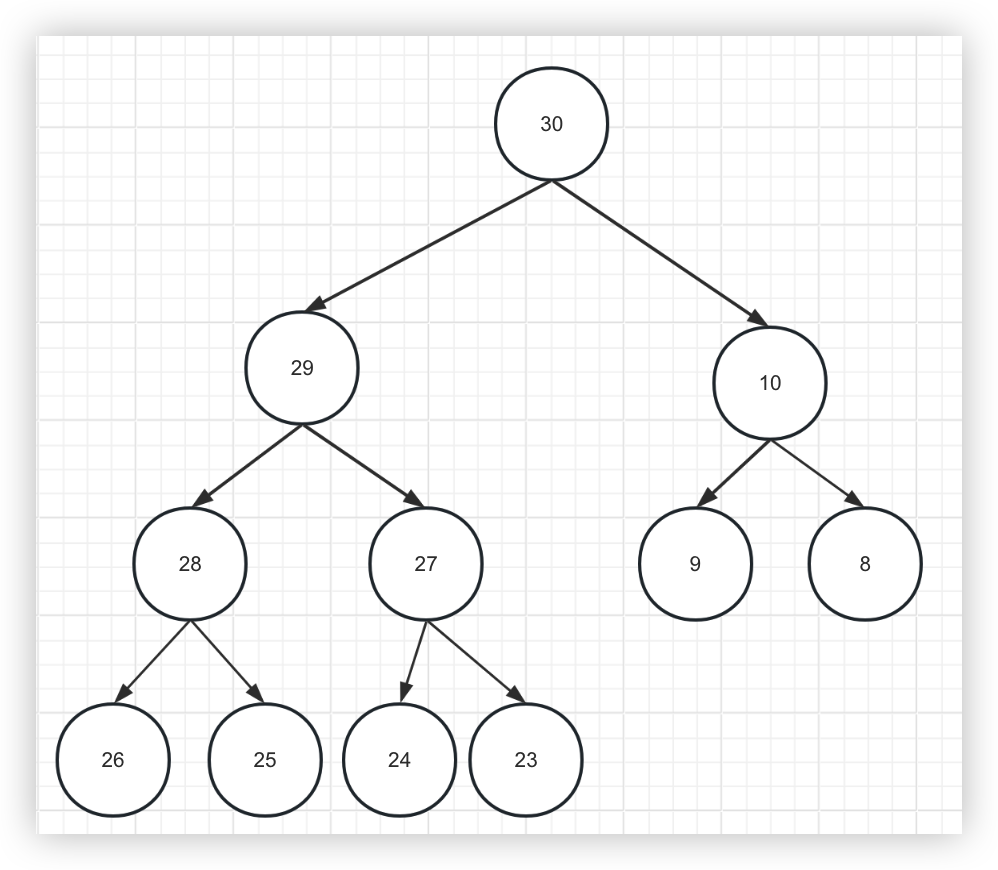
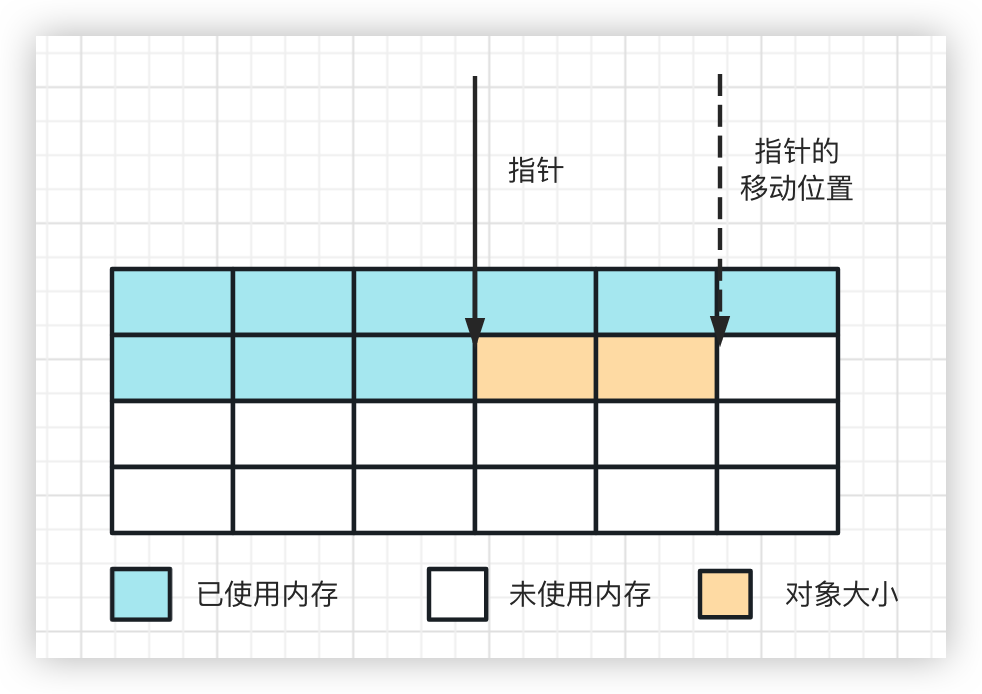
那堆这个数据结构是怎么插入新结点呢?
1、首先将新结点放到末尾
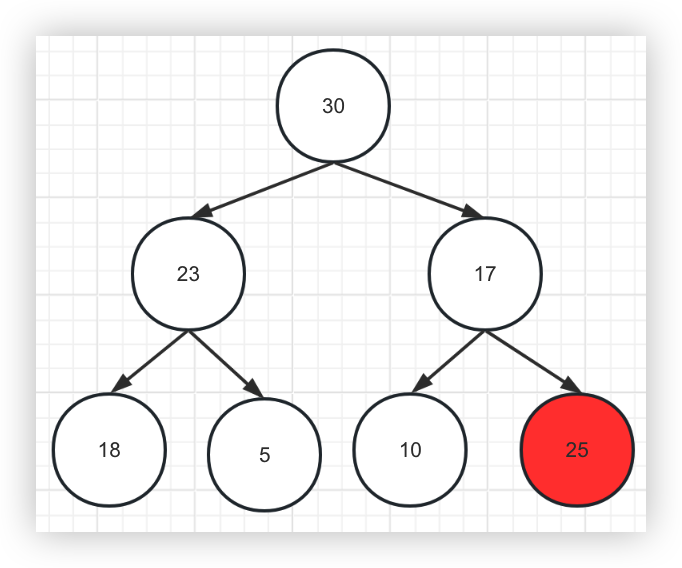
2、将结点与父结点相互比较,如果比父节点大,则进行交换,否则插入结束
25比此时的父结点30要小,所以插入结束
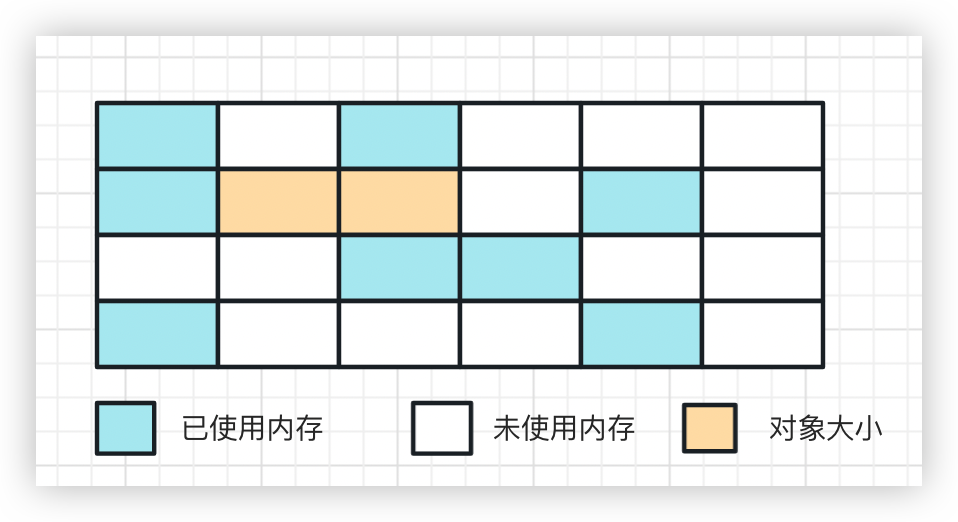
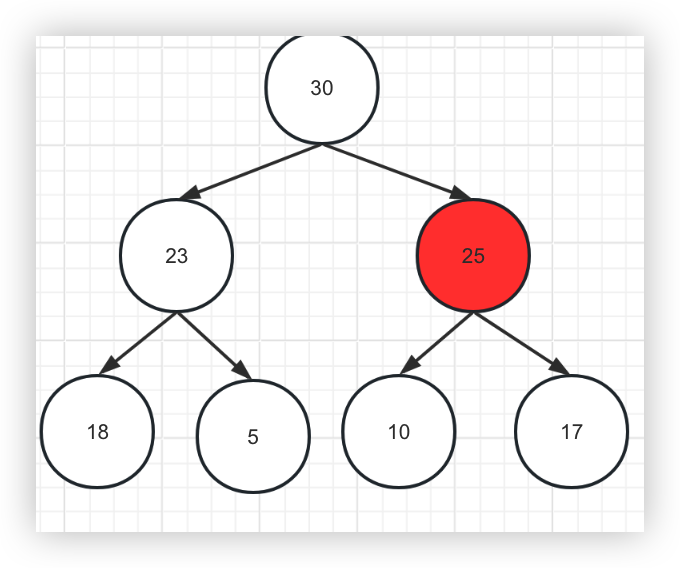
如何取值?取值也可以认为是删除根结点
1、与末尾结点交换

2、从子结点中选出较大的子结点,进行比较,若比子节点小,则进行交换,否则堆化完毕
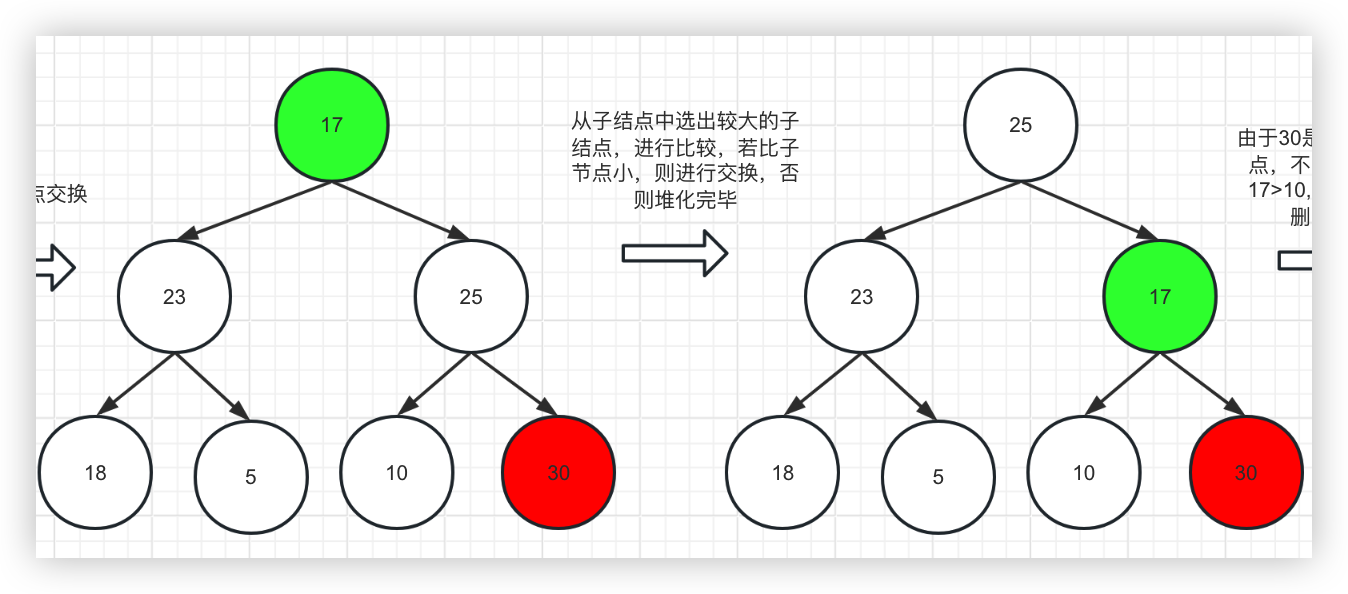
3、删除结点
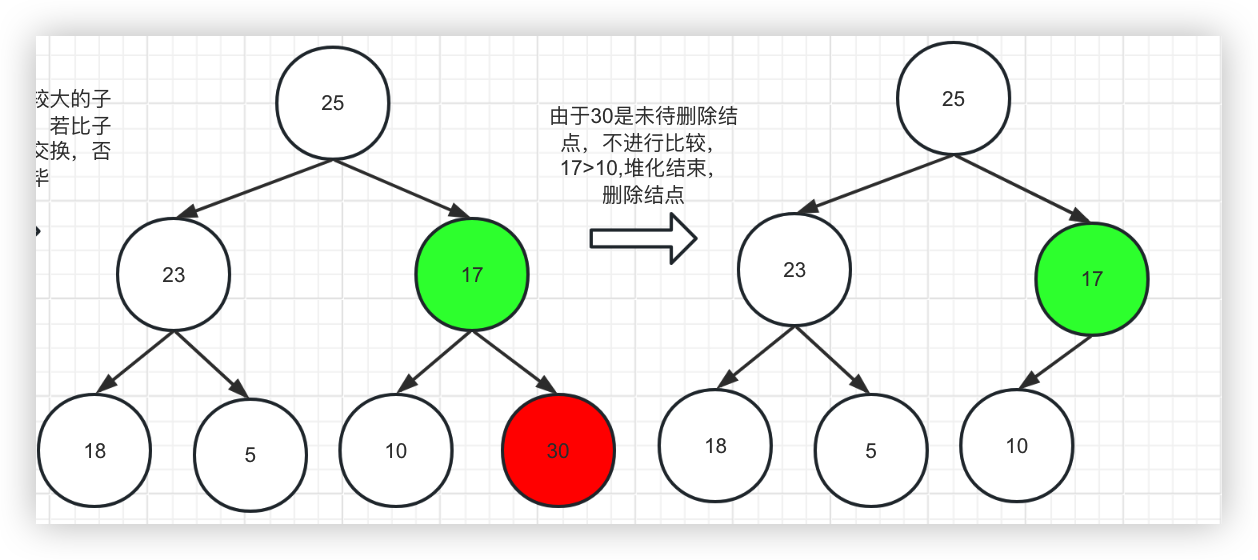
分析以上过程,不难看出,堆的新增和删除的时间复杂度都是O(logn), 而排序列表插入时间复杂度是O(n),删除头结点是O(1)
通知
数据结构选定了,还有个问题没解决。
正在执行中的线程如何得知有了一个更早执行的任务进入了队列呢?这时候就要唤醒线程,让线程重新获取最近的任务。
案例代码中我们使用的是sleep方式让线程休眠,可以采用interrupt线程中断的方式将线程唤醒。
但java中还有更为优雅的方式,那就是park机制。
public void testPark() throws InterruptedException { Thread thread = new Thread(() -> { log.info("线程开始休眠"); LockSupport.park(this); log.info("线程已被唤醒"); }); thread.start(); // 模拟2秒后有新的任务 Thread.sleep(2000); log.info("放入新任务"); // 唤醒线程 LockSupport.unpark(thread); }
LockSupport.park(this);会将当前线程阻塞
LockSupport.unpark(thread);会唤醒指定的线程
打印日志如下
10:44:53.493 [Thread-1] INFO com.xxx - 线程开始休眠10:44:55.497 [main] INFO com.xxx - 放入新任务10:44:55.500 [Thread-1] INFO com.xxx - 线程已被唤醒
集成
1、首先,队列我们改为java中的PriorityBlockingQueue优先级队列,此队列的内部结构即为堆数据结构
// 定义阻塞队列 private static final BlockingQueue<Order> checkQueue = new PriorityBlockingQueue<>(100);
2、定义订单类,由于使用优先级队列,需要实现Comparable接口用于排序
class Order implements Comparable<Order> { String orderId; long checkTime; Order(String orderId, long checkTime) { this.orderId = orderId; this.checkTime = checkTime; } // 为方便使用封装一个获取延时时间方法 public long getDelay() { return checkTime - System.currentTimeMillis(); } @Override public int compareTo(Order o) { return (int) (this.getDelay() - o.getDelay()); } }
3、编写在线程中获取订单方法
// 定义静态变量用于唤醒线程时使用 private static Thread thread = null; private void start() { // 开启线程从队列中获取任务 thread = new Thread(() -> { while (true) { try{ Order order = take(); // 查询订单是否支付,未支付则取消 boolean isPay = checkOrderPayState(order.orderId); log.info("执行完毕,订单id:{}, 检查时间:{}", order.orderId, df.format(new Date(order.checkTime))); }catch (Exception e){ log.info(e.getMessage(), e); } } }); thread.start(); } private Order take() { while (true) { Order order = checkQueue.peek(); // 无订单则直接阻塞等待 if (order == null) { LockSupport.park(this); } else { if (order.getDelay() <= 0) { return checkQueue.poll(); } // 延时等待至订单超时时间 LockSupport.parkNanos(this, TimeUnit.MILLISECONDS.toNanos(order.getDelay())); } } }
4、编写将订单放入队列方法
public void orderPlusMax() { // 假设这里已经下单并得到了订单id String orderId = String.valueOf(orderIdGenerator.incrementAndGet()); // 随机一个20秒内的检查时间 long checkTime = System.currentTimeMillis() + TimeUnit.SECONDS.toMillis(new Random().nextInt(20)); // 将任务放入队列 if (checkQueue.offer(new Order(orderId, checkTime))) { log.info("订单id:{}, 检查时间:{}", orderId, df.format(new Date(checkTime))); // 判断新放入的订单是否是第一个,是则说明新的订单是最早执行的 if (orderId.equals(checkQueue.peek().orderId)) { // 唤醒线程 LockSupport.unpark(thread); } } }
5、测试
public void test() throws IOException, InterruptedException { start(); for (int i = 0; i < 6; i++) { orderPlusMax(); } }
测试效果
11:37:27.751 [main] INFO com.xx - 订单id:1, 检查时间:11:37:3211:37:27.752 [main] INFO com.xx - 订单id:2, 检查时间:11:37:4211:37:27.752 [main] INFO com.xx - 订单id:3, 检查时间:11:37:3111:37:27.752 [main] INFO com.xx - 订单id:4, 检查时间:11:37:3911:37:27.752 [main] INFO com.xx - 订单id:5, 检查时间:11:37:3311:37:27.752 [main] INFO com.xx - 订单id:6, 检查时间:11:37:4111:37:31.753 [Thread-1] INFO com.xx - 执行完毕,订单id:3, 检查时间:11:37:3111:37:32.756 [Thread-1] INFO com.xx - 执行完毕,订单id:1, 检查时间:11:37:3211:37:33.758 [Thread-1] INFO com.xx - 执行完毕,订单id:5, 检查时间:11:37:3311:37:39.754 [Thread-1] INFO com.xx - 执行完毕,订单id:4, 检查时间:11:37:3911:37:41.757 [Thread-1] INFO com.xx - 执行完毕,订单id:6, 检查时间:11:37:4111:37:42.757 [Thread-1] INFO com.xx - 执行完毕,订单id:2, 检查时间:11:37:42
以上优先级队列+LockSupport其实就是Java中DelayQueue的原理
什么?为什么我不直接扒开DelayQueue的源码给你看,哦,它的源码太简单了,我看你看着会想睡觉。
持久化
在一步一步的分析优化下,性能问题我们解决了,订单不同的延时时间问题我们也解决了。
但是还是不能上生产,因为服务停机导致取消逻辑消失的问题还没解决。
细想一下,这里的根本原因是因为队列是在内存里,服务停机导致内存数据清空。
如果我们把这个队列进行了持久化,是不是就可行了?
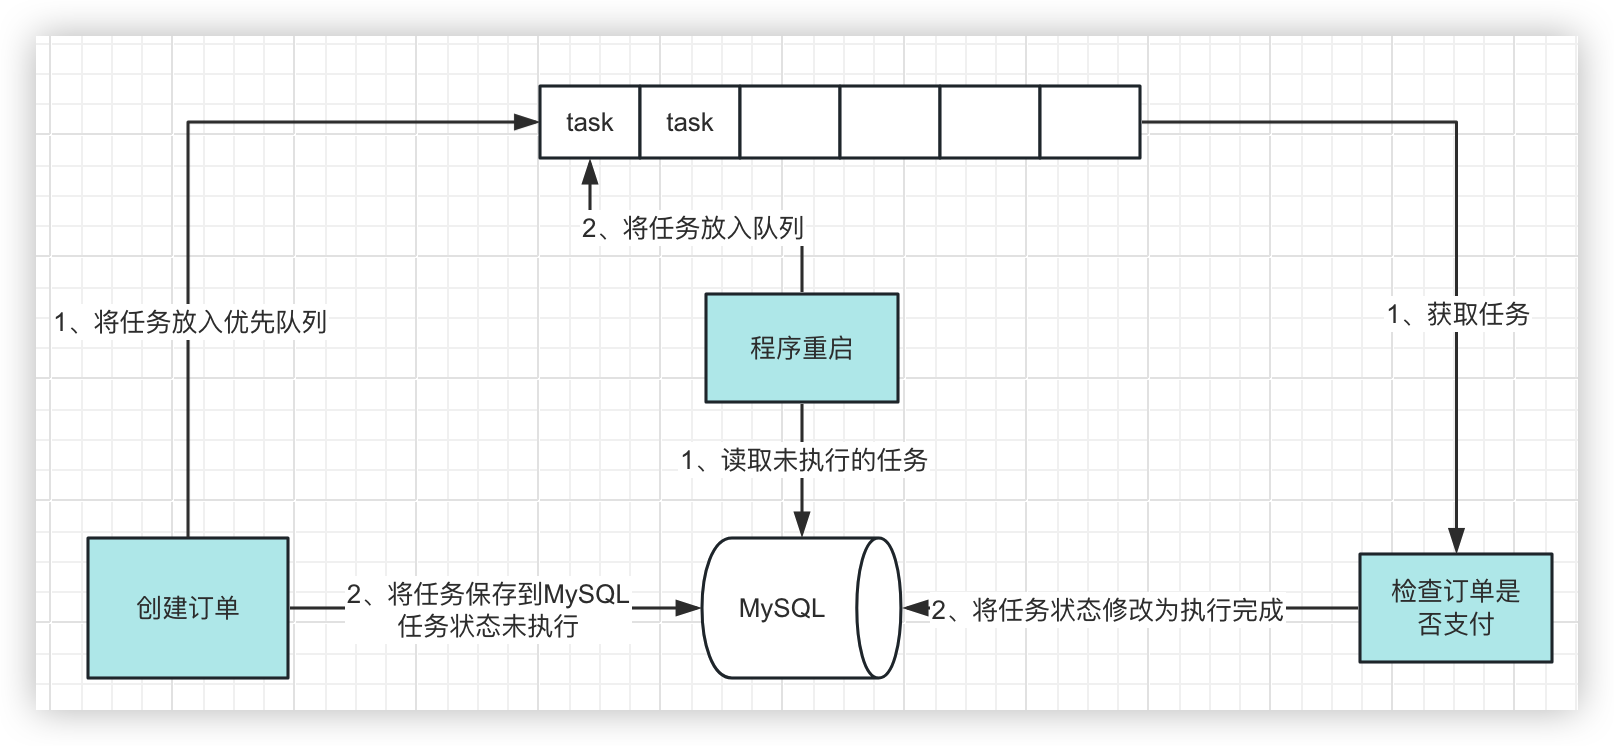
借用MySQL
第一种方式,我们可以借用数据库,每次将任务放入队列的同时,往MySQL中插入一条任务数据,执行完任务更新任务状态,程序重启时查询未执行的任务放入队列
1、定义任务类
public class Task { private Order order; // 执行状态:1、未执行 2、执行完成 private Integer state;}
2、增加插入逻辑
public void orderPlusMax() { // ...... Order order = new Order(orderId, checkTime); if (checkQueue.offer(order)) { log.info("订单id:{}, 检查时间:{}", orderId, df.format(new Date(checkTime))); // 插入数据到MySQL saveTask(order); // ...... } }
3、订单检查后将任务状态修改为执行中
private void start() { // 开启线程从队列中获取任务 thread = new Thread(() -> { while (true) { // ...... log.info("执行完毕,订单id:{}, 检查时间:{}", order.orderId, df.format(new Date(order.checkTime))); // 修改任务状态 updateTaskState(order.orderId); // ...... } }); }
4、程序重启时查询未执行的任务放入队列
private void rePushTask(){ // 查询未执行的任务列表 List<Task> taskList = queryTask(); for (Task task : taskList) { // 将任务放入队列 checkQueue.offer(task.getOrder()); } }
当然,还有种更为轻量的方法就是利用JVM的程序停止的回调函数, 在程序停止时将队列中还未执行的任务进行持久化。
Runtime.getRuntime().addShutdownHook(new Thread(() -> { // 读取队列中的所有任务 for (Order order : checkQueue) { // 持久化保存 saveTask(order); } }));
但是这种方法只能在程序正常停止的情况下使用,非正常停止(kill)则失效,故不推荐。
借用Redis
MySQL有一个问题就是不太好做分布式,而Redis的原子性(单线程)特性则很容易做到。
我们当然也可以直接像用MySQL一样直接把Redis当数据库用。用Redis的List数据类型就可以了。
但如果你熟悉Redis数据类型,再类比一下以上案例,会不会想到:
案例中的优先级队列是有序的数据结构,Redis也有一个zset的有序集合,我们能不能直接把内存中的优先级队列直接换成zset?
在这之前,我们先看看Redis的zset数据类型用法
public void testZSet(){ String key = "task"; // 往集合中添加一个元素 参数分别为:集合key, 元素值, 分数 redisTemplate.opsForZSet().add(key, "2", 2); // 从集合中按从小到大的方式取出元素,参数分别为:集合key, 分数最小值, 分数最大值 // 最小值和最大值是边界,-1, 6表示取出集合中分数为-1到6(闭区间)的元素 Set<String> set = redisTemplate.opsForZSet().rangeByScore(key, -1, 6); // 取出元素并带分数 TypedTuple类型有两个变量:value, score Set<TypedTuple<String>> set2 = redisTemplate.opsForZSet().rangeByScoreWithScores(key, -1, 6); // 取出元素,最小值-1,最大值6,从offset 0开始,总数取1个 Set<String> set3 = redisTemplate.opsForZSet().rangeByScore(key, -1, 6, 0, 1); redisTemplate.delete(key); }
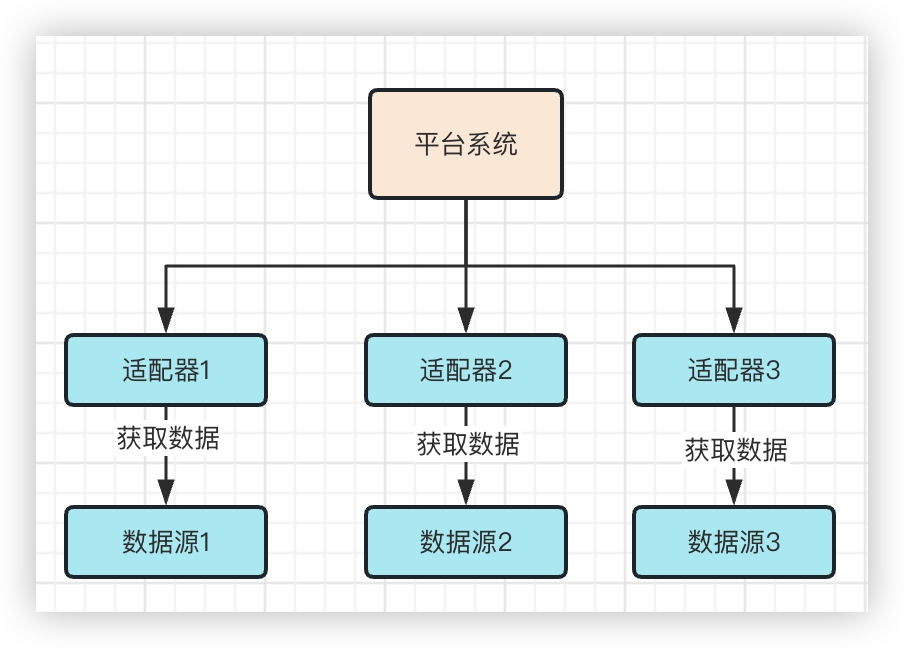
改造流程图

更改代码
1、注入Redis
@Resource private RedisTemplate<String, String> redisTemplate;
2、修改创建订单代码
public void orderPlusMax() { // 假设这里已经下单并得到了订单id String orderId = String.valueOf(orderIdGenerator.incrementAndGet()); // 随机一个20秒内的检查时间 long checkTime = System.currentTimeMillis() + TimeUnit.SECONDS.toMillis(new Random().nextInt(20)); // 将任务放入队列 if (Boolean.TRUE.equals(zSetOperations.add(key, orderId, checkTime))) { log.info("订单id:{}, 检查时间:{}", orderId, df.format(new Date(checkTime))); // 获取第一个订单 Set<String> orderSet = zSetOperations.rangeByScore(key, 0, Long.MAX_VALUE, 0, 1); Optional<String> first = orderSet.stream().findFirst(); String redisOrderId = first.get(); // 判断新放入的订单是否是第一个,是则说明新的订单是最早执行的 if (orderId.equals(redisOrderId)) { // 唤醒线程 LockSupport.unpark(thread); } } }
3、修改获取订单代码
private Order take() { while (true) { // 获取第一个订单 Set<TypedTuple<String>> typedTuples = zSetOperations.rangeByScoreWithScores(key, 0, Long.MAX_VALUE, 0, 1); Optional<TypedTuple<String>> first = typedTuples.stream().findFirst(); // 无订单则直接阻塞等待 if (!first.isPresent()) { LockSupport.park(this); } else { String orderId = first.get().getValue(); Double checkTime = first.get().getScore(); Order order = new Order(orderId, checkTime.longValue()); if (order.getDelay() <= 0) { // 删除zset中的订单 zSetOperations.remove(key, orderId); return order; } // 延时等待至订单超时时间 LockSupport.parkNanos(this, TimeUnit.MILLISECONDS.toNanos(order.getDelay())); } } }
对比来看,Redis的方式是否比MySQL更为简洁呢?当然,Redis一定要开启持久化配置,否则redis挂了同样也会数据丢失。
复盘
虽然最后进一步了优化,解决了持久化问题,但是该方案仍然只局限于单机环境,问题的根本原因在于LockSupport的机制是线程内通信,而不是进程间的通信。这个问题又该如何解决?
虽然还有那么多虽然,但是已经写了那么多,容我下篇继续可好?
本篇文章如之前所言,延时消息确实涉及太多的知识点,大家可以自己算一下~
最后,如果可以的话,还请点赞转发关注,阿紫非常感谢大家的捧场!
]]>