Welcome back to GitHub for Beginners, a series designed to help you navigate GitHub with ease.
If you’ve been following along, we’ve covered some basics of GitHub, including the top Git commands every developer should know, how to create repositories, and how to upload files and folders to your repository.
Today, we are going to talk about the GitHub flow, and how to use it to add code to our repository.. The GitHub flow is a way of using GitHub to share resources with others and work collaboratively. It’s not just for code. You can also use this process to collaborate on anything you store in a repository on GitHub.
Cloning a repository
Adding code to your repository starts with cloning that repository. Cloning a repository creates a local copy that you can use to do your work. By keeping this local copy synchronized with the remote repository stored in GitHub, you’re able to get the latest changes and push your updates so others can receive them.
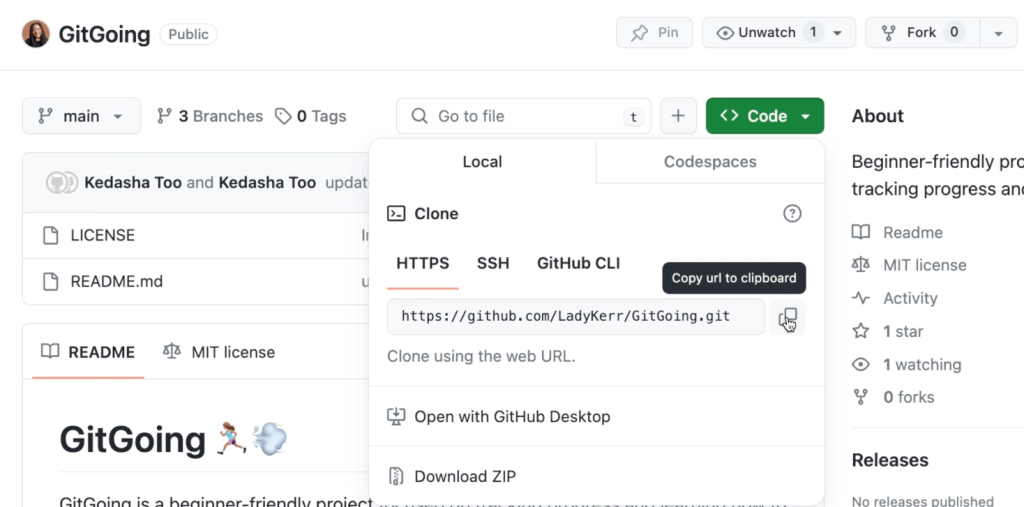
First, navigate to your repository on GitHub that you want to clone—I’ll be cloning this repository. Click on the green button that says “<> Code”. You will see a window that includes a URL for your repository with a “Copy” button next to it under the “Local” tab. Click the “Copy” button.

Now, open your terminal and type git clone with an extra space at the end. Then, paste the URL for your repository and press Enter.
Once the command finishes, enter the directory by typing cd project and then hitting Enter. Make sure to replace project with the name of your repository. Once in the directory, you’ll be on the main branch. You can verify your branch by typing git status and pressing Enter.
Creating a new branch
The first thing that you want to do whenever adding code to your repository is create a new branch. This is an essential part of the GitHub flow because it protects your main branch.
When you create a new branch, you will need to give it a name. Since you are creating the initial version of the project, you can call the branch version1. When you name branches, it is helpful to use names that are descriptive of the work you are doing in that branch. In your terminal, type git checkout -b version1 and then press Enter.
This creates a new branch called version1.
Committing changes with GitHub Desktop
In addition to using the terminal, you can use GitHub Desktop to create new branches and add code. Download and open up GitHub Desktop. Just like before, the first thing you need to do is clone the repository. Click the option that says, “Clone a Repository from the Internet…” Paste in the URL for your repository in the box provided. If you don’t want to enter the full URL, you can instead enter the GitHub user and repository names separated by a forward slash: <username>/<repo>. Then, click the “Clone” button.
Once connected to the repository, you need to create a new branch. Click the section of the ribbon at the top of the window that says “Current Branch.” This opens a pull-down window displaying the branches. Click the button that says “New Branch,” name your new branch CSS, and click the blue button that says, “Create Branch.”
Now that the branch is created, you can save code to the project directory or move it using your file manager. Save or copy a style.css file into the project folder; you can find the one I’m using here. As soon as you add code to your project, GitHub Desktop will be aware of the change. You will see the file listed as a changed file and have the option to commit this change to the CSS branch.

Enter a summary of the changes you have made and a brief description in the boxes immediately above the blue “Commit to CSS” button. Then, click the button. Now that you’ve made the changes to that branch, you’re done! Now, you can push your code to the remote repository and get the pull request going.
Committing changes with terminal
Moving back to the terminal, verify that you are in the appropriate project directory and run touch index.html script.js to create empty files with those names in your local repository. Using your code editor of choice, open up these files and either write or copy the code you want to upload to GitHub. Once you are done, return to your terminal.
Run git status in your terminal to see the list of files that you’ve worked on. At this point, you should see the two files you created: index.html and script.js. Add these files to your staging area by running git add . to add them both at the same time. This command adds all of the untracked files in your project directory. Once they are added, commit these files to the staging area by running git commit -m "created initial project" in your terminal.
Now, it is time to push your code to your repository. Before doing so, run a quick git status command to make sure you don’t have any untracked changes. Then, run git push origin version1 to send your code up to GitHub.
Opening a pull request
Now that your code has been pushed, use your browser to visit your repository on GitHub. You’ll see a small dialog at the top of your repository indicating that CSS and version1 had recent changes. In order to merge those changes into your main branch, you’re going to want to open a pull request. Click the green button in the dialog box that says “Compare & pull request” for the CSS branch.
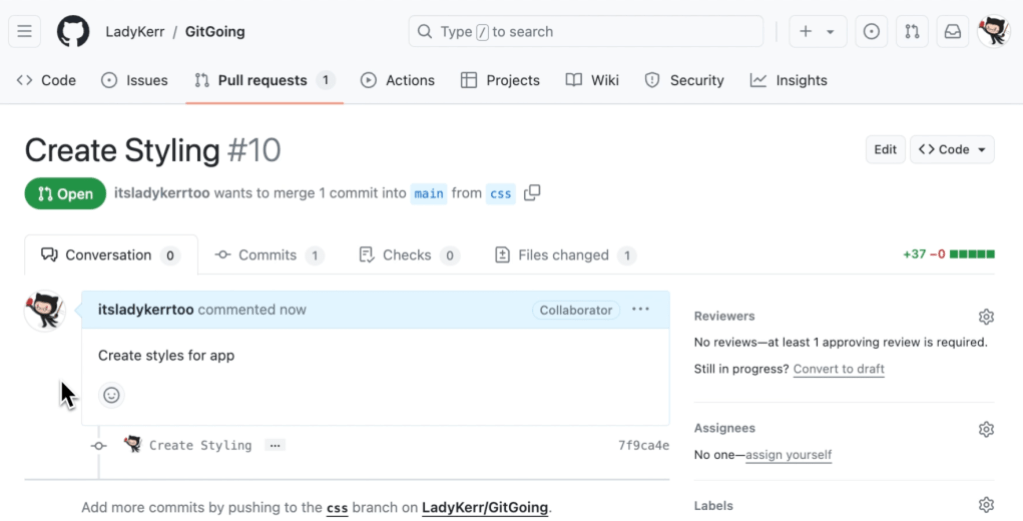
Add a title that summarizes the changes and a brief description indicating what changes you made. Then, scroll down and click the green button under the description that says, “Create pull request.” Congratulations! You’ve just opened your first pull request! 🎉

After opening your pull request, GitHub will perform some checks to make sure you can manually merge the pull request. If the check takes more than a few seconds, you might need to reload the page. Once the checks are complete, you will see a green button that says, “Merge pull request.” This will open a dialog box that gives you the chance to provide a title and description of the changes. These fields will be automatically populated with the information you added when you created the pull request. Click the green button under the description that says, “Confirm merge.” This pulls your changes back into the main branch.
Now, click the tab at the top of the window that says “<> Code”. You’ll see that you still have a notification for the changes on version1. Go ahead and click the “Compare & pull request” button, and once again create a pull request. However, don’t merge it quite yet!
Merging to main branch
You may have realized that your main branch now has changes which don’t exist in your local version1 branch. This is because your version1 branch was created using a copy of main before the CSS changes were uploaded. When you opened the pull request, you might have even received a warning indicating that your branch was behind main.
In order for you to safely upload your changes from version1 into main, you’re going to pull those latest changes from main into your local version1 branch. To do this, return to your terminal.
Type git switch main and then press enter. Then, run git pull to pull in the CSS code changes added to the remote repository. Then, run git switch version1 to return to your version1 branch. After changing branches, run git merge main to merge the changes from the main branch into your current branch. After running this command, a text editor will appear with a merge message. Type :wq to save the message and quit the editor. Now you need to push those changes, which you do by running the git push origin version1 command.
Return to your browser and navigate to the pull request you created. If you need to find it again, navigate to your repository and click the “Pull requests” tab at the top of the window, then select the pull request. Once you are on the pull request, select the green button that says, “Merge pull request.”
Deleting a branch
Now that your changes have been uploaded to the main branch, you can delete your old branch. First, switch over to your main branch by running git switch main in your terminal. Then, type git branch -d version1 and press enter. This deletes your version1 branch.
Your next steps
Now that you have learned how to add code to your repositories, you can create projects and collaborate with other developers!
If you have any questions, pop them in the GitHub Community thread and we’ll be sure to respond.
Here are some more resources to help you on your GitHub journey:
Written by
Kedasha is a Developer Advocate at GitHub where she enjoys sharing the lessons she's learned with the wider developer community. She finds joy in helping others learn about the tech industry and loves sharing her experience as a software developer. Find her online @itsthatladydev.