Showing posts with label 6mm. Show all posts

Saturday, 30 May 2026

Jessing the Falcon (Alpha Strike)

 The Alyina Mercantile League had put out the call for help and the Full Throttle Lemmings had responded. The terms of the contract were generous because the Hinterlands were full of opportunity for those that sought it, so companies were always busy. A remnant of Clan Jade Falcon was standing in the way of the AML's newest business opportunities and the AML had declared that this aggression should not stand. The meeting with the factor had been interesting and had given Jai the opportunity to practise her sales spiel, even though it was pretty much a foregone conclusion that the Lemmings would get this contract.

 "You see," Jai Rator, CEO of the Full Throttle Lemmings, explained to the factor, "The lemming of ancient Terra was a ferocious creature. Despite its small size, it could bring done prey much larger than itself. A swarm of lemmings could fall on a fully grown heffalump and reduce it to just bones in less than a minute. Lemmings were so ferocious and committed to the hunt that they would even throw themselves off cliffs en masse to land on the prey below. They originated the death-from-above attack, you know. That is why we have adopted them as our nomme de guerre and company name. We may not be the largest mercenary company around, but our commitment to ferocity and teamwork has ensured that the company has lasted for over one hundred years."

The factor looked sceptical about this biology lesson. They had never heard of lemmings before though, so perhaps it was true. There were many strange creatures out there in the universe.

"Now," continued Jai, "let me show you our current roster of mechs and vehicles. You will notice that we tend to keep them in the livery of their original owners, apart from painting the head and shoulders in our Lemming colours. We want our foes to know that we do not fear them and find it enrages or unnerves them, so they make mistakes that we can take advantage of."

She stood up and led the recruiter out into the mech bay, where the company was being serviced before the next contract.

(L to R) Wasp, Archer, Phoenix Hawk, Devastator, Wolfhound, Centurion, Spider, Mad Cat (Timber Wolf)

Jai was pleased with the newly signed contract and with the fact that she could continue the family tradition of drinking and fighting in this way. It had not always been easy to keep the Full Throttle Lemmings going while she had been CO of the company, but she had managed it, and she was sure her great-great-grandmother Jennie would be proud of what she had done with them. Now, of course, Jai had to get the company through this next campaign without going bankrupt, which would mean trying to get her pilots to care about damaging their mechs. She reviewed the resources available to her for this contract and assigned two lances and support units to it. The units assigned were the best fit she could manage based on budget and utility. They would have to do. At least she knew she could mostly rely on the ground commander Tom Skalle, who had been with the company for a while now, to try to nurse them through this campaign. For her own part, she was stuck with doing the company accounts again. The Mercenaries Review Board was demanding a full audit. Honestly, she would rather face a Dire Wolf in a Locust than wade through all these numbers with her accountants.

(L to R) Patton, Savannah Master, Patton, J. Edgar, Savannah Master, J. Edgar

The force listed below, and pictured here, will be my assigned unit for my first run through Battletech Aces: Scouring Sands. I have no idea how effective it will be. It was designed around using mainly unpainted figures from my collection, so that I was pushed to paint them. The mechs I assign to the Full Throttle Lemmings are always those that are left over after I have allocated mechs to regular forces, which I feel is as good a way as any of simulating salvage and the vagaries of the market for an irregular force.

The force is heavy on lights and mediums, with a couple of heavies and an assault mech in support. The Savannah Masters are present for fast scouting and scanning of objectives. The tanks are there as additional cheap and relatively quick support. The Lemmings prefer highly mobile tactics and I have designed with that in mind, even though I know that light mechs tend to go up in smoke with just one hit in Alpha Strike. Wish me luck!

In terms of content, I am going with the recommended 4 named pilots. These are the heroes with the potential to improve and earn special abilities. I have also saved 2 points to convert to Support Points so that I have a small warchest available for paying the named pilots and hopefully enough to cover repairs if things go completely sideways in an early mission.

Roster

Named Pilots

  • Tom 'Headcase' Skalle (Mech Pilot)
  • Anne 'Goldfish' Rikke (Mech Pilot)
  • Turi 'Ironwood' Skogen (Mech Pilot)
  • Lene 'Dodger' Stolen (Combat Vehicle Pilot)

Units (399 PV + 40 SP)

  • Archer ARC-5R
  • Centurion CN-10D
  • Devastator DVS-2
  • Mad Cat (Timber Wolf) B
  • Phoenix Hawk PXH-9
  • Spider SDR-8K
  • Wasp WSP-5A
  • Wolfhound WLF-2
  • J. Edgar Light Hover Tank
  • J. Edgar Light Hover Tank
  • Patton Tank
  • Patton Tank
  • Savannah Master (Reflective)
  • Savannah Master (Reflective)

Wednesday, 27 May 2026

1st Falcon Sentinels (Battletech)

 The local games shop got a stock of Battletech Aces: Scouring Sands, so I took the opportunity to buy it. I cannot remember being this excited about a game in a long while. Aces is a solo engine for Alpha Strike and is designed to be used with the Alpha Strike boxed set, although you could easily get into it with Alpha Strike Commander's Edition rules plus some mechs of your own.

The boxed set includes the Aces rules and cards, two training scenarios that use the mechs from the Alpha Strike boxed set, and a campaign together with seven mechs and two vehicles that constitute the opposing force for the included campaign. There are also the counters needed to play and some card terrain. If you have Aces and the Alpha Strike boxed set, then you can get started immediately because you have all the mechs and terrain needed. Obviously, having a wider selection of mechs for your mercenary scum is always an advantage, but it is not essential.

The miniatures from the boxed set

Now that I have the set, it is clear that game play is not limited to what comes in the box, but that you can use the solo engine for any Alpha Strike game. It comes with activation cards for all the core mech roles, so you are not limited to what comes in the box. My own plans will be to use this with various of the supplements, such as the Historical Turning Points: Galtor pack set in 3025, the Operational Turning Points: Falcon Incursion or Hot Spots: Hinterlands among others. There are almost too many possibilities, and no doubt my ambitions are greater than my ability to achieve all of them!

Bane 3

Marauder IIC 10

Thunderbolt IIC

As I mentioned, I was really excited for this boxed set, so much so that the first thing I did on getting it was to sit down and paint the figures that came with it. No waiting to let the figures mature in the pile of unpainted lead/plastic here. Nope, straight down to the painting and a week later they are all coloured in. They won't win any painting competition prizes but I am happy.

Summoner H

Rifleman C 2

I no longer remember why I chose them, but I decided a while back that my Clan Jade Falcon force would be the 1st Falcon Sentinels, so that is who this mob belongs to. I'll post my thoughts on the rules as I get into the campaign, whenever that is, but these are the first members of my dirty clanner unit that will also provide an opfor in Clan Invasion and Hinterlands campaigns at some point.

Howler 6
Locust IIC 4
These mechs will be supplemented with those I need for the Hinterlands campaign based on the opposing forces in that book to fill out a larger force and provide some variety of baddies for the Full Throttle Lemmings to fight.

Fulcrum hover tanks

The Scouring Sands campaign includes support units such as emplacements, foot infantry, Elementals in power armour and so forth. It provides the figures for the Fulcrum hover tanks above and counters for other support units so you can get started right away. However, I had a box of Elementals lying around, so I quickly painted them up too. After all, it is a miniatures game, so miniatures are better than counters in this context.

Clan Elementals
Hopefully, I can replace the other provided counters with miniatures at some point, but for now the goal has to be playing the campaign with what I already have, because my other goal is not to buy more new miniatures until I have painted much more of what I already have.

With the OpFor ready, I now need to design my own campaign force to face off against them. That force will include some unpainted mechs to push me to paint more of the Pile of Shame/Opportunity. But first, I need to return to the Forgotten Ruin campaign and finish that.

Sunday, 15 March 2026

Full Throttle Lemmings GTO (Battletech)

 "All Lemmings report to the briefing room!"

The Lemmings groaned in unison. This could only mean work was going to interrupt their play. They dutifully, if unwillingly, put down their card decks, dice, drinks and other diverse devices, and wandered over to the briefing room.

Jennie was already at the podium.

"Good news, Lemmings!"

The assembled crew doubted that very much.

"We have just taken delivery of some new scout vehicles."

A picture of four battered Savannah Master hovercraft appeared on the screen behind her. The Lemmings peered at these weird, non-mech-like contraptions. They were tiny! Worse yet, they had neither arms nor legs, and there appeared not to be a PPC among them. Several Lemmings scratched their heads in confusion.

Yellow takes the lead, closely followed by Green and Red with Blue tailing in fourth place

"Ok, Lemmings, pay attention! These are our new scout vehicles. They are 5 ton hovercraft mounting a single medium laser. Our techs tell me that it should be possible to retrofit ECM in place of the laser if that is operationally required, but for now they are stock Savannah Master hovercraft. They have several advantages over our light mechs as scout vehicles, not least of which being that they are a fraction of the cost of a single Locust. With how you lot manage to get your mechs damaged every time you take them out, and the cost of those repairs, I have decided that we need something cheaper for scouting duties. Therefore, all of you will familiarise yourselves with piloting these Savannah Masters. You may need to hop into them in a pinch and I need pilots who know what they are doing with them."

The mech pilots among the assembled crew all groaned. This was like being put on the naughty step.

Jennie continued, "I have drawn up a roster for training in the use of the Savannah Masters and it has been sent to your comm units. Report at the designated time for familiarisation. Dismissed!"

The Lemmings sloped out of the briefing room.

A few hours later, familiarisation was well under way. Jennie could hear the howling of the Savannah Masters' turbines as they were driven at full speed through the training course. All of the Lemmings pilots were present and cheering on their fellow pilots. Occasionally, some of the watchers cursed as the training session ended, but all were present.

"So, Anna," Jennie turned to her number two with a big, satisfied smile, "How are you doing?"

"Heh, I'm up quite a few C-Bills now. That was a genius idea getting some of the mechs to bet on the results of getting round that training course. I doubt the pilots will even be angry that they were conned into enjoying this, when they find out. Looks like Savannah Master racing is a hit, and should stand the pilots in good stead when we need to use them as scouts."

It should come as no surprise that the first thing the Full Throttle Lemmings would do when given high-speed, light hovercraft is to find a way to race them and bet on those races. It just stands to reason. It also stands to reason that the Lemmings would buy Savannah Masters. They seem to have a griefer-like reputation among the Battletech community, and the Lemmings are a bit like that in my head.

These Savannah Masters are from the CGL salvage box. In the box, you get four vehicles and two plastic bases, which is a tad disappointing. The idea is clearly that you put two vehicles per base, but that feels wrong to me. I looked for hex bases of the right size, but none were readily available without paying a fortune in postage. As an alternative, I glued 2mm mdf bases together to make extra bases of the right thickness. This way, I could base the vehicles individually.

I have had these little beauties a wee while now, but felt the urge to slap some paint on them the other night, encouraged by completing the mechs from Scouring Sands and thinking that they will be perfect scout vehicles for that campaign.

These Savannah Masters will appear in future Battletech games, but right now I am wondering if I can set up a micro-Gaslands game with them, or if statting them up for Car Wars would be a better option. Are there other automotive combat games that they could be used with? Better yet, ones with solitaire modes?

Saturday, 22 November 2025

Rasalhague Dominion / Clan Ghost Bear Mechas (Battletech)

 I was supposed to be painting 15mm fantasy, so, as is the way of things, I wound up painting my first clan star for Battletech instead. Why is it so hard to focus on the things you need to do and so easy to get distracted by side projects?

2nd Tyr Assault Cluster, Rasalhague Dominion

With the release of Battletech Aces: Scouring Sands, and all the photos of the boxes at Essen plus everyone reporting their own acquisition of this boxed set that has not reached the rest of us in Europe yet, I felt inspired to paint the clan mechas from the Alpha Strike boxed set. I had undercoated them an age ago in blue, so, despite originally thinking I would paint these as Jade Falcon and those from the Clan Invasion boxed set as Ghost Bear, I chose to follow through on what I had started instead. I am quite pleased with how they worked out in the end and it was a fairly painless process, apart from painting all those gold and silver stripes. I am happy now, but was cursing at the time, especially because my hands are not that steady so the stripes come out a bit wonky all too often.

Warhawk (Masakari)

The painting process itself involved an ultramarine blue base coat, block in weapons and other colours, and then dip with Army Painter strong tone. After that, I dry brushed the base coat and two lighter shades of blue over the top. Then I touched up the gold and silver panels a bit and highlighted the weapons and cockpit windows. Nothing radical there.

Timber Wolf (Mad Cat)

After the painting, I applied decals bought from Defiance Industries Wargaming. They did not have 2nd Tyr Assault Cluster in their inventory, but produced the specific decals to order for no extra cost. I really feel like the decals set the mechas off nicely.

Pouncer

Regarding the background, I am working with the Dominions Divided supplement set in the Ilclan era. The story there feels a bit contrived, but the Rasalhague Dominion feels a smidge less evil than the other options. Also, I like the colours plus the Scandi connection.

Nova (Black Hawk)

I picked the 2nd Tyr Assault Cluster to be my formation. The history of the Rasalhague civil war has them taking a beating, describing them as "understrength in both machines and personnel" at the end of it. That gives me a lot of freedom to field whatever I want/have to hand, because it means they will have to pull old mechas out of storage and maybe rely more on salvage than they might otherwise do. I like this freedom that also fits with the canon.

Fire Moth (Dasher)

These mechas will be fielded as Rasalhague Galaxy from Clan Ghost Bear for games set in earlier periods, but I am hoping that Battletech Aces: Snowblind is not too far away so that I can use them in a solo game set within the background they come from. In the meantime, I shall just have to nag my local games shop until they get Battletech Aces: Scouring Sands in, and then I shall have to paint the originally planned Jade Falcon units for that.

Saturday, 13 September 2025

One Step Beyond (Battletech)

 When Jennie walked into the Lemmings' control room, she found Anna dancing beside her console, headphones on and oblivious to the world.

"Hey, Anna, whatcha doing?"

Jennie had to repeat herself several times before Anna realised she was there.

"It's the new album from Sadness."

"What?"

"You know, Sadness."

IYKYK

"No, I don't know. You know I don't listen to music."

"It's those guys from the Dorkonis Combine. They've got a new album out."

"Wait! What? Dorkonis Combine?" Jennie laughed.

"Yeah, one of the techs called them that and now it has stuck in my brain. So, they have a new album out and it's brilliant. Say what you like about their military chops, they really know how to put together a catchy House-K-pop tune. Here, listen."

Anna switched the feed to the speakers in the control room, and soon both of them were caught up in the music.

I painted up some more mechs for House Kurita, and when I lined them up on the painting table it reminded me of that album cover. Sorry. I do like how the decals from Defiance Industries Wargaming finish the mechs off nicely, but the varnish has given the mechs a slightly satin finish, despite being ostensibly matt, so I shall have to go over that again.

Also, apologies for the very hasty work to remove background shadow.

Catalyst Game Labs plastic mechs from various lance packs and boxed sets

Saturday, 30 August 2025

Elves for Fantastic Battles

 Between work and everything else, I have run out of steam and not done much hobby stuff recently, so I have not managed to carry on Broneslav's adventures and may have to consider not trying to map everything myself. Still, a little progress om game-related things has happened and I hope to have more time in the near future. Mind you, that's adult life, isn't it? "I'll have time for the thing I want to do next week, once I just get these fifty urgent tasks out of the way." Repeat ad nauseam.

I've been wanting to do something with the 6mm figures from our Talomir Tales campaign for a while now, but have not really been sure what. You can see the National Elf Service as it was on the Talomir Tales blog. Originally I planned to rebase them all to 60mm frontage bases from 40mm and make up fantasy equivalents of historical armies for Impetus. In tandem with this, I have carried on collecting rules sets, because, you know, you can never have too many fantasy wargame rules sets. One of those sets is Fantastic Battles, which I have not tried yet, but which reads well and offers a lot of flexibility, so I have high hopes.

Enough Elves to give an Orc a bad day

So with all these thoughts in my brain, I decided to rebase the Elves first onto 30mm x 30mm bases. Fantastic Battles states 40mm x 40 mm bases, but all my 6mm ancient and medieval armies are on 60mm x 30mm bases, so this would mean I could shove two bases together to make an opponent for a historical army using other rules. With a bit of fudging, I could also use the historical armies with Fantastic Battles, although I'll be restricted to companies with an even number of bases, unless I paint up some smaller bases to use to make change, which need not be too onerous a task.

The Elven infantry with archers in front and spears behind. The general is mounted in the centre and flanked by a druid and the famed bard Elvish, with two heroes on the outer flanks.

I could have left the Elves as they were on their 40mm frontage bases, but rebasing builds in compatibility with other parts of my collection, and I do find the 30mm/60mm base more aesthetically pleasing for no rational reason that I can think of. Also, if I ever play someone else, whose army follows the official basing, I can always use a sabot base for my own troops, so no worries there either. One thing I did consider was rebasing to 1" square bases, because Fantastic Battles uses base widths as the main measurement. As such, it would have been more convenient for game play and require a much smaller table, but it could lead to issues with larger fantastic monsters and war machines not fitting on the standard base.

A full company of Elven knights

In addition to rebasing the existing figures, I painted up the Elven knights who had languished in the Pile of Possibility (aka the Pile of Shame) for far too long. I also found some more spearelves in that pile and quickly slapped paint on them too. I like how the whole army looks. Once I have rebased the goblins, I can set up a game and test the rules properly.

In the spirit of using what I already have, the Elves are supported by a detachment of Centaur light cavalry

It's a simple army with just the core elements and can easily be expanded in the future. When I am back in the UK at Christmas, I shall dig out the Goblins and see if I can get them rebased. Who knows? I might even manage to set up and play a game.

Saturday, 17 May 2025

A couple of games of Battletech: A Game of Armo(u)red Combat

 There is much satisfaction to be had from marking off hit boxes on mecha sheets.

I set up the first of the scenarios in the rulebook that comes with the Battletech: A Game of Armored Combat and played it out solo to refamiliarise myself with the rules. The scenario features two identical lances fighting until one side is no longer combat effective. I took control of one side and left the other to be controlled by a solo bot I found online.

The forces (each side had the same):

  • Locust
  • Commando
  • Catapult
  • Shadow Hawk

The Game

The good guys charge in from the left (multicoloured mechs). The bad guys enter from the right (red and unpainted mechs).

The game was fairly simple and I made many tactical mistakes, resulting in my lance losing its light mechs early on when the bot sneezed on them. Who knew my Locusts and Commandos were so vulnerable and the enemies' light mechs were built of hardened adamantium plates? Lesson learned.

Beyond my tactical mistakes, I also concluded that my dice were fifth columnists determined to sabotage my chances. They missed easy shots, while the enemy poured home all kinds of improbable hits. It only took a single internal hit for the enemy to score a critical on my Commando that detonated its ammo and blew it to smithereens, for example. Meanwhile, the enemy mechs took hit after hit to their internal structure and never once suffered a critical hit.

The bot added a layer of uncertainty to the proceedings. For some reason, the enemy Commando spent a lot of the game running away from my force or hiding behind the enemy Catapult. It's pilot clearly saw what happened to my Commando and decided not to suffer the same fate!

It was a dice-intensive game, but with four mechs per side it was larger than was comfortable for solo play and took a lot of energy and brain power to keep everything straight in my head. As a result, I played a couple of turns a night over the course of a couple of weeks. In the end, I finally got my game together and ganged up on the enemy light mechs, taking them out, then turned on the Shadow Hawk and Catapult. This became a slugging match where the enemy Shadow Hawk had no armour left at all, but stubbornly refused to suffer a life-ending critical hit, fighting to the very last internal structure point on its central torso.

Meanwhile, my Catapult ran out of missiles and had to close on the enemy Catapult which had also run out of missiles. In a brutal slog, both mechs blasted bits off each other until only the core of each remained. The two mechs faced each other and went for their lasers. Mine missed. The enemy hit. My pilot was forced to eject from their destroyed mech.

They don't look it in this picture but both mechs are trailing armour plates and shedding bolts at this point

My Shadow Hawk limped over to the enemy Catapult and faced it down. The duel could have gone either way. Both mechs were trailing critical bits of their structure and dropping bolts all over the place, but the gods spoke and the last mech standing was my Shadow Hawk.

This was a brutal game in many ways, but good fun.

The Second Game

The second game was the second scenario in the rule booklet. It was much shorter. It featured a Battlemaster attempting to break back through to its own lines. A Wolverine, a Commando and a Locust were all that was in its way. I chose to pilot the Battlemaster myself and let the bot take the others.

The Battlemaster enters from the left. The enemy is massed behind the hills awaiting their chance

I raced towards the enemy, trying to use cover to stop them from ganging up on me. As I neared the enemy, I managed to single out the Commando. After a huge number of missed shots, a PPC to the chest followed up by a couple of laser shots disintegrated the Commando. The Battlemaster's cockpit was heating up but it was still manageable. Time to single out the Locust. Damn, it was fast and hard to hit! A lucky PPC shot took its leg off and it fell to the ground. I kicked it until it stopped moving.

But the Wolverine had moved up on me while I was doing this. No way I was going to escape the faster mechs so I took cover and fired a series of shots, needing only a 6+ to hit. Every single shot missed. The Wolverine blasted my Battlemaster's head, ripping all the armour away and melting bits of the internal structure. Blood dripping from my head, I tried to focus on hitting the Wolverine with everything I had.  The situation was critical, so I went full alpha strike. Again, every single shot missed and as the heat built up in my cockpit, the Wolverine took aim and fired. It was the last thing I ever saw.

Two turns, two head hits, no more Battlemaster. Wildly improbable shooting from the bot, but a great fun game. From a solo perspective, having a non-combat related goal is more interesting than just blasting the other side, as this game showed.

Final Words

I have found other solo bots online, including scenarios, so I shall try some of those out, and am very tempted to combine them with the mercenary campaign rules found in the Mercenaries boxed set and in Hotspots: Hinterlands. Restricting solo games to a couple of mechs a side max will reduce fatigue and make the games go more quickly. I can easily play larger games if ever I find a group to play with, but I can see the option for a nice little solo campaign building up the Full Throttle Lemmings using yet another different rules set. It will be like Fox Tales with much more situational humour and dad jokes (not that Fox Tales is not already the best Battletech fiction around, but, you know)!

On the solo front, I cannot wait for Battletech: Aces to be released. I feel like Alpha Strike and the solo system in the Aces boxes will suit me nicely, although I have not actually played Alpha Strike yet. It is up for playing in the near future though, as soon as I have painted all the mechs from the boxed set. Not sure when that will be though. I am right off painting at the moment.

Saturday, 14 December 2024

ChiCom Acquisitions and Mergers Department: Corporate mechas (6mm sci-fi)

 If you followed the progress of our Hell on Dodgson's World campaign, you will know that ChiCom are the evil corporate invaders, who sought to overthrow the existing peaceful regime on Dodgson's World. An alternative perspective, as generally publicised by the ChiCom Corporate Marketing and Brand Awareness Department, is that they came to Dodgson's World to provide the benefits of access to the wider galaxy in return for being allowed to mine certain valuable ores. However you view it, ChiCom has decided to beef up its Acquisitions and Mergers Department with a mecha company consisting of two stars of mechs. I imagine the committee meeting went something like this:

"So, we need mechs. Everyone else has them and our shareholders are getting anxious that we are not keeping up with the latest technology. Also, the CEO has demanded one instead of his company AV. Biggins, how's the market outlook on these?"

"I've done some market research on these, and it is clear that mechs will boost our share price through increased shareholder confidence. They are also a useful tax write-off, so they seem eminently affordable."

"Wiggins, what's out there and how do we sort this out?"

"I've examined existing organisations and it is clear that the Clans are superior to the Inner Sphere in every way, so I suggest that we organise our mechs as stars of 5 mechs each. The shareholders have expressed a preference for this and would prefer that we call them Stars rather than Lances. They also like the idea of naming each mecha to give our corporate negotiations a more personal touch."

"Right, Stars of five mechs each and names it is. Higgins, can we source mechs at a price that the shareholders like?"

"It's tough but I have a line on some mechs. Clan mechs are too expensive, but the Star organisation should be enough there. It is clear that this organisation works well, because the Clans are kicking the Inner Sphere's arse all over the place. Using this organisational structure will give the right impression to our shareholders even without the Clan mechs. I have put some feelers out and find a source of budget mechs that meet our criteria and will keep the shareholders happy."

"Biggins, what about names? You're marketing. What do you have for me?"

"Sir, the consultants have run the numbers and presented the options to the focus groups. I can safely say that we have some absolute doozies for you. They truly represent our mission and values. I am certain the CEO will love them."

"Great, we have a plan. Well done, Biggins, Wiggins and Higgins. Set up a purchase order and get the first company of mechs ordered. To the next order of business, the company picnic..."

The Mechas

Following the conclusion of our Hellfire campaign, I decided to repaint the ChiCom forces. The old paint jobs were very basic and I was not happy with them. I started on repainting infantry and vehicles and still have to finish them all off. I also decided to add some mechs because I was getting dragged back into the idea of big, stompy robots as fun on the table top. At that point, the EM4 mechs fit the budget nicely, so I got 10 of them and built them. Half got painted really quickly and the rest have languished until now. The plan is to field these as a generic opposing force in solo games of Horizon Wars, Hardwar, FutureWarCommander, 5150 No Quarter: Mecha Combat and Battle Suit Alpha. Other rules sets may also get involved but these are the main ones I currently have for this.

So, without further ado, I present the first two trinaries of the ChiCom Acquisitions and Mergers Department.

White Trinary

White 1: The Spirit of Corporate Unity

White 2: The Global Reorganisation

White 3: The Management Buyout

White 4: The Executive Headhunter

White 5: The Corporate Reshuffle

Red Trinary

Red 1: The Management Directive

Red 2: The Hostile Takeover

Red 3: The Emergency Board Meeting

Red 4: The Internal Memo

Red 5: The Departmental Downsizing

Epilogue

The CEO looked up from the paperwork about his new mecha force and frowned.

"Hmm..."

"Sir..."

"Shush! I'm pondering!"

"Sir!"

He stared at the documents again and frowned again.

He sighed.

"Excellent job, Miggins. The shareholders seem delighted and my stock is up several points. Keep up this sort of work and I'll have that new Type Y Luxury Cruiser before this time next year. Go and carry on the good work."

He looked down at the paperwork again. As soon as Miggins had left the office he tabbed through the screens back to the details on the Type Y Cruiser, checked off a few options and clicked buy.

"No point waiting. Miggins has this well in hand."

He sighed again. This time contentedly.

Thursday, 13 January 2022

Swanning About in the Desert - A Command Decision: Test of Battle AAR

 I love the Command Decision rules by Frank Chadwick but rarely play them because they don't suit the time I normally have with my poor, long-suffering friend Steve. However, this week I have become enthusiastic to try a scenario from the Benghazi Handicap sourcebook solo. I picked 'Scenario 7: The Battle for Hafid Ridge', which is set in 1941. This is the first one for which I painted all the figures and made the terrain, although I realised when I decided to set it up that I have no 6mm sangar or entrenchment markers, so I used ASL counters instead. I am also using ASL counters to mark unspotted units, and it occurs to me that I could use them for a variety of other purposes in the game, such as ghost markers and the like.

I played at half scale because it suits the space I have. I also used the Fog of War cards, including the ones for the Western Desert that are downloadable from the Test of Battle website. The plan with the cards was to draw them as normally and to use them to the best advantage of the drawer. Cards that could not be used at all in the context of the game were discarded as they were drawn. As it turned out, there were few opportunities to use the cards I drew, but they don't normally have a massive effect anyway. It's more about a little colour and unpredictability in the game.

The scenario sees a tiny Axis force dug in and attempting to hold off an Allied tank regiment until reinforcements can arrive. The Allied force must capture one of two 'pimples' in the desert while keeping their line of communication secure. They can also expect some reinforcements to help them hold whatever terrain they can. The biggest problem for the Allies is that they have no infantry to take and hold ground until the reinforcements arrive. The other biggest problem is that one of the Axis units is an 88. That has the potential to cause problems. This scenario lends itself quite well to solo play because the initial set-up leaves the Axis few options and thus makes them easier to manage. I did not have the patience to work out how to adjudicate phantom stands, so I am ignoring those for now. This changes the scenario slightly, because there is less recce required to work out which Germans are where, but I want to keep the game simple because I am playing alone and have to manage everything.

I used Charles Grant's Programmed Wargames Scenarios as the basis for the solo engine. The first scenario in the book 'Hill Line Defence' is pretty much the situation for this game so I used the tables in that scenario to decide set-up and how both sides responded to the changing situation on the tabletop.

  • Rules: Command Decision: Test of Battle
  • Sourcebook: Benghazi Handicap
  • Figures: Heroics and Ros 6mm
  • Terrain: XPS hexes made using Hex Terrain Toolkit. XPS from Panel Systems. Not sure who made the building.

Set up

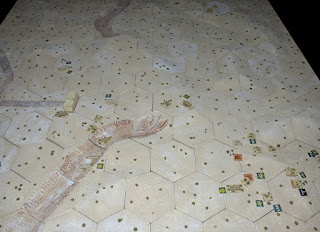
Dicing for the defenders, I find that their orders are to occupy the two objectives and not to move. This means that they will get Hold orders until they have to respond to the Allied attack. I diced to see which command would set up on which 'pimple'. The anti-aircraft platoon set up on the German right flank (Point 208). The anti-tank platoon and motorcycle troops set up on the German left flank (Point 204). All the guns were in trenches and the remaining troops were in sangars.

2nd Royal Tank Regiment diced for set up and it was decided that they would attack in strength on their right flank with a smaller force in the centre to scout and mop up routing troops! This means that the Allies will be attempting to capture the objective held by the anti-tank platoon first and then to sweep left against the anti-aircraft platoon.

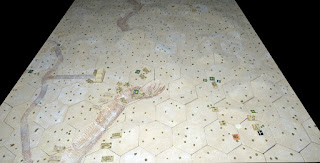
The forces at set-up. Germans are to the top of the picture occupying the two objectives. British forces are deployed center and right towards the centre of the picture

All troops start the game unspotted, so the first job is to find them. The Allied tanks will quickly be spotted and the Germans have probably been watching the dust clouds for ages. The tanks are poor at spotting, so the Germans could well remain unspotted even after they fire, and the tanks will need to close the range quickly if they are to stand a chance of finding targets.

I am gobsmacked by how empty the battlefield is at this point! So, to the game. It's been a while since I played so it is probably good that there are few troops on the table

Turn 1

The Axis forces get Hold orders. All the Allied troops get Cautious Advance orders with a view to moving into range and finding the enemy quickly while still having a chance to shoot well if they do spot the enemy.

The tanks advance quickly and are spotted by the Germans. B Squadron spots two infantry units in sangars along the front of Point 204. As B squadron advances on Point 204, the German 37mm ATG opens fire first, followed by the anti-tank rifles of the motorcycle battalion. One of the A13s is forced back and retreats out of range. In the centre, the A10s of C Squadron come under heavy but ineffective fire from the 88 and the 20mm Flak, but cannot see where the fire originated from.

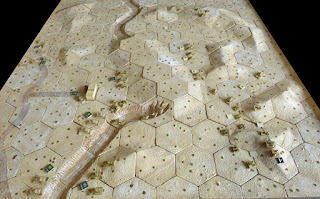
The British advance (left) versus the German stutzpunkt (right)

Despite concentrating their fire on Point 208, the British tanks failed to score any hits.

Even with the volume of fire, all troops' morale remained high. The Germans reloaded and prepared to shoot these sitting ducks once more. The British armour resolved to close with the Germans and engage more effectively.

Turn 2

At this point, confusion struck in A Squadron's A9 cruisers. The Germans played a Fog of War card that permitted them to change the tanks' orders form Hasty Movement to Hold. They would be sitting ducks on the rise where they were. Whatever movement caused the confusion also caused the German AA platoon to be revealed (British Fog of War card).

Despite this fortuitous confusion, the German flak units failed to score a hit on the British tanks who milled around, wondering which gear they should be in.

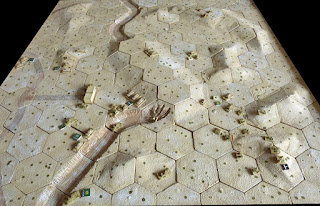
Confusing and carnage (British on the left, Germans on the right of the picture)

On the other flank, the Allied armour laid down heavy machine-gun fire on the German positions and eliminated a platoon of the motorcyclists. B Squadron suffered too, as another of its troops was driven back.

Both B Squadron and the Motorcycle company were unhappy with the treatment they were being given and were pinned by the fire.

Turn 3

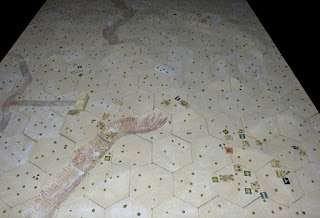
British reinforcements are evident by the dust cloud they make racing up the track to support 2 RTR. 6 RTR deploys two squadrons to protect the line of communications initially. The other two advance to support 2 RTR. Infantry and artillery race forward to take up firing positions. Meanwhile, much ammunition is expended and B Squadron falls back in its entirety to regroup. Point 208 seems ridiculously unassaultable at this stage, and high command has clearly goofed in sending a tank unit in first. Maybe with the reinforcing infantry units, the British will make more progress.

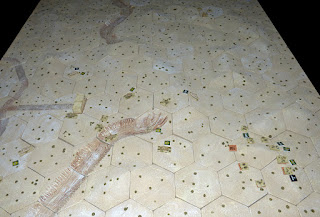
British reinforcements arrive from the left of the picture

Turn 4

The British commander saw a dust cloud on the horizon. German reinforcements were on their way. He chose to hold in defensive positions before committing his reserves where the Germans attacked. The battlefield was covered in smoke from all the shells being fired and an A9 of A Squadron 2RTR was now ablaze near Point 208. No German troops were hurt, although they were still keeping their heads down as best possible. The British unlimbered their 25lbers and prepared to clear Point 208 once and for all.

An uneventful turn

Turn 5

The German commander deployed his new Motorcycle troops and anti-tank battery to shore up the defence of Point 208. In the process of deploying, two of the light trucks were destroyed but his troops were made of stern stuff and shrugged off the loss. They had no intention of retreating from the objective anyway! He advanced his armour in the centre where it could aim to flank the enemy troops and roll over their guns before driving for the exit point on the British baseline. Heavy fire from the British drove one tank back, but morale was high and the troops were veterans so they were unphased.

German reinforcements arrive from the right of the picture

The British forward troops withdrew with cover from their armour, while the infantry dismounted and prepared for a charge on the enemy positions under cover of their guns. Things were not looking good for the British troops, but they were stout yeoman all and were determined not to lose.

Turn 6

The 25lbers laid down suppressive fire on two of the enemy anti-tank guns. The German armour advanced. The British armour advanced. In the firefight as the enemy combatants closed on each other, an A13 and a PzII were brewed up and several tanks on both sides were forced back to regroup before carrying on. The plucky British infantry raced towards the enemy sangars, only for half their number to be driven back by the weight of fire.

Armoured chariots clash!

The tank gunners prepared their guns in their racing tanks, awaiting their moment. It arrived with a crash of thunder as dozens of armoured chariots on both sides opened up. Shells rained down on every target on the battlefield. At the end of it, German shot weighed heavier than British. Four British tank units were brewed up to two German. The infantry were also cut down by the Motorcycle Battalion. British pluck was not enough to defeat German steel yet, but the British armour vowed to carry on.

Turn 7

Things looked very bad for the British but there was still time to carry the day if only they could push forward fast enough. Laying down suppressive fire on Point 208 again, the British armour advanced towards the Germans, closing the range as fast as they could to counter the German advantage of armour. The ensuing clash saw half the armour on both sides destroyed or fleeing.

A bad turn for British morale

The Germans had Fog of War cards that benefitted their own morale checks this turn, and just as well given some of their rolls, and one that forced additional penalties on British morale checks, which resulted in an entire tank squadron routing from the battlefield. On the positive side, the British were able to fix one of their A10s thanks to a Fog of War card and were able to automatically fix a Shaken unit.

Turn 8

The sun is heading for the horizon. The battlefield is littered with brewed up tanks. Those that remained moved towards the fray once more, determined not to let the enemy win and many more now lay as shattered hulks on the desert sand. The 25lbers finally got the range on the enemy positions on Point 208 and drove an enemy unit out of their sangars. In return, enemy fire drove them from their guns and they had to fall back to cover.

Nearly nightfall

Turn 9

Once more the tanks charged and the guns opened up. The 25lber crews recrewed their guns. One of the 25lbers was hastily manhandled up the rise to get a better line of fire (Fog of War card) and promptly demolished the German 50mm anti-tank gun. As the tanks clashed, the British gunners suddenly found the weak points on the German armour. None was left by the time the firing paused. In contrast, the German guns barely found their mark at all.

The British finally start to have an effect
Turn 10

The British armour surged forward once more, only for an A15 to be knocked out by the 88. It's gunners had finally found their sights. The 20mm AA drove back another A15. The unit was pinned down now. Meanwhile, on Point 208 the Germans stubbornly held on. One Motorcycle Rifle platoon was destroyed but the rest of the force there were solid, even if they were pinned down by weight of fire. They gritted their teeth and prepared to weather the onslaught a while longer.

The Germans hold on

Turn 11

Heavy fire continued to rain on Point 208 as night fell and a series of desperate charges were made by both sides seeking to break the stalemate here. However, as night fell the Germans still held the objective. The tattered British force withdrew to laager away from the battlefield while the ragged remnants of the German force held the field and victory.

As night falls, the British find their efforts were too late and the Germans hold the objectives

Final Thoughts

That was an extremely bloody battle. It could have ended on turn 8 but the dice declared that it would end on turn 11. It could have gone on one more turn, but I do not think that would have been enough, even with the late successes of the British.

Mistakes were made both with the rules and the tactics, but at least I can put the latter down to Programmed Wargames Scenarios and the dice. I feel that once the scouting was done, the British should probably have focused on the anti-aircraft platoon, as the weaker defensive position. It would have cost them a few tanks, but the 25lbers could have neutralised that position more quickly while remaining out of range of the infantry on Point 208. However, the battle plan was decided by the AI from Programmed Wargames Scenarios, and I chose to follow that rather than use my 200' general's knowledge of the table. It made for a good game just the same.

It will be a while before I can play another game of it, so I imagine that the same rules mistakes will be made once more because I will be equally rusty with the rules then, if not more so in fact. I don't really care about the rules mistakes. I try to stick to the spirit of the rules anyway, and my opponent in these solo games does likewise. It was good to dig out my 6mm WW2 armies after so long, and it was great to use the terrain I spent ages building. I have enough terrain for the next scenario, but I still need more. The one I plan to play after that has a chunk of the escarpment on it, and I need to figure out the best way of modelling that using hex tiles.

Monday, 5 July 2021

Nano-Towton for Basic Impetus

It's been a long while since I posted anything here. This is mainly because I have had my head down working on my next book which should be published in January 2022. There will be more on that another time. The lack of posts is also largely because of a lack of gaming since I moved to Norway in 2021. All my gaming stuff is still in the UK, and circumstances have prevented me from shipping a load of it over here. Hopefully, that will be sorted soon, but we shall have to wait and see. Anyway, here is an older post from one of my other blogs. I felt it needed updating and reposting because I noticed today that the links to the order of battle and original rules are broken. Here is the original post followed by the order of battle and my notes on refighting the game, just in case you want to be prepared for some outdoors gaming next winter.

Back in the winter of 2010/2011, while we were preparing to refight the Battle of Towton with a ridiculously large number of figures, I decided I needed some fresh air, so I took a small contingent of the figures I had painted outside into the snow and sculpted the terrain for a game. I used the original Basic Impetus rules and originally posted on The Rather Large Towton Project blog. 


No time to refight the battle with 20000 or more figures? Not enough space? You need new, improved Nano-Towton(tm)! Nano-Towton uses amazing miniaturised technology to permit you to refight the battle of Towton in an area as small as 2' x 2' (600mm x 600mm). The idea is that you can have some semblance of a refight using armies of only around ten stands each in a short space of time. I chose to do this with Basic Impetus because they are free and I prefer them to DBA.

The Armies

Lancastrian Main Body: 2 Men at Arms, 2 Billmen, 2 Archers, 1 Borderers

Lancastrian Ambush Party: 1 Billmen

Yorkist Main Body: 2 Men at Arms, 2 Billmen, 4 Archers

Yorkist Reinforcements: 1 Billmen

The numbers above were stands in my game. They could be units if that is what your rules use, or even individual figures if you want to turn the whole scenario into a skirmish game.

Terrain and Deployment

Each army starts on a hill, on opposite sides of a valley. There is a wood on the Yorkist left flank and the ground slopes down to a stream on that side of the table. The Yorkists may not deploy in the woods.

In my game, the Lancastrian army had a frontage of 30cm. The Yorkist army had a frontage of 24cm. The game was played in a 2' x 2' area and the armies deployed on hills 20cm from each other.

20cm is the maximum range for longbows in Basic Impetus, so you can adjust this to suit your rules.

There should be space on each flank for the Lancastrian ambush and Norfolk's arrival.

Weather

Wind and snow flurries reduce the range of Lancastrian bows by 1d6cm, diced for each turn. Historically, the Lancastrians are supposed to have shot off all their arrows without hitting the Yorkists because the weather was against them.

Other rules

  1. Dice for Norfolk's arrival from turn 3 onwards. On a die roll less than the current turn number, Norfolk will arrive on any die roll less than the current turn number. It should take the Lancastrian army about four or five turns to reach the Yorkist army, and you can adjust Norfolk's arrival with this in mind.
  2. The Lancastrian ambush party is in the woods and will spring the ambush on any turn they roll less than the current turn number.
  3. The Lancastrian army is not allowed to advance until they have won the initiative. From that point on they may manoeuvre normally. This includes the ambush party moving.
  4. The Lancastrian player has a -1 penalty on their initiative roll until they have won the initiative. After that, this penalty does not apply.
This gave a decent game for me, but you may need to adjust this to match your preferences and rules.

Friday, 15 March 2019

Hellfire: A little more hell on Dodgson's World

Figures: Irregular Miniatures
Buildings: Various
Terrain hexes: GHQ Terrainmaker

The heroic resistance fighters of Dodgson's World took on the brave liberators of Dodgson's World at my house last night. The rebels arrived mob-handed in a selection of improvised armoured vehicles worthy of the A-Team (circled in blue in the image below). Their goal was to seize the air traffic control equipment from the New Clemency spaceport and make off with it. This would make it hard for ShortCom to land new troops and would disrupt ShortCom activities massively, thus giving the rebels a chance to focus on defeating existing ShortCom troops before new ones could be brought in.
The situation just after the start of the game
 The spaceport defence company, augmented by a small militia company and a company of mercenary Thaugs who acted as the police for the spaceport village occupied the spaceport buildings (circled in red above). A battalion of ShortCom regulars was known to be in the area and they might be made available to the spaceport defence troops. They would enter from the right of the picture when Steve had rolled enough points for them. A single d6 was rolled each player turn and the value added to the previously rolled total. The troops would become available once the total reached their points cost.
Another view of the game at the start.
The rebels rolled forward as fast as they could. The spaceport defence vehicle heroically drove out to meet them, and was promptly destroyed by rebel fire. The militia company holed up in the hangars fared little better and was soon retreating towards the control tower having taken more casualties than it liked.
Lorries packed with troops follow up the armoured spearhead.
As the rebels raced forward, elements of 26T battalion started to appear. The troops in the control tower had made contact and emphasised the seriousness of the situation. Two companies of infantry and two guided missile carriers were soon tearing up the road towards the spaceport. The missile carriers met the same fate as the spaceport defence vehicle but the infantry made it into the cover of nearby buildings and prepared to assault the rebels.
Reinforcements arrive
Rebel vehicles screamed up the apron. The fire from their gunners drove the spaceport defence company and the militia back but returning fire immobilised one vehicle and took out the gunner on another. Light losses for the rebels. It seemed like nothing could stop them.
The lorries approach the control tower ready to deploy their troops and carry off the control equipment.
As the lorries deployed their load of troops, the spaceport defence company was routed. The troops entered the control tower and began dismantling the equipment. (At this point, I got too carried away and forgot to take any more photos.) The troops in the control tower came under fire and took some losses but three turns later they had loaded the equipment onto a lorry and were prepared to skedaddle with the loot. At this point, the two companies from 26T battalion broke cover and close assaulted the vehicle companies. A combination of  melee and RPG fire saw the artic and one of the cars destroyed. The rebels were pulling away. Seeing nothing else for it, a ShortCom RPG gunner fired his weapon at the lorry with the equipment on board. He hit it and turned the lorry into a fireball. At this point, there was nothing for the rebels to do but scoot away. They had not achieved their objective.

The game was a draw thanks to Steve's last lucky shot with the RPG. Up to that point, it had felt very one-sided. Rebel casualties were amazingly low because of the lack of anti-vehicle weaponry among the corporate forces while corporate casualties were huge. Despite this, he prevented me from achieving my victory condition (escaping with the equipment) but by destroying it, he also stopped his own victory. To be fair, I think this was the best outcome he could expect by that point of the game. No doubt both sides will spin this into a propaganda victory.

After two games, we are of the opinion that Hellfire is a decent set of rules. The mental arithmetic that is needed to calculate combats is, no doubt, good for our ageing brains and will offset some deterioration there. However, we are also both of the opinion that these rules, more than many others we play, require the players to play within the spirit of the rules rather than the letter of them. Playing them with a rules lawyer would be even more hellish than other rules sets.

I was a bit worried that I would not have enough buildings to cover the table. Turns out I did, although there is little coherency in the architecture, and I really need to get more of them painted.