I've been surprisingly productive this week.
I've read a couple of blog posts about wasting what you have, not
wearing or using clothes you have made for yourself because perhaps of minor
faults which mean you can't bear to wear it. I recognised that description.
We've been sorting out some things (in the course of which I've been gathering
together my stash fabric which had been in different places - I couldn't
believe I had so much!). David brought me a large blue IKEA bag of what
he thought was fabric for me to sort through. In fact, it turned out to be
Joanne's stuff, which I assume she had left behind by mistake during one of her
moves. There were some garments clearly hers including unworn items, still with
labels plus sheets, duvet covers and a jacket. Also in there were some items I had made. As
this has been in the garage, I did a lot of washing.
Simplicity 1542 for Joanne
There were two skirts I had made for Joanne. These were made before I had a blog, (January 2014) so no blog post. The photo here is not of the skirt I found - I had made 3 skirts in all. One was perfectly okay - a cotton skirt in a maroon patterned cotton with a waistband.
 |
| It was too late to take a photo of the skirt. This is the fabric |
I
made the other quickly and did a simple casing with elastic as a waistband but
I found that the elastic had twisted. I stretched the elastic to the length of
the casing and stitched through the fabric and elastic in two rows. The elastic
should be secure now. That didn't take long. I think the skirt is much
more functional now.
 |
| I really lie the jacket - but this project was skirt only |
 |
| This is similar to the maroon skirt I found |
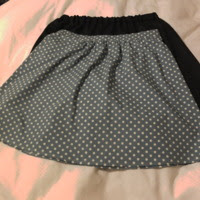 |
| You can just see the black elasticated waist skirt in the background, before my quick alteration |
Pyjama Jacket using McCall's 4979
Also in there was a pyjama jacket that I made for myself originally (also January 2014) using this
pattern and a yellow brushed cotton to tome in with the spotted yellow lightweight cotton I used for the trousers and top. I didn't review the jacket on PR so I don't have a photo from then. I did review the pyjamas, with me wearing them, but that's not for today! (If you really want to see me wearing them, you'll have to look for yourself on my PR projects!!) Here are the pyjamas:


I
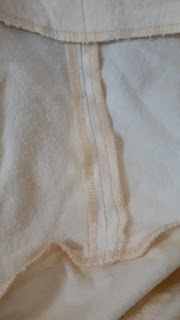
can't remember if I gave the jacket to Joanne after she borrowed it. The facing was not
attached to the jacket and seemed determined to turn exposing the interfacing
side.
 |
| Even after I washed and ironed these, the facing wanted to turn |
In addition, this was one of my early makes and the shoulder and armhole
seams were unfinished and fraying somewhat.
 |
| Shoulder/armhole seam - fraying fabric |
The side seams were overlocked. I
don't think I had a working overlocker at the time so assume I did this in the once
monthly sewing class that I attended at the time, before I found my current
more local classes. That was certainly where I made the pyjamas - trousers and
bias top with shoe string straps and toning jacket. Everyone made the same
pyjamas as a class project. I remember being scared of the overlocker but we
were all ‘forced’ to use it. I got over my fear but at the time I still
had no idea how to determine seam width on an overlocker.
I decided to unpick the top of the armhole at the shoulder seam. This
allowed me to get into and overlock the edges of the shoulder seams, changing
to a set of threads a close as possible to the fabric shade. I also
overlock finished the armholes as much as possible - I didn't deconstruct
enough to do this 100%. I then resewed the shoulder/armhole seam.
 |
Shoulder seams and armhole seam now overlocked. Much tidier.
Rough edging at neckline seam hidden by facing (top of photo) |
The
facing had been understitched etc so I certainly didn't plan to unpick that to
get every last part of shoulder seam edge overlocked. No matter, this would be
covered by the facing. I decided to top stitch the facing to hold it down. The
thread I used is not the same thread as I used previously but it's fine for
this project. The two top stitching rows certainly don't match. Nevertheless, I
think it does look better, but more importantly I think this has improved both
the function and the longevity of the pyjama jacket. Less ironing required too. Do the young iron?
 |
| The original row of topstitching at edge of jacket and new row at side of buttons, holding facing down. This follows edge all the way around at an even distance |
Joanne is welcome to the jacket but if she doesn't want it, then I'll reclaim
it as lounge wear.
M&S Top alteration
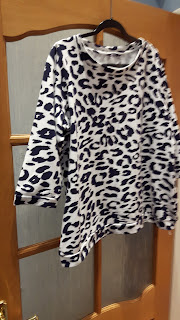 |
| Not a great photo but the best I could do tonight |
Next was a sweatshirt top I bought quite cheaply. The sizing was rather
strange which is why I think it was so markedly reduced (M&S). I bought a top 2 sizes bigger than my usual size in M&S but this just fitted me in the
arms and at the bottom hip band. However, it was huge at the side seams. I pinned out the
excess fabric, though not as much as I would have liked as I was constrained by
not wanting to alter the armhole. So zero at the top of the side seam, quickly
changing to a 1" plus reduction, staying at that for a while and then
tapering out to zero again for the hip band which I didn't want to unpick. I
first basted to try it out and asked David to check. He pinned it tighter but
the sides were uneven so I stayed looser rather than tighter to match them up.
I then sewed the new seam on the sewing machine and finished off by overlocking
in white thread, cutting off the excess fabric. Result is not perfect but
perfectly satisfactory and a top I will have no hesitation in wearing.
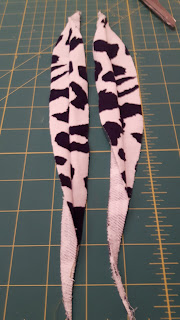 |
| The removed part, against a scale. |
Concord Tee toile and AGM preparation
 |
This is a dress made with the fabric I used as my latest toile for the Concord tee.
I've just tonight discovered that this is a Pont de Roma fabric |
I made a new Concord tee toile with some of the fabric I found,
leftover from a previous make, using the bigger bust size pattern. I'm still
not happy with the fit, so I'm not finishing it completely and will ask for
advice about it next week. It's not yet photographed as I want to alter further first.
Edited to add - I took to class tonight and I got advice to alter the sleeve and to take in part of the fullness across the back - that is, more fullness. I've more to say on this but I'll wait until I post a specific post.
Unfortunately, I'll miss my Thursday sewing bee
because of our Vets’ AGM; I'm secretary so I've got to be there! I've got 95%
of what I need ready for that. It's taken quite a while so I'm glad to get the
back of that broken. That's something else I've been very productive doing this
week.
Preparing to make a Morris Blazer
I chose some stash fabric to make a Morris blazer, found a source for
stretch lining and printed out and taped the PDF pattern, read some helpful
reviews on PR and watched the sew along tutorial. I will have to make some
changes for fit but it seems a fairly straightforward make. Not all the reviews
are positive, in fact some far from it. I'm not sure when I'll start that. It's
probably the wrong season now. I've wanted a casual stretch fabric blazer for a
while. The fabric I've chosen is striped - is that too difficult to use, do you
think?
Edited to add - I also took this to class tonight, as I needed to do a full bust adjustment. There are no darts on this blazer. Dan gave me some advice. Advice on the site ends up adding a side bust dart, so I'm not so sure that a stripe will be ideal. Rotating the dart just didn't work.
Some new fabrics and cataloguing the old
I carried on washing fabric. Stash and new. I had a delivery of
fabric for specific purposes but I've only so far washed one, a bright yellow
cotton twill intended as cargo pants for one sil.
 |
| This doesn't begin to show the colour, I'm afraid |
Another, not yet washed,
is a quilted self patterned fairly heavy jersey. I originally had this in
mind for a kimono for Joanne's Christmas if I can't find a more exciting and
suitable fabric, but I'm not sure this will work - it's too heavy and spongy, but I really like it. It's black, so not really my
colour (though I think it would make a nice Morris blazer!)
 |
| I really like this. It's a black rather than the dark grey showing here |
I didn't do much proper tidying of my sewing cave this week so that's
still to do - I certainly can't leave it much longer! I've decided that I can't face
cataloguing each piece of fabric but I've divided into boxes by type (wool;
stretch; woven; linings and interfacing; crafts) and hope a
simple title will suffice for the present.
South Shields - market and library
For over 20 years, I worked in South Shields but never visited the
market. I didn't sew in those days, of course, as I didn't take up dressmaking
until after I retired . I was aware that there was fabric at the market on a
Saturday but even after taking up sewing I didn't visit as I played golf on a
Saturday. So one of the unexpected side effects of not playing golf at the
moment was that I could visit the market. I knew that I had already bought from
one set of fabric vendors as they attend the Chester le Street market,
which I had visited. I heard that one of the regulars in Shields was
giving up so I realised I had to visit sooner rather than later.
Earlier in the week, I got a delivery of fabric, including some brushed
cotton for making a shirt for David. Not surprisingly, it's a green-based
plaid, which David chose himself. I'm hoping I have a suitable shirt pattern.
 |
| Again, the colour is not right despite waiting until daylight to take photo.It's a lovely fabric. |
I had originally thought I'd make a shacket but we've now decided on a
shirt after all. One of the other stalls in the Shields market consists
of a small square of tables where the vendors stand apparently trapped in the
middle. They sell interfacing, trimmings, thread, zips and buttons galore, with
no room to move. I bought some buttons for David's shirt. I think the buttons
look good with the fabric. I hadn't taken the fabric so wasn't able to buy
thread but have some that is excellent for the buttons, though I think I need a
darker shade for all the topstitching.
Last week, The Word, South Shields’ new library and The National Centre for the Written Word, opened and so we went
in for a coffee, overlooking the Tyne. We also went up to the viewing area for
a better view. They have an exhibition area - a Ridley Scott exhibition
is on at present, until May, I believe. In two weeks time they have a Gothic for Girls event with fashion and story so I may visit that. It's a great building. It has some fabulous areas inside.
Fabric and Haberdashery in Blaydon
We have had a broken shade on a triple pendant light fitting for some
considerable time which we have been unable to replace, either just the shade
or all 3 shades. We have looked all over and searched on the internet to no
avail. It's one of a pair, one upstairs and one downstairs. We finally decided
we'd need to replace the whole fitting. Last week we noticed a new lighting
store so decided to visit on the way home today. This is in a store called the
Curtain Store in Blaydon. I used to shop there when it was an old dingy
warehouse used as a remnant warehouse by its sister store around the corner. As
well as home ware and curtain fabric, I bought some cheap fabrics I used for dressmaking toiles. That closed for refitting
and is now a lovely store with cafe and toilets etc. We didn't buy lights - but
they do now have a whole dressmaking and haberdashery section! I didn't buy
anything but I know where it is! They did have some fabric I liked but I
had already bought enough. I can show some control!
Domestic DIY - fridge problem
We were on our way to Maplin. Our tall larder fridge appeared to die -
it was flashing and giving audible warnings and not keeping temperature. David
searched online and came up with our problem as a common issue. The
replacement circuit board is £189 (ex labour) but the likely culprit capacitors
are much cheaper and David is very handy. We got the capacitors from Maplin but
then when he dismantled the fridge to replace them, found that our board is somewhat
different from the ones described in the tutorials (for want of a better word)
David found. We've ordered a likely replacement. In the meantime, the fridge is
working again - apparently these capacitors are 'self-healing' so we've
possibly bought a respite. If /When the fridge plays up again and the new
capacitor ext doesn't work, we may consider a new fridge to get the guarantee.
We can buy a fridge for not much more than the cost of the circuit board, but a
replacement fridge of the same type is over £600. Is it worth getting the
circuit board replaced when necessary? Mmm.
Tailoring Class and McCall's jacket tissue fitting
I've mentioned my tailoring class in passing, really. This coming week I
think we're starting to work on our personal blocks. I decided to cut out and
tissue fit a Palmer Pletsch jacket McCall's 6172. I used the high bust measurement to choose my size, as advised, despite my HB-FB difference being just 2", as I always need an FBA. I don't need a narrow back or broad back adjustment, I don't think, anyway - David was helping me with the fitting. I do need a 2.25" FBA and I'm in the process of doing that and then will enlarge arm by 1.5". Then I need to check to see what's that's done to hip room and bust position. They may need altered. They do on the tissue at the moment but I think I need to wait see. I do plan a toile. I know that PP feel that you can go straight from tissue fitting to adjusting on your fashion fabric, but I'm not happy with that concept.
Edited to add - Rory had a look at the humongous FBA I ended up doing on the tissue. She tissue fitted it and felt that it was okay but needed some work at the shoulder which she felt would be better done in calico. So that's my plan - I'd like to ge tit cut out before the tailoring class on Wednesday.
(Written Sunday)
I was taken by
surprise by it being so dark so early today, thanks to the clock change. I
haven't got the photos I wanted to take for this post, which has been written
in dribs and drabs. I'm busy tomorrow but I might sneak in some photos before I go out tomorrow morning or in the evening after I come back from the Sewing Bee.. (Edited to add - yes, they're there!)
Halloween tomorrow. We bought some goodies for possible guisers. We weren't brought up on Trick or Treat, which is getting more common here. I did have Halloween parties as a child and dressed up - we dooked for apples, tried to eat candy apples blindfolded etc. A long time ago!! I'm not at all sure about the 'trick' part of it - does that include egging houses if the householder doesn't provide money? Sounds unpleasant. The guisers who tend to come to our house are young children accompanied in the background by a parent or older sibling. An occasional much older group, but we haven't had issues with them. We have had our house egged, twice. Not because we refused to provide - it wasn't even Halloween and we didn't see the people involved. Like ringing a doorbell and running away, but much nastier.
Edited to add - we had a number of pleasant guisers. Usually wishing a Happy Halloween. Children. Dan was late for class tonight - she got her car egged. First time she's ever been the victim of egging.
