E-Mail:

If you enjoyed visiting this blog, please feel free add a comment after the article in question :-)

Search This Blog

Showing posts with label WW2 15mm. Show all posts

Monday, 6 April 2020

15mm Terrace Houses

Another terrain item in my drawer was an mdf kit for a terrace of three houses I'd bought at Colours way back in 2017!

Beginning the painting process.
Sadly, to my shame, I cannot tell you who made this, but I remember being impressed by the finished items on the stall which led me to make the purchase.


At the time, I thought their approach was novel as they included a laser etched sheet of card (pre-cut to size) to simulate the slated roof. Today this is quite a common approach, but not then.

Painted parts ready for assembly. Just need the mdf frames adding first. My little helper making an appearance once again.
The model was straight forward to build and makes into a one-piece building -  that is no removable roof to allow figures to be placed inside - although the bottom is open so you could place the whole model over figures if you wished. The model is mounted on a nice base that represents a stone slab pavement.

Held together with rubber bands while the PVA glue dries overnight.
Unusually there are separate mdf window and door frames to add to the outside of the building. These stand a little more proud than the real items might, but they do add to the three dimensional look of the item. Sadly. one round frame was missing...too late to do anything about that...should have built it earlier!

The double-sided tape applied, before removing the backing paper. Edges trimmed with very sharp scalpel.
The etched detail (brickwork, frames, doors etc.) are nicely rendered and give two alternative looks to the building - on one side the windows & doors are of a more modern design that the other.

The etched roofing card added.
The card slated roof was attached using double-sided tape. The first time I've tried this and it went extremely well. The card sticks down smoothly and evenly and is ready to be painted straight away.
Roof painted and dry-brushed and mdf chimneys added. This is what I call the more modern looking frontage.
The whole model comes un-painted and I opted to do the majority of finishing prior to assembly which I think was the best approach.

This is the other side, which I think gives a perhaps more dated look? Note missing circular frame in the centre.
Finished, the building looks great, another addition to my 15mm terrain piece box!

Next projects.....15mm Normandy Terrain - Part Two

These are now finished. The ten telegraph poles were firstly sprayed black, and then dry-brushed light grey. The supports for the wires were picked out in dark cam brown and the insulators in Iraqi sand. The base was finished off with a coat of brown craft paint and some static grass.


The sentry box and barrier were painted up as per examples I found on line.  The zig-zag pattern is eye-catching and a little challenging free-hand! The lettering on the barrier was simply hand drawn with a fine permanent marker pen, as was the eagle logo.


The sandbagged barrier and brazier were finished off largely with Skeleton Horde & Black Templar Contrast paints. Both the above had the ground work finished off with brown craft paint and static grass.


To pimp up the rather basic Warbases ruin. I firstly glued some randomly cut pieces of foam rubber (from a figure blister) into the corners to form the basis of rubble piles.


Then these were covered with an artist's textured paste I bought some years ago from Lidls. This is quite course, with fragments of texture 2mm in length which give a good impression of scale rubble.


Once dry I added a few matchstick timbers to the rubble piles and, when dry, sprayed the whole thing matt black.


Once this was thoroughly dry, I dry-brushed all surfaces with light grey acrylic craft paint.


Then this was followed with a very light dry-brushing of white acrylic paint. The timbers were dry-brushed light brown.


And that was the item finished. This still allows bases to be placed inside the building, but I now looks a little more realistic. Useful for any modern scenario WW1 to present day.


Tuesday, 4 December 2018

Zvezda 1/100 Ferdinand and Sturmtiger

I bought these two (and a few others besides) early in 2018 with a view to building them up to review and add to my collection. I started this piece of work in May, but then forgot about them until last Sunday when I found them whilst was looking for something else!
 As ever the box art gives you an overview of assembly, which looked to be straight forward enough.
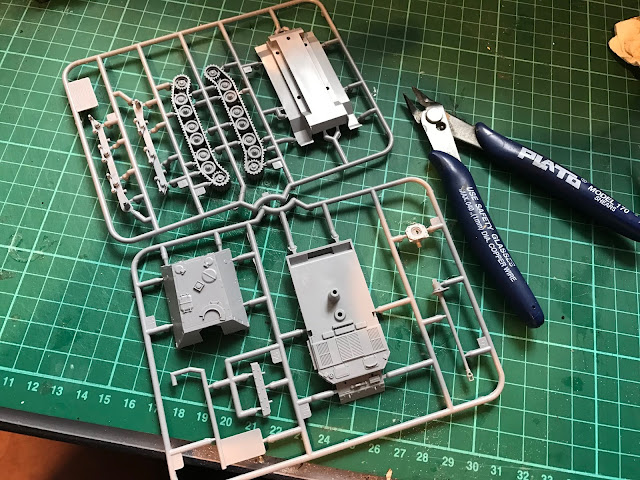
The parts come on two sprues moulded in a hard grey plastic. Parts are easily clipped from the sprues though (as ever) it is hard to do so without leaving tell-tale marks on the track surfaces.
These five parts are required to build up the chassis. Beware there are right and left hand track units....check before you glue!
 The chassis once it was assembled.
Next stage is to assemble the fighting compartment and attach this to the upper hull. There is a separate front armoured plate to fit with locator pins so you get it the correct way up. The fighting compartment has some nice detail including the interlocking armour joints at each corner of the superstructure.
Finally attach the completed upper hull and fighting compartment to the chassis and attach the 88mm gun/mantlet and the model is finished.
Very quick to assemble and a lovely little model of an early (pre-bow machine gun) Ferdinand. I guess this would be best suited to Kursk era battles, though the MG and a STUG III type cuploa would be easy enough to add for later battles (i.e. Italy) turning it into an Elefant!
 The other model was the Sturmtiger Heavy Assault Mortar/Rocket Launcher.
This time the box artwork just showed the finished tank as the assembly instructions were on a printed sheet inside the box.
 They obviously thought it too complex to rely on an exploded diagram on the box!
 Once again all the parts are on two sprues, moulded in light grey polystyrene.
Starting again with the chassis, the kit uses what seems to be one of Zvezda's rather over complex means of attachment. I guess this is to make the model truly snap-fit, but does seem just a little over-engineered.
 Once assembled it looks like this, ready for the track units to be attached.
 Also there is a front armour plate at the bow to be fitted along with the tracks.
 Once again, I have a tendency to mark the tracks when removing them from the sprues, no matter how hard I try not to.
The body of the hull comes in one piece. Nicely detailed with interlocking armour plates engraved. All that needs to be done is to add the main gun etc. and the winch for spare ammo.
 With care the back piece can be held in place whilst the front is glued.
 This then enables the gun to elevate freely.
There is a large gun mount surround to add afterwards, and a mantlet, before the barrel is fixed in place. There is a finely moulded bow MG mount (take care with the barrel!) and the aforementioned winch to attach. The rear plate has the exhausts already moulded in place, but there is a part of the air ducting to add to the engine plates.
 Finally attach the completed hull and rear plate to the chassis to complete the model.
Another really nice little kit. Simple enough to build and gives a nice rendition of a rather rare Panzer. The late type steel rimmed wheels of the track unit, might prove to be suitable to produce a late model Tiger 1 when combined with another kit?
To finish these off I gave them a spray coat of Vallejo Air Desert Yellow over a coat of white primer. Then followed Vallejo Air German Green over spray, and in the case of the Sturmtiger, Vallejo Air German Brown too.

The Sturmtiger was given desert yellow flecks to the green and brown areas to create an "Ambush" finish and then both models were weathered with Vallejo Sepia wash and high-lighted with Vallejo Iraqi Sand. They were both based on sand covered mdf bases (as all my AFVs are) and markings added from my ever diminishing supply of surplus Dragon decals.

Excellent little models, fairly straight forward to assemble and enough detail to lead to a good finish. These are such good value at approximately £3 you cannot go wrong. What's not to like...?

Monday, 30 October 2017

Pacific – 15mm Crossfire Scenario

I was sifting through my lead mountain a few weeks ago and came across several Peter Pig packs of figures I’d bought some 4-5 years ago.

These were a mix of WW2 Japanese infantry and USMC inspired by having watched the HBO Mini-series “The Pacific”.
Re-discovering these figures prompted me to re-watch the programmes and together this got me thinking about how I could create a wargame based in this theatre of operations. The obvious choice of rules (for me anyway) was to use Arty Conliffe’s Crossfire to refight a company level battle.
As I’d just built two mdf landing craft from Original Laser Designs, I wanted the scenario to be an opposed beach landing. So with that sliver of a plan I set out to decide what had to be done.

I had an idea that this game would lend itself to a demonstration/participation game for use at either club level or a gaming show. Therefore I planned for it to be both compact and portable.

I had four ready cut sheets of 6mm mdf, each 30cm square, left over from my HOTT project a few years ago so I decided that this would form the beach and interior jungle area of the game. I’ve played Crossfire on several occasions over quite small boards and found it still to work fine.

The actual beach area at first caused me some concern….but then I hit on the idea of printing out some beach graphics I found on-line. I printed them to a size that allowed them to be cropped to 30cm x 25cm. and then laminated them with gloss finish pockets. These were then stuck onto 5mm Foamex board (a scrap sign) and the sandy beach area sprayed with matt varnish. Job done.
I then turned my attention to the four mdf sheets. Firstly I varnished them on both the upper and lower surfaces to avoid warping.

Then I devised the shapes of sand dunes/banks I'd incorporate using paper templates. The design I came up with allows a little variation with swapping the tiles around.
The sand dunes/banks were added using 5mm Foamex board.
These were blended to the main board with decorators caulk.
Then everything was coated in PVA and sand scattered over it. To seal the sand in place another coat of varnish (Oak stain colour) was given to the upper surfaces of the four boards.
Finally when all was dry, the upper surfaces were dry brushed with emulsion paint from a suitable sand coloured matchpot. This was then left to dry while I tackled the other items.
I was going to scratch build some defensive positions and get a Sarissa mdf jungle hut, but fate intervened when at Colours in September. I found on the Products for Wargamers stall a box of ex-Mainly Military resin pieces being sold off for a song. I came away with 5 defence positions and a jungle hut for less than £6!
These were simply painted to match the base boards.

The foliage was the next item on the list. I firstly bought 25 palm trees from China via ebay for £2.50, which arrived surprisingly quickly! Then I found a pack of Games Workshop jungle trees in my pile of things to do – this gave me four more (large) palm trees.Then whilst at Colours I found some nice jungle plants that cost me a further £5.
These were all mounted on mdf terrain bases (random shaped) from Products for Wargamers. With sand, and some resin boulders (from The Square) added they look the part and form the areas of cover for the figures to move around the table in a Crossfire game.

With the base board finished, it was time to paint the figures.
To boost the Peter Pig miniatures I bought the Battlefront USMC platoon. These at first looked to be very rough and ready. I guess they were quite old sculpts as the castings had a lot of flash and mould lines to be cleaned up.

Eventually I was left with sufficient  figures to form two rifle companies with command figures. To complete the organisation, I had bought support weapons from Peter Pig so had .30 MMGs, Bazooka teams and 60mm Mortars to add to these as well as a Zvezda M3 Stuart.
The Japanese figures were all Peter Pig. The quality of which is excellent. Little to clean-up and very characterful sculpts that make it easy for you to paint them up.

The Battlefront figures are actually 18mm not 15mm,  so don’t mix well on the same bases as the PP figures, but once painted proved to actually be very well detailed with a good mixture of weapons etc.
I’ve ended up with more figures than I really need (I’ll use them on larger games using my 6x4 desert mat) as I only need one company of USMC with some support and a platoon of Japanese with 2xMMG support for this scenario.
Now it’s all completed the terrain fits into one Really Useful Box (bottom one in the picture) and the figures into another. All very easily transported. Now all I need is to try out the scenario…..anyone fancy a game?