Showing posts with label Christmas. Show all posts

Wednesday, 25 December 2013

Merry Christmas

Wishing everyone a Merry Christmas.
Have a wonderful day whatever you are doing.

XOXO Sioux

Tuesday, 24 December 2013

Another 12 days!

Well as I said on this post....I really loved making my 12 days of Christmas Advent calendar bags...so I did carry on and finish a full set of 25!! ;)

Bag 13

Bag 14

Bag 15

Bag 16

Bag 17

Bag 18

Bag 19

Bag 20

Bag 21

Bag 22

Bag 23

Bag 24

Bag 25

My sweetheart is loving having a little sweet treat every day ;)
It gives me a lot of pleasure!

xoxo Sioux

Tuesday, 25 December 2012

Happy Christmas

Just popping in to wish everyone who visits here a very Happy Christmas.


Take care....thank you for the support in both my down times and good times....remember to hug the ones you love.
xoxo Sioux

Sunday, 27 November 2011

Advent Sunday

It's the first Sunday in Advent so it's time to light the candle.
My hearth at the moment looks like this...


...Christmas decorations don't go up in my house till after my birthday later in December but to celebrate Advent I like to bring out my much loved angel and light a candle.
I bought the poinsettia on Thursday in Sainsbury's......I thought it was very reasonably priced at £3.50 and looks very festive sitting in my log basket...
...not that I've got any logs 'cos the fire is electric!! :) LOL
Have a peaceful Advent.
xoxo Sioux

Saturday, 25 December 2010

Seasons Greetings

Wishing everyone a very Merry Christmas!


Thanks for being there in 2010!

Hope your Christmas is full of warmth, joy and laughter!
TTFN
xoxo Sioux

Friday, 25 December 2009

Merry Christmas To You!

It's Christmas!
Wishing everyone a Wonderful Christmas....wherever you are.


"Let your heart be light"

xoxo Sioux

Monday, 21 December 2009

Big round of applause please!

Please give a big round of applause to the maker of my Christmas cards this year!


No I'm not asking this for myself but for my DH!


Yep folks my DH made the Christmas cards this year.....he cut all the card to size, did all the stamping and put it all together........fab job or what?!


I felt guilty about not using my Paperartsy stamps as the main focal this year as they have been on my cards in the last 3 years...........but you see I saw the Papermania stamps and just had to use the gorgeous reindeer image and wording from the set.....I did manage to put a Papersartsy sentiment stamp on the bottom edge of the design but it's barely visible as it was stamped in Versamark.


So I'll explain what DH did to make them.


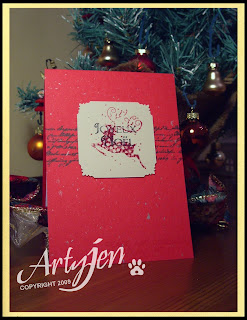
He cut the red silver speckled card from PDA Card & Craft (SSBFL) in two longways to make 2 A6 tent fold cards from each sheet..........stamped a T!m script stamp across the top in Archival black and the sentiment "Peace and Goodwill to all Men" along the bottom in Versamark ink for the watermark effect.


Stamped the reindeer in Adirondack cranberry on the squares of kraft and stamped again onto the white insert card as a secondary image for a faded effect............Stamped the wording "Joyeux Noel" in Archival black directly on top of the reindeer and "Merry Christmas" above the reindeer on the insert..........Finished by using a corner punch on the kraft card focal image and attached with silicone to raise it up from the surface a little.


So........................I'd like you to give him all the support you can.......he did make 65 after all!!!


Thanks for looking and happy stamping.


xoxo Sioux


P.S. Message from DH.........Whilst I admit I made the card from start to finish it was my DW who designed the card and explained what I had to do at each step......I could not have done it otherwise!! I can safely say that I will not be entering myself for stamper of the year 2010!!! TTFN Pip :)

Sunday, 28 December 2008

Christmas Traditions

I love to go out to a local spot where there are lots of berry laden bushes. I have a great time cutting a big bunch of greenery and red berry delights and making them into a Christmas bouquet for the front of our house. I find it easier than faffing about with a circular wreath! I went last Sunday and made this to hang at the front of our house. The holly and the ivy were both from my back garden but unfortunately my holly never has any berries! Hopefully the bouquet will last into the New Year and up to 12th night.

Arty best wishes

Saturday, 27 December 2008

Arty Girlz Challenge # 66 Home Art

12 Days of Christmas wall hanging12 Days of Christmas

Thought I would post this as my entry to the challenge this week at Arty Girlz. Can't begin to pretend I just made it but I love it and it has been appearing every year at Christmas for about 7 years. The panels were a piece of quilting material that I cut out and folded around a stiff cardboard base layer. They were padded out with quilting wadding and glued. Each panel was attached to the next with a strip of gold sparkly ribbon and the whole thing hangs from a wooden rod with decorative wooden beads on each end.

Friday, 26 December 2008

Santa Hat Freebie

Would you like to make a Santa Paws card for next Christmas? I have made the hat available as a download, just click on the image to go there. It is a png file so there will be no nasty white background if you are going to use it digitally. It was designed at approx 6 x 3.5 cm but you can obviously make it larger or smaller. Enjoy, but please read the copyright rules before downloading.

Friday, 5 December 2008

Paperartsy Christmas Card 2008

Finished at last, 64 cards done in the end, for Christmas this year. If I get any back now that I wasn't counting on I'm sorry, but you won't be getting one of these! I thought I'd take a few pictures as I went through the process of making them. I started by stamping the main focal point of my card using Paperartsy stamps that I was lucky enough to win a couple of years ago (I just love these stamps). I first used black archival ink (important as it is not effected by water) to stamp the Christmas Delivery stamp from Xmas - Plate 3 in the lower corner of a 3.7cm square piece of heavy watercolour paper, this is important as the next step will not create quite the same effect on other papers. I stamped this image again onto a piece of scrap paper and cut it out to use as a mask to cover up this portion and then used Adirondack cranberry ink to stamp the damask type image from Xmas - Plate 1 over the top. Leave them to dry for a while and lightly paint water over the top, avoiding the delivery stamped area, to create the water coloured effect. (If you paint them straight away the definition is lost in the pattern). Don't they look good all lined up together?


And here is the close up of the image.
Close up focal imageI took a piece of white A4 card and cut in two length ways and scored to make a tent fold card and embossed lines across the bottom and slightly higher up where the focal image was to go. I used Fiskers corner rounder scissors on the bottom edges and then stamped the "tis Christmas" in cranberry again and added a bit of glitter. I actually cut up a stamp to do this, it was a bit scary!


I think you can probably see the glitter and the embossed lines on here better.
The stamped focal point was layered onto firstly white card then red card and lastly recycled buff coloured card all edged with a black marker pen. Red raffia was wrapped around the card three times and the focal image attached on top.I created an insert in my Serif Drawplus X2 programme and printed it out then used the corner rounder again.
InsertAnd here are some of the finished cards.

Finished cardHope everyone likes them as they took me longer to do than I intended.
By the way
Tim Holtz is doing his tags of Christmas again this year he has some great tutorials and is giving away some great blog candy just leave a message to be in with a chance.
Have a Christmasy arty weekend.