Showing posts with label 15mm. Show all posts

Tuesday, September 28, 2021

I certainly do not need a new project...


This weekend we celebrated the birthday of a friend and his son, who happens to be really into tanks lately.  Casting about for a present, I thought about the 3d printer sitting in the garage, and printed out a M1A1 and T-72BM. These had a bit of clean up and sanding before I primed them. 

The duelists

What the newly printed T-72BM looked like

As the title indicated, I certainly do not need a new project, but at least the terrain for 15mm Normandy would be useful for 15mm WWIII... However as these prints took roughly 15 hours each, it might make sense to just buy some of the lovely Battlefront kits instead. (and the Team Yankee starter comes with a bunch of tanks). 

Tuesday, September 8, 2020

US Army Color Tests

As a bit of an escape from painting buildings in Normandy, I did some color tests for the US forces.

I was mainly thinking of triads for painting armor after looking at the rather excellent painting guides produced for the new Victrix 12mm tanks (the guides take large scale modeling effects and apply them to the tiny tanks for some exquisite effects).  The guide suggests using the color modulation method, where you create much more extreme contrast by highlighting each segment on its own.  In the guide AK-Ammo brand paints are used, since they are pre-mixed in various shades of OD.

Anyway, since Ammo paints are rather scarce in these parts, I thought I would look at what paints I had on hand, and then mix them with the Olive Drab paint that I have (Vallejo 887 Brown Violet). 


The paint tests above are mixed at roughly 1:1 with the OD paint, and then brushed with a coat or two onto a 3x5 card.   I picked a mix of GW, Reaper, and Vallejo paints to make a shade and highlight of the center row of base OD. Since I am color blind deficient in this range of colors, I sent the picture above to my sister, who as an interior designer has a much better sense of color than I do.  She selected a couple of colors to test further, which I then used on the card below.


Here I spray primed the card before painting it, to get a better representation of the color on the final models, and then mixed various ratios of paint.  The center blob is OD mixed with black, which seemed like the best (and easiest) way to get a darker shade.  Anyway, an interesting little project, which amongst other  things reminded me how hard it is to mix colors!

While I had the paints sorted out, I painted a paratrooper just to see how it would go. 


The last time I painted any paratroopers was in 2014, and I must say that the 15mm figure was much harder!  I did have all my color notes from then, and I think it was helpful, particularly for the specific bits of gear not covered in the Battlefront painting guide.  Now I just need to churn out another 40 of these guys... (and finish off those Germans)

Wednesday, August 12, 2020

Beaux bâtiments en normandie - part 1

To have a good miniatures game, you need rules, miniatures, a surface to play on, terrain, and various accouterments (dice/cards/counters/markers etc.).

For World War II skirmish games I had the first three, but was lacking the third. Since I knew that the forces I was collecting were roughly centered on "late war" and more specifically Normandy (with the paratroopers in the earlier uniforms), I thought that Northern France would be a good place to start.

Now, as you know, Normandy is about as well trod a war-gaming ground as you can find.  D-day, and the months following have built up about as much mythology as you can for something so recent, and of course the terrain itself lends itself to smaller actions, which are easier to war-game on the tabletop convincingly. (even if large actions lend themselves to greater historical accuracy...)

So Normandy terrain.

Fortunately as mentioned above this is a well hoed row, and there are plenty of inspiring builds out there.  In addition, there are plenty of commercially made items for sale, and a plenty of photo-graphical evidence as well, since both the Commonwealth and US armies were accompanied by photographers and other journalists.

A rational person, or at least one not so cheap as I am, would view the above, and then go to some MDF laser cut shop and buy a small village, customize that a bit, and move on.  Not being rational, and being cheap, I went another route:

Unfortunately I did not take any pictures of the first couple buildings at the early stages of construction, but here you can see on in progress to give you an idea of how these went.  Card stock carcass, card and paper details, and modeling putty "skin".   Other buildings got a skim coat of drywall jointing compound, and a couple got foam sheet stone work.

After a "few" hours we end up here:


Then it came time to do shingles...


I cut a bunch of these out on the Silhouette Cameo we have (as well as the windows, shutters and other details), but they covered only one half of one roof, and then I laboriously cut out most of the rest of the strips by hand.  As you might expect, making the same motion over and over again hundreds of times is not great for the ol'muscular-skeletal system, and with eight buildings to cover it took a long time. 
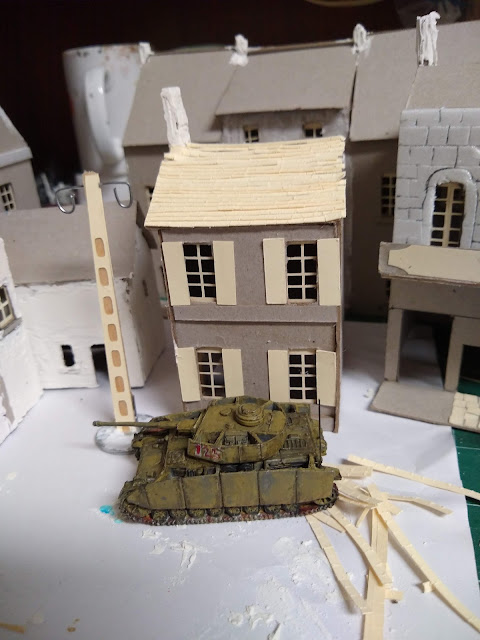
Scale check

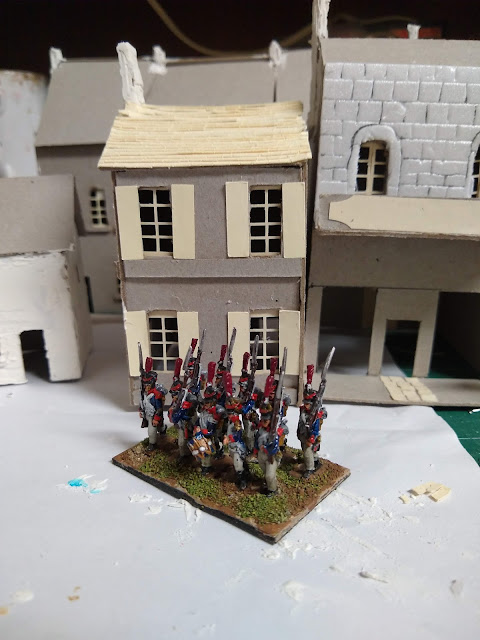
The nice thing about old buildings is that they can be used in many eras...
Throughout this project I collected pictures on the internet and printed some of them out, made sketches, doodled in the margins of other things, and otherwise compared terrain to the actual thing.  Google street view came in handy as I "drove" around Normandy looking at old villages and farm roads. I even had my sister send me some vacation pictures she had taken from one of her trips to Normandy (brother-in-law is a Band of Brothers fanatic).


Lots more to come on these buildings!

To be continued:

Wednesday, August 5, 2020

Battlefront 1/100 M4A1 Tank Kit Review

As part of the massive boxed Flames of War starter "Hit the Beach" (which I got for my birthday), you get eight sprues of American M4A1 Sherman tanks.

Battlefront M4A1 Sherman tank sprue
The eight tank sprues make two variants of the iconic cast body M4 tank (over 9,500 built), and with the added three 76mm gun sprues, it can make two more variants.

Battlefront M4A1 76mm cannon/large hatch sprue
The 76mm gun sprue adds a larger hatch version of the hull top, the T23 two hatch turret, and of course a 76mm gun.

Anyway, eight tanks that build up into four different variants is pretty cool, but how is the kit itself?

Added radio antenna, commander, and magnetized M2 heavy machine gun
I found the kit a complete delight to build.  The plastic is the same sort of very hard and very precise casting you get on high quality model kits, rather than the softer (but more durable) plastic you get with miniatures.  If you look at the picture above, the tanks are in one plastic type, and the commander is another.  The tank does not quite fall together, but the fit is so precise that you have to be more careful about dry-fitting than usual... because you might not get the piece out easily to glue!  Like many Battlefront tanks, the turrets are set up to either take a peg (included) or a pair of 5x1mm magnets (not included).

With the Hit the Beach starter, you get eight tanks, three 76mm sprues, and one American tank commander sprue. (there are a further two Commonwealth tank commanders on the infantry sprues, but the M4A1 was mostly used by the US).  This allows you to build either a company command of two tanks and a platoon of five tanks, or two short platoons of four tanks each.  (the Battlefront suggested layout of two command tanks and two short platoons of three tanks each is also an option)  The major deficiency of buying the tanks this way vs. the dedicated tank platoon box is no decals, but white stars are not that hard to paint...

At a retail cost of $6.25 (US) per tank, it is not the cheapest option (although it is cheaper than most alternatives); however, for that price you also get a commander sprue, which would cost more from most sellers (and of course you also get three PzIV tanks, two Pak40s, a terrain piece, and three platoons of infantry).  That makes it a great deal if you need any of those items, have a friend to share with, or sell on eBay.

In summary, great little tank models, and highly recommended.

Wednesday, October 16, 2019

Painting Tiny Germans

I have started painting the infantry (and support guns) mentioned in my prior post.

It has been something like 10 years (!) since I have painted any 15mm figures, so I decided to do a test figure, see how I liked the colors and such before I really got into it.

Keep in mind that the figure is based on a 19mm disk, so you can see that this is blown up a bit, but I think that the painting is not terrible... but hang on, why does it look sandy?
Did not roll the figure around in sand before painting
Bother.

Under magnification it appeared that the figure was covered in fuzz from the white primer (which did fail after this use).  Review of the other figures revealed that some others were similarly afflicted, so under magnification, I scraped each of the figures with my finger nail, and used a file for smaller bits.

Now smoothed, I touched up the paint a bit, and ended up with the following:
Still not perfect, but getting closer to where I want to be, and I have pressed on with painting the rest of the platoon and infantry supports.

Thursday, August 29, 2019

15mm Skirmish Plans

I moved my desk again recently, which gave me the chance to tidy up a bit and photograph  my 15mm skirmish force that I previewed in the last post. 

Shown are a German Panzergrenadier platoon (Battlefront metal figures) and support assets (nearly all Old Glory cast Command Decision).

The three squads of the platoon are based on what I will euphemistically call "19mm copper clad zinc disks", with larger versions of the disks for the machine gun teams.  The best part about this basing is that it cost mere pennies. Then I increased the cost by buying self-adhesive magnetic disks, which you can see to the right of the picture.  PzG platoons are small and thus brittle, but very shooty with all those machine guns. (and I had them on hand)

Additional Company/Battalion/Regimental/Divisional assets:
Under officer, panzerfausts, sniper, MMG squad, LeIg 74, PAK 40, Stug III (with gun variations), Panzer IV H, Panther, SdKfz 222, a standard SdKfz 251 and a 251/10 commander's vehicle (with 37mm gun), and a couple of kubelwagens.

I clearly like all of the additional assets!  Happily, everything here except the MMG squad was drawn from my reserves of miniatures, since 13 years ago or so I had the idea that I would like to play Flames of War and bought a couple of kilograms of metal to that end. The grey painted Panzer IV and the SdKfz 251 have been on my painting desk since then...

What I do not have are on board mortars, forward observers, medic, or any panzerschreck teams.  Or terrain, rules, or an opposing force...

Thursday, August 22, 2019

So it has been a while...

Hello blog followers.  Sorry that it has been so long since the last post.  I would give excuses about being busy with this, that, and the other, but really I was just not doing a lot of hobby, and for whatever reason did not want to blog about other things. 

I have been painting those Night Goblins from my prior post, and have them nearly finished.  Then again they have been nearly finished for a couple of months, so we will see how long it takes me to actually get them done done.

Even though I have not been hobbying that much, I have (as one does) been on Ebay, which is pretty dangerous.  I managed to lose a bunch of bids, which is good, if frustrating, but did win this WHFB dwarf lot...

 That is an old Marauder organ gun, a mostly complete bolt thrower, a steam 'coptor, a mess of crew dwarves, and some random warmachine pieces.  Plus eight monopose plastic dwarves and three newer dwarves that fit in with my army.  And Burlock Damminson.

Once I had bought something, it was easier for something else to fall into the cart...
 In this case a 210x150cm "tapestry" that will work very nicely as a play mat for space games, as seen in the next picture.

And finally, if various projects are stymied by having a lack of time, and you just unexpectedly bought some new miniatures for an old army, then naturally you should be starting a different and completely incompatible project...

I.e.  15mm WWII skirmish gaming.

So that is where I am at.  What about you?

Tuesday, April 16, 2013

15mm Hammer's Slammers

Hammer's Slammers, the mercenary regiment of the future as detailed by David Drake, is what got me into the whole Dirtside/6mm thing.  Reading about columns of tanks advancing under fire, and artillery desperately trying to penetrate their defenses was inspiring enough that I sought out a rule set that would let me game it. [which is something I still hope to do sometime]

However, as you are probably aware, 15mm is where most of the excitement is in scifi games lately.  The ability to have a full company of infantry and support units interact in a meaningful and semi realistic way is certainly appealing to most gamers, and 15mm is a size that still allows for figure detail, while to taking too much table size.  StarGrunt is the classic rule set for this sort of gaming, but there are many others.

So 15mm Hammer's Slammers would appeal to a lot of gamers, and there have been a few attempts to build a proper Slammers' blower tank, both official models, and unofficial ones.  Anisty Castings is now the licence holder for the official 15mm models, taking it over from Old Crow.  With the new licence, they also updated the models to be correctly scaled at 1/100, and they are just gorgeous as you can see. [painted by John Treadaway]

£8, John's painting not included.
Anisty is also making new models of the combat car, which will also have photo etch details for the canopy and other parts.
£5.50 with crew
So, while I do not [yet] have any 15mm scifi forces, I certainly will be taking a look at these, and if you like the Slammers, or just great hover tanks, you probably should too.

Sunday, October 30, 2011

Eureka Miniatures

As part of my D&D project, I needed to get some dogs to serve as retainers for the PC party.  (or as wild dogs to slay the PC party)  Looking around the various dog options from the myriad of sources on the Internet, I fixed on the Eureka Conquistador dog handler and dogs set as being the best bargain, and bought it from Eureka USA (for somewhat less than from Eureka AU).  Since they have flat rate shipping, I tossed in a few other useful figures for monsters and the like, which I will not talk about now. (I was also very tempted to get a squadron of Saxon horse for my 1809 project, but fortunately sanity prevailed)

My order came very quickly, and was packed quite well. I was really quite pleased with the service that I got from Eureka USA.

The dogs from the set are great, perfect for what I want to use them for, and while they have a little bit of flash between their legs, they are cast well, and should clean up nicely. 

Not necessary for this current project, but also interesting is the dog handler himself. I had always thought that Eureka figures would be too small for use with GW figures, but as you can see from the picture below, that is not the case at all. I am quite pleased with its size and heft as compared to the smaller Bretonnian figure on the left, and the larger Empire figure on the right.  Consequently, I think it should be possible to make a small Estalian or Dogs of War force using Eureka figures, and they would not look out of place with GW figures at all. Unfortunately, I have not opened my pack of Foundry El Dorado adventurers, so I was not able to compare with those, but I think they should match up fairly well.

With my Eureka purchase, I also threw in a Venturan trooper with SAW 15mm figure for comparison purposes.  Since these are relatively new, this may be of use to someone who is interested in getting these figures.

Left to right we have a Resistant Roosters US soldier in Greatcoat, the Venturan, a late war German  Grenadier from BattleFront (Flames of War GE722), and a German anti-tank gun crew man from Command Decision (Old Glory).  As you can see the picture they are all close enough for use on the same battlefield, although, possibly not in the same squad.  
The Venturan was well cast and quite proportional, although a bit thin legged considering he has body armor on. The integral base was quite thin, and would be easy to blend in. The SAW, as you may be able to tell from the picture, is pretty clearly a SF BAR, which I found amusing. At $0.67 a figure, they are quite reasonable, and a full platoon would not break the bank.


As a concluding cautionary note, the Eureka figures do contain lead, so be sure to handle them appropriately, if like I do, you have small children.

Soon, I hope to discuss the other figures I am getting from Perry miniatures, Red box games, and Ebob.