Showing posts with label Raguhn. Show all posts

Friday, 28 June 2013

Raghun for Lasalle: the full report

I have uploaded the full Scenario and After Action Report (AAR) of the combat of Raguhn to the main web site. You can watch the development of the battle (76 pictures) by following the instructions to use the visor


And, naturally, you can watch and/or download, the rest of the scenarios (for Napoleon's Battles, Lasalle and Song of Drums and Shakos) of the site!


Share |

Thursday, 13 June 2013

Final considerations about Raguhn

Actual position of the Russian forces
The battlefield was, in theory, dominated by the bridges located in the center and eastern zone, which could make possible the stopping of Russian columns or even their break into two parts, out of range of each other.
However, the French vanguard lost a precious time, which turned out to be unrecoverable, cleaning the central wood of enemies, so only a lone lancer regiment was available to try the taking of the strategic central features. Additionally, the appearance of the Russian units (based on the dice), allowed Osteman-Sacken to deploy his forces in a way facilitating the defense, and thus the line of western hills at South of Brugerkint, become the actual focal point of the battlefield.
That hill line protected the only escaping route available to the Russians, i.e. the road running through Burgkemnitz, since the other road was cut off by the French advance almost from the beginning of the fight. The French C-iC- realized its importance and left to their own devices to his right flank forces in a continuous and futile skirmishing with the Russian Cossacks and regular cavalry, which protected the withdrawal of the infantry units in that area. The French vanguard also had a secondary role in the central sector, and although they cleared the forest from Russian Jaegers, they suffered greatly at the hands of Russian units covering the exits of the forest. Actually, the French vanguard acted as a covering force of the French main attack.
That main attack was launched in the western sector, where the bulk of the French forces inclined to the left. First the cavalry and then the infantry, advanced uphill against the defensive line formed by the Russian C-i-C, which also realized the importance of the position. At last, the Russian units rejected several attacks of the French line infantry, which were left next to collapsing point. This fact was used by the Russian forces to follow their march westwards under the protection of their victorious infantry, because of the excessive time needed by Bertrand to mount another assault.
 

French losses
1/, 2/ and 3/8e Legere; 4e Chevaux-Legers Lanciers (8 moral points). The actual units onto the battle field were 14 battalions/6 regiments/3 batteries (43 moral points), so the losses amounted to 19%.
Russian losses
1/8th and 1/ and 2/39th Jaegers; 1/Simbrisk IR; Light Battery #35; Kourland DR and Karpov#2; Loukoffkin and Kutainikov #4 Cossack Pulks (14 moral points). The actual Russian forces used were 14 battalions/5 regiments (3+)/2 batteries/3 cossacks (46 moral points), so the Russian losses were 30%. However, if the total Russian forces are taken into account (i.e. the un-used units are considered to successfully pass along the battlefield), that were 19 battalions/6 regiments/(4+)/5 batteries/8 cossacks (67 moral points), i.e. 21% of losses.
 

This is a combat where the assignment of victory is not easy and it can ba a drawn battle.


Share |

Monday, 10 June 2013

Raguhn for Lasalle (and VI)

Bertrand and his men make a last effort and advance to take the hills before the village of Burgkemnitz, the key for the Russian retreat, now that the southern  exit has been made unavailable by the French...

... but the Smolensk Dragoons break the 9e Hussars...

...and the French battalions atacking the hill are repulsed one after other...


... and at last, and near the exhaustation, Bertrand concedes the day and the Russian retire, relatively unmolested


... under the close menace of the fresh French infantry battalions of the Hulot brigade (12th Division)

Who's the winner? Watch this space for the final analysis


Share |

Sunday, 9 June 2013

Raguhn for Lasalle (V)

The French C-i-C is trying to cut the the Russian retreat line and launches his left flank cavalry. The 5e Hussars breaks the Kourland Dragoon Regiment...

...and then, the battle-crazed Hussars rush up the hill to break and disperse the Russian gunners

... until they are finally stopped by the 1/Tarnopol IR in square, and fall back on the edge of collapse.

Meanwhile, in the central sector, the 12e Chasseurs a Cheval Regiment is forced to fall back before the square of the 1/Bieloserk IR...

... while their exhausted comrades of the 2/8e Legere are broken after a vicious firefight with the deployed 2/Bieloserk IR

At last, in the French right flank, the White Russia Hussars have routed the 2e Chevaux-Legers Lanciers, momentarily relieving the pressure on the retiring Russian infantry units in that sector.


The Russians are retreating while defending their ground inch by inch!


Share |

Saturday, 8 June 2013

Raguhn for Lasalle (IV)

The French main body inclines to left, to cut the Russian line of retreat

and the last Russian units (see here for the mechanics) have appeared


The Russians are really retiring westwards, protected by their left flank guard

To be continued


Sunday, 2 June 2013

Raguhn for Lasalle (III)

The 1st and 2nd battalions from the 8e. Legere have broken the Russian 1/8th Jaegers in the big wood

while the 2e. Chevaux-Legers Lanciers Regiment also disperses the Cossack Karpov #2 Pulk

thus triggering the aparition of the Russian second line (see here)

The Bertrand's task is is becoming more difficult!


Thursday, 30 May 2013

Raguhn for Lasalle (II)

The 1st and 2nd battalions from the 8e Legere are advancing through the wood to eject the Russian Jaegers, while the Russian cavalry in the background is advancing towards the west.

Meanwhile, the French main body under Bertrand has arrived in the central sector, and also advances to face the Russians.

In the eastern sector, the Russian Cossacks have routed the French Chasseurs a Cheval, thus retarding and maintaining at bay the French right flank guard.


Watch this space!


Sunday, 26 May 2013

Raguhn for Lasalle (I)

The battle, or rather the race, for Raguhn has begun.
The French vanguard, composed from the 4e. Chevaux-Legers Lanciers Regiment and three battalions of 8e Light Infantry, arrive cautiously following the main road (See the terrain here). The area seems free of enemy troops so, where are the Russians?.
Suddenly the cavalry vedettes detect green-clad troops left and right of the road.

French vanguard advancing
Russian Jaegers, Hussars and Cossacks at he right flank
Russian Jaegers and Cossacks at the left flank
Both sides start a race for the cemetery and the village of Burgkemnitz.

Watch this space!


Friday, 24 May 2013

Ready for battle

The terrain and troops for Raguhn are redy. Below you can see the three sections of the battle field, as well as the troops, waiting for the deployment.
Note that whereas all French units will be used in the battle (assuming they arrive as Reinforcements), the Russian ones are a pool from which the actual fighting units, appearing on the table, will be randomly chosen.


Next thing I need, is some spare time!


Share |

Saturday, 4 May 2013

Raguhn for Lasalle. French dispositions and home-rules

I have decided for Raguhn as the name of the new Lasalle Scenario. In the real world, that town was the final destination of Osten-Sacken's forces when escaping from French pursuit and the point where they crossed the Mulde River, thus reaching safety with the rest of the Blucher's Silesian Army.
In previous posts I have described the historical background and general situation, the OOB's and the map and Solo mechanisms ruling the Russian deployment. Is now the time for the French dispositions, the special scenario rules and the conditions for victory.


French dispositions
The French forces belong to Morand’s 12th Division (Bertrand’s IV Corps) and Roussel’s 2nd Lt Cavalry Division (Sebastiani’s II Corps) and make up for a total of 14 infantry battalions, 6 cavalry regiments and 2 foot and 1 horse batteries. All these units will be used, and must be divided into Advance Guard, Main Body, Right Flank Guard and Left Flank Guard and will enter following the blue arrows of the game map. My assignment of units and commanders was:
Advance Guard (Enter in Move 1, central green arrow)
Belair (-1/¶) (1st Brigade/12th Division)
1/8e Leger R/E/SK2
2/8e Leger R/E/SK2
3/8e Leger R/E/SK2
4e Chev-Leg Lanciers R/E/Pu/Ln
Left Flank Guard (Reinforcements, left green arrow)
Roussel (-1/¶) (2rd Light Cavalry Division)
4/8e Leger R/E/SK2
5e Hussar Regiment R/E/Pu
9e Hussar Regiment R/E/Pu
7/1 Horse Battery Horse/2 cannon/Medium/1 Howitzer
Right Flank Guard (Reinforcements, right green arrow)
Lagrange (-/¶) (8th Light Cavalry Brigade)
2e Chev-Leg Lanciers R/E/Pu/Ln
11e Chasseurs a Cheval R/A/Pu
3/137e Ligne R/E/SK2
Main Body (Reinforcements, central green arrow)
Bertrand (+1/*) (C-i-C )
Morand (+1/*) (12th Division )
2nd Brigade Toussaint (+1/*)
1/13e Ligne R/E/SK2
2/13e Ligne R/E/SK2
3/13e Ligne R/E/SK2
4/13e Ligne R/E/SK2
3rd Brigade Hulot (+1/*)
1/23e Ligne R/E/SK2
2/23e Ligne R/E/SK2
4/23e Ligne R/E/SK2
1/137e Ligne R/E/SK2
2/137e Ligne R/E/SK2
1/2 Foot Artillery Foot/3 cannon/Medium/1 Howitzer
3/2 Foot Artillery Foot/3 cannon/Medium/1 Howitzer
7th Light Cavalry Brigade Dommanget (-/-)
12e Chasseurs a Cheval R/A/Pu

Situation at the start and Reinforcements
There are not units in the table map at the start of the game (see map). The French Advance Guard enters in turn 1. The rest of the French units may enter as reinforcements. Use 2D6 for the Arrival Turn (p. 91 of e-Lasalle). The units arrive in march or attack column as desired.
The Russians units enter according to the Solo mechanisms described elsewhere. Try to maintain the integrity of the organic brigades and divisions.

Optional rule: Irregular cavalry (Cossacks)
Lasalle does not allow Irregular units to charge regular ones in open terrain, so this rule try to remediate this apparent anomaly.
1) Irregular cavalry units may charge enemy units standing in 'limbered' or 'march column' formation in open terrain.
2) Irregular cavalry units must to pass a 'Discipline' test to initiate the charge in open terrain.
3) If routed in 'decisive combat' the irregular cavalry unit is immediately broken.

Optional rule: Assaults of defiles (bridges and fords)
Tha Raguhn tablemap contain several bridges and fords (open terrain) corssing several stremas (rough terrain). To profit from the advantages of bridges and fords, the units must be in march column formation. Any other formation used to move across a stream is affected by the rough terrain penalizations. If a unit whishes to charge across a bridge or ford in march formation (a possibility not allowed by Lasalle rulebook), use the following optional rule:
1) A march column can assault a defile like a bridge, a fortified gate, a ford, etc. It represents not only true march columns, but also all those formations with a very reduced front.
2) It fights at 1/2 dice and with no previous shooting, adding a -2 for "bad terrain" as they will be fighting in cramped quarters.
3) The enemy can use the "cover" or "higher elevation" modifiers when applicable.
3) However the small front, the enemy never halves their dice

Victory conditions
The French goal is to block the Russian retreat, while the Russians must to accomplish the contrary. The victory assignment must be made on the basis of the total number of Russian units exiting by the west side of the table, but taking in account that the Russian units not appearing actually on the table are assumed to have escaped French detection. The following table list one possible Victory table as a function of the percentage of these escaping Russians units.

75% - 100%   Russian Victory
50% - 75%     Drawn battle
25% - 50%     French minor Victory
Under 25%     French major Victory

However, this table must be game tested.


Share |

Saturday, 27 April 2013

Raguhn: the new Lasalle Solo Scenario

The research for the new Lasalle solo Scenario (I am not still sure of the final name) is almost done. As said in previous posts, the French forces belong to Morand’s 12th Division of the Bertrand’s IV Corps, acting as right flank guard of the general French advance towards the Army of Silesia, and to Roussel’s 2nd Lt Cavalry Division (Sebastiani’s II Corps) part of the french advance guard. The Russians are part of the Osten Sacken’s XI Corps, left behind in a dangerous isolation, when Bluecher realized that Napoleon himself was advancing against him at full speed with several Army Corps and tried unsuccesfully to cross the River at Duben (see the Duben Scenario and the corresponding AAR). The actual strategical situation at October 8 is depicted on this re-touched contemporary map (see the original version in Napoleon-Series).


This is a "What if" Scenario not only because the actual history was slightly different and neither Bertrand nor Sebastiani catched Osten-Sacken and, but also because of the solo mechanisms used, only part of the Russian forces will appear on the tablegame (although the French forces do appear in full).
Below we can see the first version of the OOB for the Scenario. It is heavily based on the Nafziger's OOBs.


Marshall Bertrand
French IV Corps
Army Moral 43 Break point 14
14 Battalions/6 Regiments/3 batteries (11,200 men)

C-i-C Bertrand (+1/*)

12th Division Morand (+1/*)
1st Brigade Belair (-1/¶)
1/8e Leger R/E/SK2
2/8e Leger R/E/SK2
3/8e Leger R/E/SK2
4/8e Leger R/E/SK2
2nd Brigade Toussaint (+1/*)
1/13e Ligne R/E/SK2
2/13e Ligne R/E/SK2
3/13e Ligne R/E/SK2
4/13e Ligne R/E/SK2
3rd Brigade Hulot (+1/*)
1/23e Ligne R/E/SK2
2/23e Ligne R/E/SK2
4/23e Ligne R/E/SK2
1/137e Ligne R/E/SK2
2/137e Ligne R/E/SK2
3/137e Ligne R/E/SK2

1/2 Foot Artillery Foot/3 cannon/Medium/1 Howitzer
3/2 Foot Artillery Foot/3 cannon/Medium/1 Howitzer

II Cavalry Corps Sebastiani (+1/*)
2rd Lt Cav. Division Roussel (-1/¶)
7th Lt Cav Brigade Dommanget (-/-)
4e Chev-Leg Lanciers R/E/Pu/La
5e Hussar Regiment R/E/Pu
9e Hussar Regiment R/E/Pu
8th Lt Cav Brigade Lagrange (-/¶)
2e Chev-Leg Lanciers R/E/Pu/La
11e Chasserurs a Cheval R/A/Pu
12e Chasseurs a Cheval R/A/Pu
7/1Horse Battery Horse/2 cannon/Medium/1 Howitzer


General Osten-Sacken
Russian XI Corps Army
Moral 59 Break point 20 (Theoretical values. The actual ones will depend of the appearing forces)
19 Battalions/6 Regiments/5 batteries/8 cossacks (16,000 men)

C-i-C Osten-Sacken (+1/-)

10th Division Lieven (-/-)
1st Brigade Agatin (-/*)
1/Jaroslav IR R/E/SK1
2/Jaroslav IR R/E/SK1
2nd Brigade Sass (-1/-)
1/Crimea IR R/E/SK1
2/Bieloserk IR R/E/SK1
1/Bieloserk IR R/E/SK1
3rd Brigade Achlestischev (-/-)
1/8th Jager R/E/SK2
1/39th Jager R/E/SK2
2/39th Jager R/E/SK2

27th Division Neverovsky (+1/¶)
1st Brigade Stawicki (-1/¶)
1/Vilna IR R/E/SK1
2/Simbrisk IR R/E/SK1
2nd Brigade Alexejev (+1/¶)
1/Odessa IR R/E/SK1
1/Tarnopol IR R/E/SK1
3rd Brigade Kollogribov (-/¶)
1/49th Jager R/E/SK2
2/49th Jager R/E/SK2
1/50th Jager R/E/SK2

16th Division Repninsky (-/¶)
1st Brigade Rachmanov (+1/-)
1/Okhotsk IR R/E/SK1
2/Okhotsk IR R/E/SK1
1/Kamchatka IR R/E/SK1
2/Kamchatka IR R/E/SK1

Pos. Bat.#10 Foot/4 cannon/Hvy/1 Howitzer
Pos. Bat.#13 Foot/4 cannon/Hvy/1 Howitzer
Lt. Bat. #24 Foot/4 cannon/Medium/1 Howitzer
Lt. Bat. #35 Foot/4 cannon/Medium/1 Howitzer
Horse Bat. #18 Horse/3 cannon/Medium/2 Howitzer

Cavalry Vassilshikov (-1/¶)
3rd Dragoon Division Uschakov (-1/¶)
Smolensk DR R/E/Pu
Kourland DR R/E/Pu
2nd HussarDivision Raskachoff (+1/*)
1st Brigade Yurkpwski (-/¶)
White Russia HR V/E/Pu +
Akhtyrsk HR V/E/Pu +
2nd Brigade Vassilshikov II -(+1/-)
Marioupol HR V/E/Pu +
AlexandriaHR V/E/Pu +

Cossacks Karpov II (-1/¶)
Karpov #2 S/I/Pu
Loukoffkin S/I/Pu
Kutainikov #4 S/I/Pu
Grekov S/I/Pu
Semencikov #4 S/I/Pu
Illowaiski #9 S/I/Pu
Baron Bode S/I/Pu
4th Ukrainian S/I/Pu


Next, the initial dispositions and Scenario rules!


Share |

Saturday, 20 April 2013

Several possibilities: Another Lasalle Solo Scenario (II)

The solo Mechanics are adapted de Rich Barbuto's Solo Scenario 'Attack at Vilna')
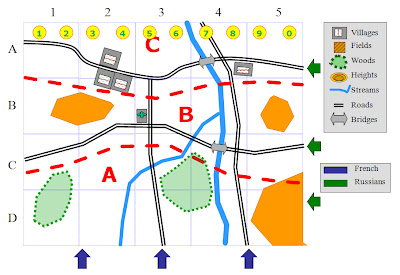
The gaming table is divided in three (A, B, C) zones and each had 10 numbered locations. As the French enter the southern (bottom) edge of the table and move north, they would first see the enemy in zone A, moving westwards, and a die will be rolled to generate and locate Russians forces. When the French enter zone B, another set of Russian forces will be generated and the same when the French arrive to zone C.
French forces belong to Morand’s 12th Division (Bertrand’s IV Corps) and to Roussel’s 2nd Lt Cavalry Division (Sebastiani’s II Corps) and make up for a total of 14 battalions, 6 regiments, 2 foot batteries and 1 horse battery. They will be divided into Advance Guard, Main Body, Right Flank Guard and Left Flank Guard, and will enter following the blue arrows.
The Russian forces will move westwards (right to left) and belong to the Osten Sacken’s XI Corps, comprising jagers, line infantry, dragoons, hussars, several position, foot light and horse batteries, and a Cossack complement.

The number of Russian units in each zone is found by rolling 1D10.
Zone A (Russian Flank Guard) : 1-2: 3 units; 3-6: 4 units; 7-8: 5 units; 9-0: 6 units
Zones B and C (Russian Main Body) : 1-2: 6 units; 3-7: 7 units; 8-0: 8 units
The type of
Russian unit in each zone is also randomly determined:
Zone A : 1-5: Jager battalion; 6-10: Cavalry Regiment. When a Russian unit appears, an additional 1D10 will determine the presence of Cossacks: 1 – 5 : No Cossacks ; 6 -0 : Cossack Pulk.
Zone B : 1-5: Line Battalion; 6-7: Cavalry Regiment; 8-0: Battery
Zone C :1-7: Line Battalion; 8: Cavalry Regiment; 9-0: Battery
The location of each
Russian unit is decided by the roll of 1D10. Only one Russian unit can be in a same point in zone A, whereas zones B and C allow for two units on the same spot.
The disposition of the Russian unit is also determined with 1D10
Zone A: 1 – 5: in march column; 6 – 0: deployed facing South (Cossacks always face South)
Zones A and B: 1 -2 : in march column ; 5 – 0: deployed facing South

To be continued


Share |