Showing posts with label Stoat. Show all posts

Saturday, 4 January 2014

More Stoats - now with guns!

  I've been meaning to post these pictures for some time - my repainted Matchbox Stoat armoured cars have received gun mounts from Peter Pig.  These are designed for Hummers but fit nicely into the top of the Stoats.  A stack of 3 washers (the same ones that I use to base my figures) are glued inside the top hatch and the Peter Pig hatch gunner drops neatly into place.  Because they're glued to the old "rolamatic" rotating platform, the gun mounts are firmly attached to the vehicle but can still be rotated if desired.

Stoats on patrol.

.50 cals in the lead with a TOW bringing up the rear.

"The Scene" US special forces watch the convoy drive past.


This time I've remembered to paint the headlights!

Note ammo box added to far vehicle.

Jerry can added to rear.

TOW mounting provides extra anti-tank punch.

Gun mounts can swivel for added play value!
I think these gun mounts are great.  The detail is fantastic and they represent an extremely cheap and easy way to add interest to a vehicle.  They are also useful to help give a sense of scale to something like these Stoats which are not specifically designed as 15mm vehicles.  As a bonus, the heads of the .50 cal gunners come separately so it would be easy to use a set of GZG conversion heads or some of the many Peter pig conversion heads to create a post apocalyptic feel.  There is a socket in the neck of the figure so you don't even need to drill a hole!

Tuesday, 30 April 2013

More Stoats - painted!

 My 3 new Stoat armoured cars are ready for action.  This time I gave them a scrub with a brillo pad (steel wool) instead of dunking them in paint stripper.  It gives a key for the paint and it's much quicker, which suits my lazy way of working.

Undercoated.
I've used a black undercoat this time.  Hopefully any chips in the paintwork won't be as noticeable as with a grey undercoat (as used on the first Stoat).

Driving through the forest.
The more observant among you might have noticed their sneak preview in yesterday's post!

GZG trooper for scale.
I've used the same colour scheme as the first Stoat.  Humbrol 75 bronze green with a Humbrol 86 drybrush.  Vallejo matt black camo stripes drybrushed with Humbrol 32 dark grey.  A dusting of Humbrol 93 desert yellow to finish off.  Tools are Vallejo stonewall grey heads with Humbrol 186 brown handles.  Fire extinguishers on the top of the hull are GW woodland green (a pot from the early 1990s!).

I think some Peter Pig Hummer 50 cal or TOW Hummer ring-mounts might finish them nicely.

Tuesday, 9 April 2013

More Stoats

More Stoats...
It looks like my post about the Stoat scout car was quite popular.  My e-bay lot containing the Weasels armoured car also includes 3 more Stoats for me to convert.  I'm thinking that Peter Pig Hummer weapons mounts might be a nice addition to a couple of them, replacing the little man with binoculars.

Saturday, 8 January 2011

Stoat armoured car

Here is my latest toy car re-paint - a Matchbox Rollamatic "Stoat" armoured scout car.


The Stoat was one of a number of fictional armoured vehicles that Matchbox released in the 1970s/80s. All the "Rollamatics" had moving parts which rotated as they travelled along - see also my "Badger" command vehicle.


All the vehicles had that very '50s/'60s Cold War sort of look like so many of the UK or Russian vehicles of that time. Silver headlights and red brakelights added by my Dad when I was a small boy!


The "Rollamatic" feature was that the little man on the top would rotate as the wheels turned. After disassembly, you can see how it all worked.


The little man did have a head and a pair of binoculars at one time, but lost them many years ago when I tried to remove him with a pair of pliers so that some of my 1/72 scale toy soldiers could stand inside. All I managed to do was cause him horrendous injury, but the remains of his body stayed firmly wedged in place! My other toy soldiers had to continue fighting on foot...


After paint stripping the body shell, it received an undercoat of £ shop grey primer. I didn't try to strip the chassis as the axle was fixed in place, and I'd have melted the wheels off!

There is so much detail cast onto the vehicle that I decided not to add anything extra, though at some stage I might drill out the aerial mount next to the hatch and insert an antenna made from a guitar string.

The Stoat received a pretty standard modern UK colour scheme; Humbrol 75 matt bronze green, drybrushed with Humbrol 86 light olive green to bring out the detail. Camo stripes are black, and the whole vehicle received a light drybrush of Matt 93 desert yellow to give it a suitably used look. I find that the desert yellow looks pretty good on most vehicles, it gives a nice road-dusty effect but without looking too harsh.

Headlights were painted in with GW mithril silver and the vision blocks are Humbrol 104 oxford blue with a Humbrol 25 blue highlight. The tyres were touched up with matt black to cover any rogue patches of the grey undercoat or the green from the hubcaps.


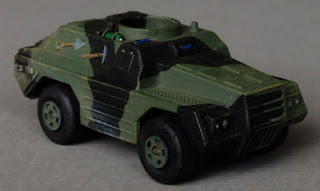
I like the stowage! Pioneer tools have Matt 29 dark earth handles with matt 61 light grey blades, with a hint of GW chainmail around the working points where wear would occur. The fire extinguisher is very old GW woodland green (I've had it for about 20 years!) with a GW chainmail end. The hinges for all the various hatches had a few dabs of chainmail where the paint will have rubbed off as they are opened.


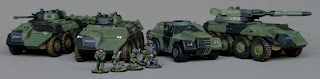
Although the Stoat may seem slightly oversized when placed alongside 15mm GZG NAC marines, it fits in very well with my DLD Kamodo AFVs, as you can see below. Review of the DLD vehicles (+ more photographs) to follow next time!