Showing posts with label 20mm. Show all posts

Thursday, June 4, 2026

Americans attack in the Argonne 1918

Somewhere in the Argonne, September 1918, and an American infantry division is attempting to crack open the rapidly crumbling German defence. An under strength German division is trying to re-establish some sort of defensive line in the face of the relentless allied offensive that began with the blackest of days and the battle soon to be known as 'Amiens' at the beginning of August. 

American FT17s advance


This game was the first outing for Murray's nearly complete American late war division, per the Great War Spearhead rules. The figures are from the HaT 20mm range. The German defenders are mostly from the Esci range. The Germans had a limited amount of level 1 entrenchments and wire to psitn in an effort to try and hold up the attackers. 


German defenders' OOB


The American attackers' OOB


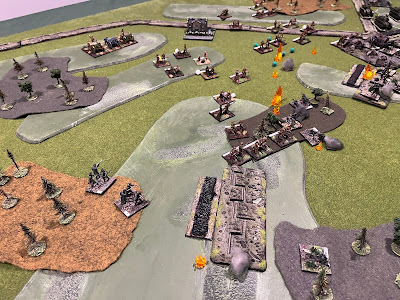
The battlefield as seen from the American right/German left, so the Americans attack from the left of the photo

The German plan of attack, with several subsequent order changes added

The German right flank, a small section of A7V tanks in support

Attacking Americans in an unusual close column advancing to the attack


A regiment of 5 sections of FT17 tanks advances down the road

The American right flank regiment, with a regiment of 18pdrs on board in support

Just showing off Murray's base labelling

German defenders in the town on the centre of the battlefield

The centre American regiment approaches the town and surrounding defences, and comes under fire

The American right flank approaches what was soon to become a hotly contested wood

The A7Vs start to move (well, lumber, really) out towards the extreme German right flank

The centre American attack starts to take casualties

On the American right the regiment charges into the wood, only to be repelled by the German defenders.  The attackers were the victims of friendly fire as American artillery firing in support not only hit the Germans but also the American attackers


The American attack on the wood is renewed, this time with more success

The initial German defenders are eliminated

The firefight in the centre heats up

The American left flank attack against the German right is stall... they had reached the end of their command arrow. Murray had been very conservative in his plan here, and failed several attempts at an order change

Casualties are mounting for the German left flank defence

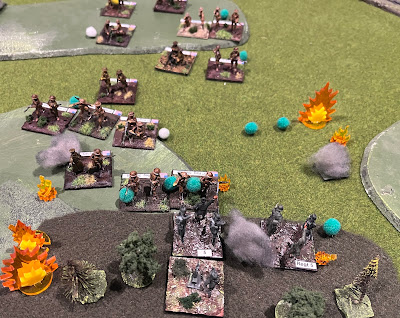
The Americans have broken into the wood on the German left... several furious melees ensue as each side hotly contests the position. The German commander has thrown his reserve company into the fight

In the centre the defenders to the right of the town are eliminated, but simultaneously the attacking American regiment fails its morale check and is unable to exploit the gap that it has fought hard to open up

The American left flank regiment finally receives new orders and begins to advance through the wood


The German left flank regiment is hit hard again ...

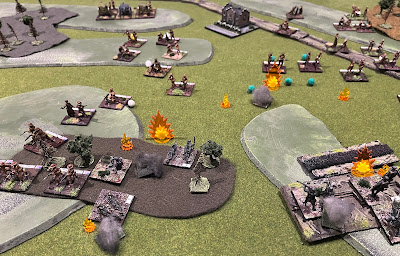
and the fourth American regiment pushes against the defenders to the left of the town. These defenders are now under fire from a regiment of 155mm howitzers

The American armour pushes into the German defence.. the sole German company in the trench line is part of the regiment reserve that had rushed forward to reoccupy the position after the initial defenders were eliminated


A section of FT17s close assault the defending German company..

..but fail (lose the combat)

The German left flank defence is largely negated, and takes a morale check (which it passes!!!)

It looks a bot of a shambles in the centre ...


The Americans begin to push against the German right with the ir left flank regiment that has finally begin to move

Attacked regiment of German 77mm field guns supporting their centre


View from behind the American centre


American companies enter the outskirts of the town, prior to launching an assault

This was the position at the end of ten moves. German counter battery fire had eliminated both American heavy artillery regiment, but had also used up its four fire missions. The armour on both sides had been ineffective, and the American attack had bogged down.

The scenario design needed to allow more preplanned fire at the start of the game, (it was intended to represent a short hurricane bombardment supporting a hasty attack, rather than the mid war preliminary bombardments that lasted days) and the initial ten move game limit we set was too short; we think probably 14 moves is required. I made some errors in handling the German response to the preplanned fire, the net result of which was that it caused no casualties .. my fault, we're always learning. Murray didn't use his artillery as effectively as he could have, and had no counter battery missions allocated. He also didn't manage the armour effectively.

We both noted the significant difference between this and the early war game a few weeks ago .. each requires a different mindset from players. It was however a great first outing for Murray's Americans... we'll see more of them, that's for sure.


Wednesday, June 3, 2026

Serbian artillery for the 1914 campaigns

I've just completed most of the Serbian field artillery for the 1914 Serbian army.  The Serbian army was equipped with a wide range of artillery weapons from a number of nations, some purchased, some captured in the 1912/13 Balkans wars. This table top artillery reflects that diversity. The models and figures are from the Lancashire Games 18mm range, suitably large to sit alongside the remainder of my 20mm armies with ease.

I chose to paint the artillery pieces in the colours of their armies of origin.


Russian 76mm field guns


French 75s


German 77s


Friday, May 15, 2026

Battle for Sabac, Serbia, 17 August 1914

In the second of our 'less well known theatres of operations' games marking the 25th birthday of the Great War Spearhead wargames rules Murray and I refought the Battle for Sabac (in Serbia) 17 August 1914.  The scenario, taken from the 'Summer Harvest' scenario book, features an Elite Serbian division (the 1st Sumadija) attempting to capture the town of Sabac from a defending Austro- Hungarian division (the 29th Infantry Division). The game was fought using my 20mm armies.

The battlefield before play commenced, the Austro-Hungarian division deploys on the left, and the Serbians attack from the right

The Serbian e plan. The command arrows reveal a flaw in the plan.

The Austrian deployment, with a regiment of 75mm guns brigaded in support at the bottom of the photo

The first three of the four Serbian regiments begin their attack. The fourth regiment is not available until turn 6, with only 12 turns available to achieve the capture of Sabac

Defending Austro-Hungarian infantry

The regiment of Austrian guns deployed brigaded. They eventually played no part in the battle at all.

The Austrian right flank regiment had divisional and Corps cavalry assets available

The Serbians swarm through Pocerski on theor right


Austrian defenders sight Serbian cavalry advancing in a small screen


The Serbian cavalry is eliminated ... ouch, that didn't take long

The Serbian right flank regiment, advancing directly against Sabac, comes under fire from the Austrian Corp 150mm guns (the only Austrian artillery to take part, as it happened). Early casualties offer a foreboding start for the Serbians

The Austrian left/Serbian right as the action develops. The Austrian defenders also start to come under artillery fire

Contact is made in the centre

The Austrian right, supported by two batteries of divisional 80mm guns

First blood to the 80mm guns

The Serbians attack the Austrian centre with a stiff bayonet charge


The first Serbian rush against the centre is repulsed with fire

Fighting alsp now develops on the Austrian right (that's the village of Jevremovac top right in the photo)

The Serbians make a second rush at the Austrian centre

And a bayonet charge against the Austrian right (Murray was counting on the 'elite' status that the scenario grants to the Serbians to carry the day)


The Serbian right is suffering significant casualties .. their thinning numbers are apparent from their very reduced presence at the top of the photo

The fighting becomes furious in the Austrian centre, as a third Serbian charge goes in

Casualties are heavy on both sides on the Austrian right too.. the gaps on the table tell the story


The Austrian centre begins to collapse under the weight of the Serbian atack

And gaps are also opening up on the right

Meanwhile the Serbian right flank disintegrates under the weight of casualties (fails its morale) and is forced to withdraw.


Carnage in the Austrian centre as the Serbian charges cut swathes through the Austrians

Similarly the Austrian right is suffering significant casualties, but is still holding.. only just

Things are getting ugly on the Austrian right ....


The Austrian centre disintegrates (fails morale)... the stands can be seen fleeing to the nearest crossing over the canal to their rear

The Austrian cavalry (which under scenario rules must remain mounted unless given a specific order change to dismount) charges in from its reserve position in an attempt to stabilise the position under the weight of the Serbian attack

The charge seen from behind the Serbian attack

Now the right is looking very weak

The Austrian cavalry is suppressed and fails to make contact

The remnants of theAustrian centre seen (nearest the canal) desperately trying to get across the bridge

The Austrian left flank regiments begin to redeploy to meet the threat from what appears to be their disintegrating right flank

The Austrian right flank regiment falls apart too, as the Serbian reserve regiment (at the extreme right top of the photo) makes contact adding its weight to the Serbian attack.

This was turn 9 of a 12 turn game. With its right shattered, and a crossing over the canal wide open, things look precarious for the Austrian hold on Sabac. From the game play perspective, while Murray had learned a lot from his previous game about being more aggressive in the attack (enabled enormously by the elite status of this Serbian division), his plan was not sufficiently aggressive to expect success and hence take the main objective of Sabac. However the Murray's plan had only taken the attacking regiments as far as the canal, reflecting the flaw in his plan, as to cross the canal and attack Sabac itself would require an order change, something not easily achieved for Serbians (or Austrians for that matter).

Using the scenario's victory points suggestions, the Austrians gained 5 VPs to the Serbians' 4.. close enough to be called a draw.

That said, in my 25 years playing Great War Spearhead this rates as one of the best games I have played in. The outcome of Murray's attacks reflected disciplined use of troops combining fire, movement, and cold steel, to dislodge the defenders.

Here is a video panorama of the battlefield at the end of the action.


Vikings and Saxons...

 The week finished with a series of DBA games at Keiths at which we used my Saxons and Vikings.  Other armies deployed during the evening (a...