Open In App

Creating New Styles in MS Word

Last Updated: 06 Jun, 2021

D

Summarize
Comments
Improve
Suggest changes
Like Article
Like
Share
Report
News Follow

MS-WORD is a part of Microsoft Office suite software. It helps to write, edit, format, save, access, and print documents. It saves the document with .doc or .docx extension. It provides many features to the user like: 

  1. Changing font, size, style of the text.
  2. Edit a particular page of the document or the entire document at once, as and when required.
  3. Checks spelling, grammar and even re-frame the sentence(s) in a better form.
  4. You can insert images, clip art, chart, shapes, hyperlink, and many more.
  5. Change the size of margins, add a border, background color to the page.
  6. It also provides a mail merge facility, which is used when we want to send the same mail a number of times and to a different person.
  7. You can also create tables.

Styles in Ms-Word are formats that determine the appearance of the text in the document. There are some predefined styles in Word like Normal, Title, Heading1, Subtitle, etc. These styles have a predefined font, size, color, etc. You can create your own style also.

Steps to Create a new style in Word:

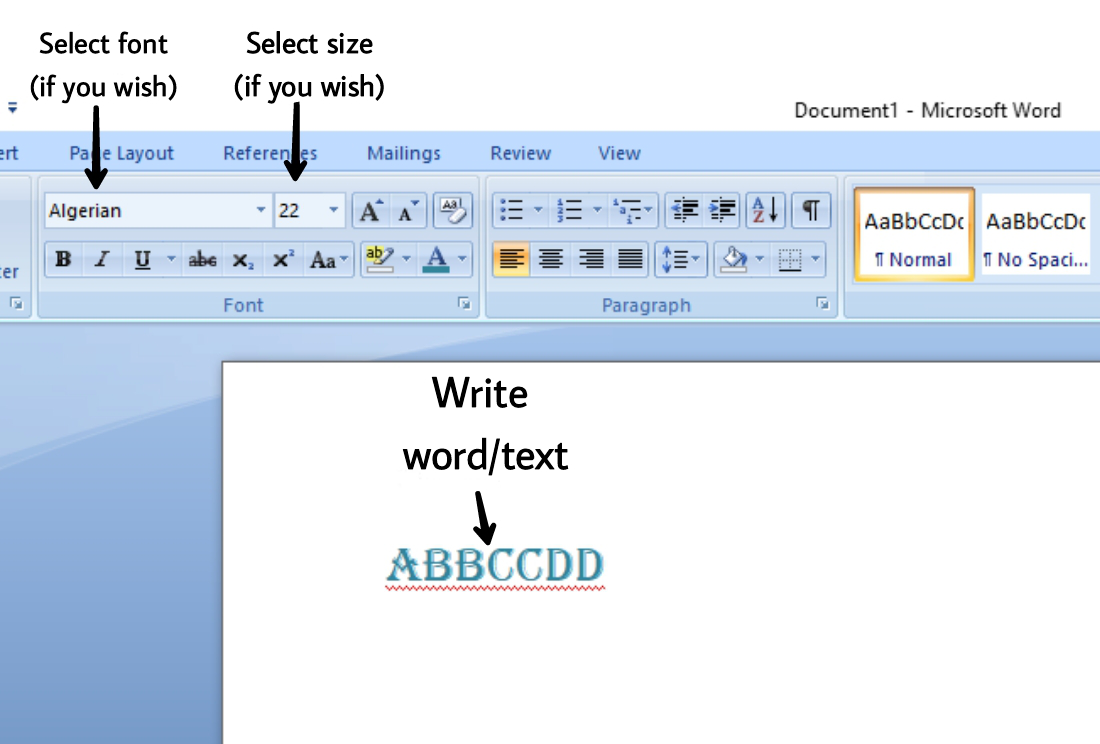
Step 1: Write the text/word on which the style is based (select fonts, size, color, etc depending on your choice).

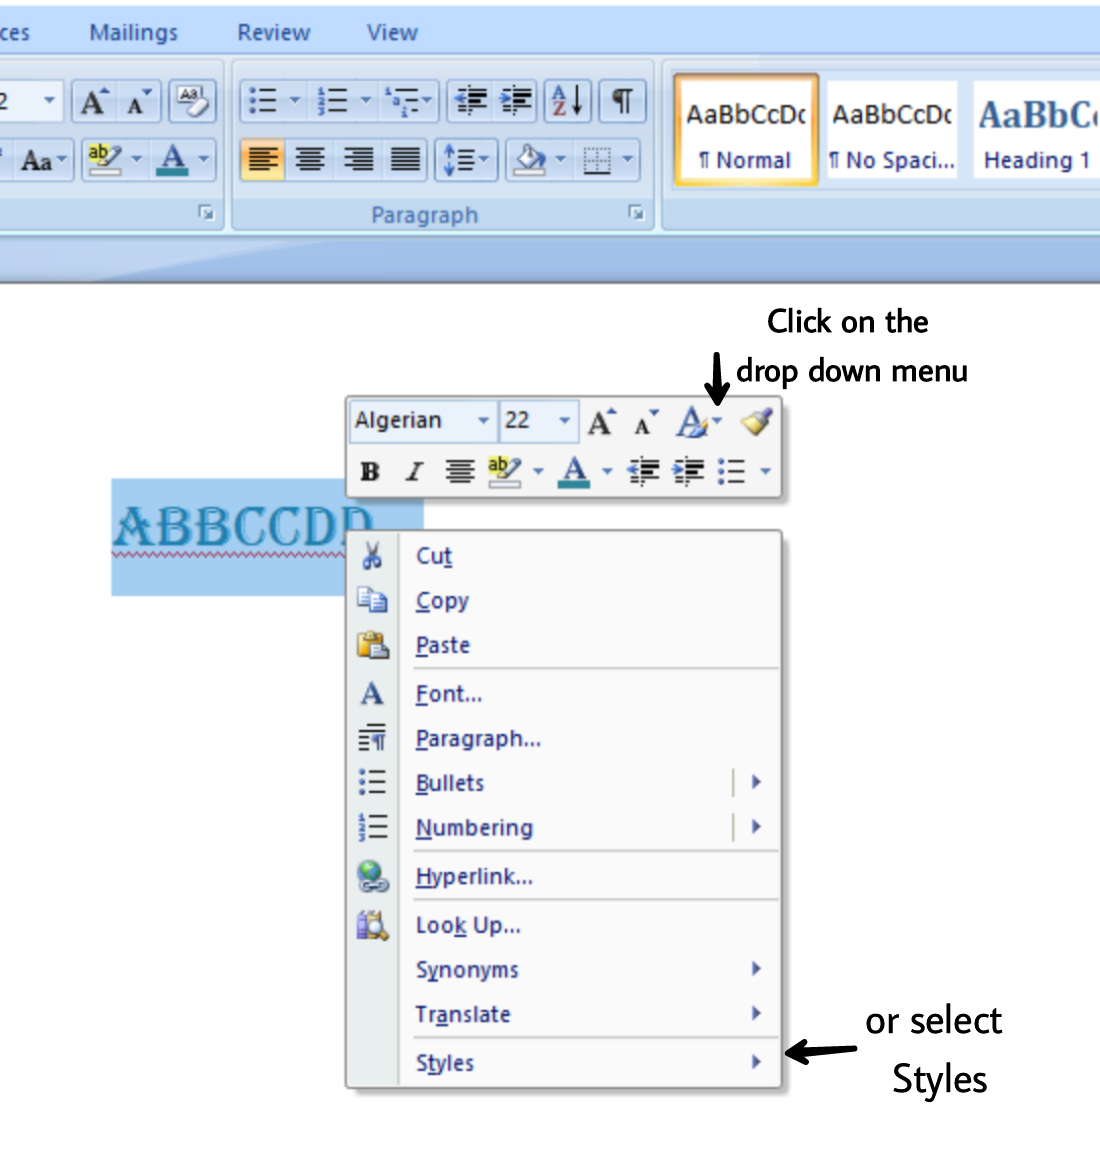
Step 2: Select the word and right-click.

Step 3: Now from the small menu, click on the drop-down menu beside Styles or Click Styles available at the end.

Step 4: Click on “Save Selection as New Quick Style“.

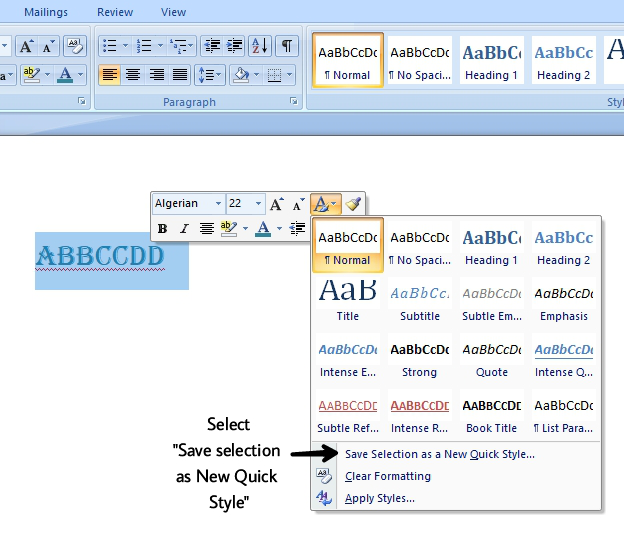
Step 5: Name your Style and Click OK.

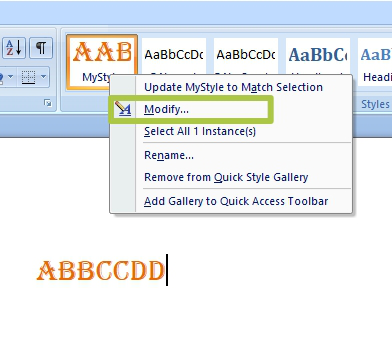
Step 6: If you want to change anything before saving, click on Modify.

Modifying Styles

To Modify the style before saving:

Step 1: Click on Modify before saving the style.

Step 2: The  Create New Style from Formatting dialog box appears.

Step 3: Make the required changes like name, style based on, alignment, size, font etc.

Step 4: Click  OK.

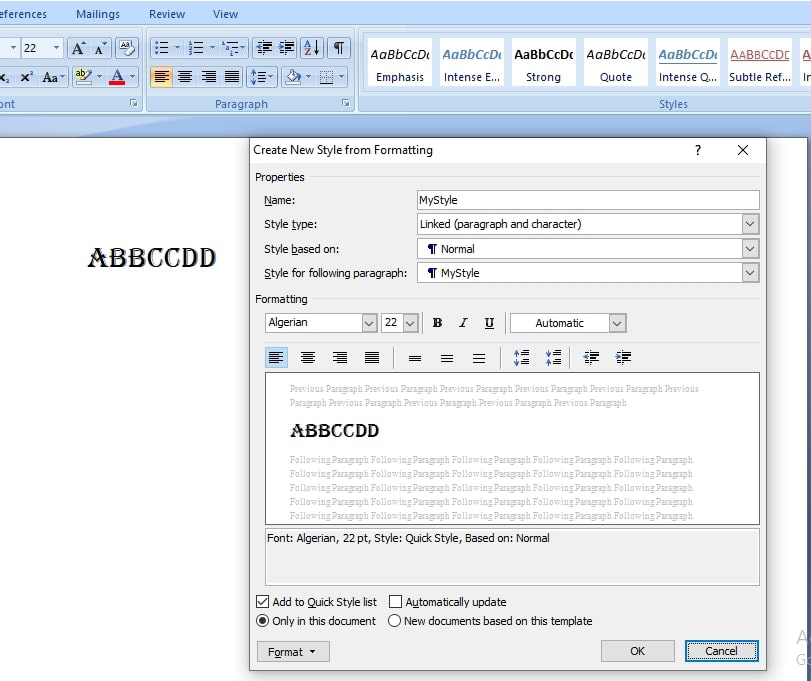
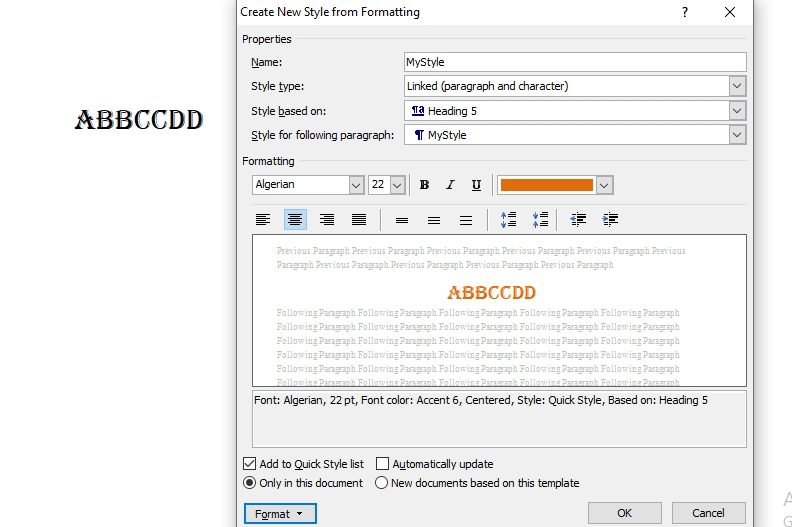
Explanation: Pic 1 contains the previous formatting we made, in pic 2 we changed the style based on, color and alignment.

The changed style is:

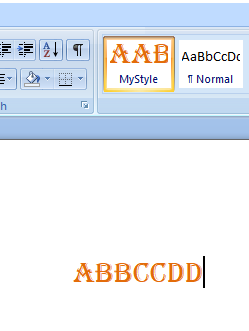
Now if we will write any text based on this style then it will be written with the same color, alignment, and heading.

Step 5: To modify the already saved style, right-click on the style and select Modify.


D

News
Improve
Discuss
Do you want to advertise with us?Click here to know more

Applying Styles in MS Word

article_img
Everything in MS Word is accompanied by a style. A style is a set of pre-defined formatting instructions that you can use over and over again in a document. Assume that we want each heading in a document must be italic, uppercase, bold, and somewhat larger. You must go through the complete process each time you need to apply formatting to the header. If you save the formatting commands as a style, you may use them whenever you need them without having to reformat them again. Types of Word styles: Microsoft Word provides 4 types of general styles: Paragraph styles: may contain character style format options, but it impacts a paragraph's overall look.Character styles: Character styles are used to format smaller parts of the text and decide how the text will appear in terms of individual characters.Table styles: Have the following table attributes: (a) Header row, (b) Gridlines & (c) Accent colorList styles: Have the following table attributes : (a) Bulleted list format, (b) Indent & (c) Numbered list FormatApply a Style in Microsoft Word In Word, there are a variety of styles to choose from. Paragraph and character styles are the most often utilized. Paragraph styles are used
Read More

Customizing Styles in MS Word

article_img
Everything in MS Word is accompanied by a style. A style is a set of pre-defined formatting instructions that you can use over and over again in a document. A style is a specified font, color, and size combination that may be applied to any text in your project. Styles may help your documents seem and feel more professional. How to Apply Style? To apply a style, select the text on which you want to apply any style. To preview a style, point to it on the Home tab (In the right-most section). Then choose the one which you find appropriate for your selected text. You can apply any of the predefined styles (That Word provides) using this method/way. Modifying a Style Follow the following steps to modify a style: Step 1: Right-click the style you wish to edit in the Styles group on the Home tab. Step 2: Choose Modify from the drop-down menu. Step 3: A dialogue box (Modify Style) will pop up. Make any formatting adjustments you like, such as font style, size, or color. You can even modify the style's name if you wish. Example: Here we are changing the formatting to Arial Black from Cambria (Headings) and choosing the style based on: "No Spacing" Step 4: To save your changes, click OK. St
Read More

Excel Table Styles and Formatting: How to Apply, Change and Remove

article_img
In Excel, you can format tables using various styles, colors, fonts, and other visual elements to make your data more organized and visually appealing. However, there may be situations where you want to remove all the formatting from a table and revert it to its default appearance. Have you ever felt stuck in the maze of Excel tables? Let’s break free together! Discover the straightforward way to remove table formatting in Excel. No more complications—just a quick and easy guide to make your data dance without the formatting fuss. Ready to embark on this hassle-free journey? Let’s get started! Excel Table StylesIn Microsoft Excel, table styles are predefined formatting sets that allow you to quickly and easily apply a consistent and professional look to your data tables. These styles include various formatting elements such as bold headers, alternating row colors, and distinct column formatting. Here's a short note on Excel table styles: How to Choose a Table Style When Creating a TableStep 1: Launch Your Excel SpreadsheetTo Apply Excel table formatting you have to open your Excel spreadsheet from which you want to remove table formatting. Step 2: Select the Data Select the data fo
Read More

Most Famous Art Movements and Styles with timeline

article_img
Famous Art Movements and Styles: Throughout history, artists have created their art by using different materials and techniques. Each of them is influenced by different beliefs and principles.Despite there are some limitations of category and artists' styles. They are grouped into some collective movements, also known as art movements. Throughout world history, so many art forms, styles and movements have developed and each of them possesses unique traits and diverse cultural influences.In this article, we have covered the list of Famous art Movements and Styles, Modern Art styles with timelines, and many more in detail.Let's dive right in.Most Famous Art Movements and Styles with timelineTable of Content Famous Art Movements and Styles ListMajor Famous Art Movements and StylesModern Famous Art styles and timelines7 most popular painting stylesFamous Art Movements and Styles ListAn art movement and style is a way to group the artworks based on their look. These artworks might have similar techniques, and themes, or can evolve at the same time. It is also possible that artists in these styles might have learned from each other. In this section, we will dive into the different art fo
Read More

Creating Bullet Lists in MS Word

article_img
MS-Word is a Word processing application used across the globe. It is a popular word processing application because of the vast feature and tools provided by it. It is used to create different types of documents and projects like letters, articles, etc. It is developed by Microsoft. Creating Bullets Bullets are used in many ways like while writing anything point-wise. Also, to prepare a kind of list or something like that. So, it is a great feature provided by MS-Word, and it is easy to use. There are different types of bullets that are supported by MS-Word, and they are: Bullets (simple bullets in which symbols are used like dot, arrow, etc.)Numbering (In this, number is given like {1,2,3...} , or alphabets {A, B,C}, or roman numbers etc.)Multilevel list (This is used when there are things like heading, subheading, and also further subheadings)Method 1: Using Bullets Let us see now how to use bullets in the MS-Word with step-by-step instructions and diagram: Steps to follow: Step 1: First open MS-Word in your PC. Step 2: Now, Open the document or create a new one in which you want to perform this operation. Step 3: Now, select the text for which bullets are to be used. (Here we
Read More

A

All About New Gemini AI Tool: Google's New AI

article_img
Everyone expected that Google would one day unveil an AI capable of outperforming ChatGPT. Google Bard was only a draft; here is Gemini AI, the new large language model (LLM), which is likely to be talked about in the coming months. We will tell you everything about it. Google continues to innovate in the field of artificial intelligence (AI). After launching Google Bard, its conversational agent based on the LaMDA engine, the Mountain View firm has just unveiled Gemini, its new language model (LLM), which beats ChatGPT on almost all counts and has an impressive understanding of its environment. Read below this interesting blog to learn all About Google's New AI Gemini Tool, its features, benefits, and pricing. Also, find out what uniqueness it has brought to the market and why it is different from Chat GPT. All About New Gemini AI Tool: Google's New AI What is the Google's New AI Gemini Tool?Features and Benefits of the Google's New AI Gemini ToolPricing Plans for Google Gemini ToolWhat uniqueness does Gemini Tool bring to the market?What makes Gemini Tool different from ChatGPT?Advantages & Disadvantages of Google Gemini ToolHow does Google Gemini Tool work?What is the Google
Read More

Microsoft Word Shortcut Keys: Complete Microsoft Word Shortcut Command List

article_img
Mastering Microsoft Word shortcuts can significantly boost your productivity and streamline document creation. This comprehensive list covers essential Microsoft Word shortcut keys, helping you navigate, edit, and format documents quickly and efficiently. From basic commands like Ctrl + C (Copy) and Ctrl + V (Paste) to more advanced functions such as Ctrl + Shift + L (Apply bullet points) and Alt + Shift + D (Insert date), we’ve compiled shortcuts for every need. Whether you're a student, professional, or everyday user, these shortcuts can save time and simplify your workflow in Word.Note: Ensure you practice these shortcuts regularly to maximize efficiency and enhance your document handling skills.Table of ContentTop Key Shortcuts in Microsoft Word: Complete GuideBasic MS Word Shortcut KeysSelect Text, Move, and Delete Text Shortcut KeysFrequently Used Shortcuts Formatting Shortcut KeysSearch and Replace Shortcut KeysRibbon Keyboard Shortcuts Tables Shortcut KeysOutline View Shortcut KeysReview Documents Shortcut KeysEnter Special Fields Shortcut KeysPrint Documents Shortcuts KeysTop Key Shortcuts in Microsoft Word: Complete GuideBelow is the list of complete MS Word Hotkeys and m
Read More

A

4 Ways to Check a Word Count in Microsoft Word in 2024 (Updated)

article_img
Knowing the word count of your document in Microsoft Word is essential for tasks like meeting word limits for assignments, articles, or reports. Imagine preparing a piece of content where staying within a specific word count is critical, and you need an efficient way to track it. Microsoft Word offers multiple ways to check word count, whether you want to view it in real-time, check selected text, or include/exclude specific elements like footnotes. This guide will explore four easy methods to check word count in Microsoft Word, helping you stay precise and organized while working on your documents.Table of ContentMethod 1: Viewing Word Count in the Status BarMethod 2: Using the Word Count Dialog BoxMethod 3: Checking the Word Count of Selected TextMethod 4: Word Count on Mobile Versions of Microsoft WordTips for Using Word Count in Microsoft WordHow to Check the Word Count on Word (with 4 methods)Need to know the exact word count of your document? We are providing four easy methods to efficiently count words in Microsoft Word. Learn how to use the built-in word count feature, the status bar, the Review tab, and the Tell Me feature.Method 1: Viewing Word Count in the Status BarStep
Read More

Creating Box Plots in Excel

article_img
Box plot is a statistical plot that helps in data visualization. It is used to show the distribution of numerical data using various quartiles. They are as follows : Lower Extreme: It is the minimum value in the data set which is at the end of the whisker.First Quartile: It is also known as lower quartile where 25% of the scores fall below it.Median: It is basically the mid-point which divides the box into two equal halves. It is also known as Second Quartile.Third Quartile: It is also known as the Upper quartile in which 25% of the data is above it and the rest 75% falls below it.Interquartile Range: It is showing the middle part of the box plot which is 50% of the scores. It is abbreviated as IQR.Upper Extreme: It is the maximum value in the dataset which is at the end of the whisker.Whisker: The two whiskers at upper and lower basically denote the value outside the IQR range or 50% of the scores.Outliers: The points in the box plot which lie outside the whiskers. Some important links to get more insights about box plots : Box PlotBox Plot using PythonBox Plot in R What is Box plot and the condition of outliers?Understanding different Box Plot with visualizationStructure of Box P
Read More

Creating Infographics with Excel

article_img
Infographics are the best option to capture user attention and effectively convey the information. We explain step by step how to create a simple infographic for displaying sales of Apples and Oranges with a background Grey image. Implementation: Follow the below steps to implement the infographics of the sales data: Step 1: Open Excel. Step 2: Go to Insert >> Icons. Step 3: Select Apple and Orange then press Insert Step 4: Select both icons, Fill White color and Black outline. Step 5: Duplicate both icons and change fill color. Select Apple Icon, Fill “Dark red” color Select Orange Icon, Fill Orange color Step 6: Prepare sample data table as below with background series (Actual data are in row 2). Step 7: Select the data table and insert Clustered Column. Step 8: Now we have four bars in the Graph and respective four icons. Step 9: To Copy the icon image to the bar. Copy red apple icon: Select respective (first) bar in graph and right click, Press “Format Data Point” Step 10: In the “Format data point”. Select “Fill & Line” (1); Select “Picture and texture fill” (2); Click Clipboard (3); Select “Stack and Scale with” (4); set 100 to Units/Picture (5) Step 11: Follo
Read More
three90RightbarBannerImg