Showing posts with label Large Figure. Show all posts

Thursday, May 23, 2019

Converting and Assembling the Mossbeard Treeman: Bones 4 Figure

     How about a bonus Thursday post today!  This past week I worked on assembling and converting the Mossbeard Treeman figure from the recent Bones 4 Kickstarter.   While I loved the basic design of the figure, I did have one quibble with it.  In my mind the arms were wrong, as they were narrower at the shoulder and wider at the wrists.  I felt that arms, as well as tree branches, are generally thicker at the base/shoulder, and get thinner as they go towards the ends.   When I pledged for the figure my hope was that it wouldn't be too hard to reverse the arms and mount them with the thick end at the shoulders and put the hands on the the thinner ends.

     Since the arms and hands were all constructed with peg and hole joints, reversing them would give me peg on peg and hole on hole connections.  This wouldn't work, so the first thing I did was cut of the pegs to make the peg on peg parts fit more closely together.   The pegs on the wrists and hands were large thick chunks of plastic, so in order to remove them more easily, I first soaked them in boiling water for about 40 seconds.
     I was then was easily able to slice through them with a hobby knife.
 
     I then assembled the legs and body, and laid out all the parts to get a feel for how it would look.   So far I was happy.
     Next I trimmed the overhanging shoulder on the body's right side.
     I then worked on trimming the new shoulder connections on the arms (What were intended to be the wrists) so that they would fit onto the body more closely.  This was a matter of trim a little, put it up against the body to test, and trim a little more as needed.
     Test fitting.
     I then got the idea to glue the pegs that I had sliced off back into the holes in the shoulders and body where they would have gone.  This, I realized, would give me good points to put in pins to help anchor the arms.
     So I then drilled holes to insert anchor pins.  I didn't have any wire thick enough, so decided to use some doweling.
     While I got the holes and pins all ready, I didn't actually glue the arms yet; as I wanted to first work on blending the wrist joints with some greenstuff epoxy putty.


      I used some of the leftover greenstuff to fill the gap in the joint where his head joins his body.
  After the wrists had time to set,  I glued the arms to the body using the wood pegs to anchor them.
      After the glue had time to set, I then blended the shoulder joints using greenstuff.


    I then primed an old CD disc and glued the feet to it.  That completes the conversion and assembly phase.  Now all that's left is the painting!
Shown with Sir Forscale. 

Thursday, May 9, 2019

Assembling and De-Necro-ing the Stygian Barge: Bones 4 Model

     Welcome to a special Thursday blog post!   I was excited to get the Stygian Barge Add-On from the recent Bones 4 Kickstarter, and I was not disappointed in the model when it arrived.  It is a truly beautiful and big ship.
      However, I didn't necessarily want to use the barge in all its Stygian glory; it looked more like a Necromancer's fancy yacht than anything else.  I wanted more of a plain everyday working barge.  I figured a plain barge would have much more game use than one specifically decked out in death-related motifs.  So, the first thing I set about doing was looking over the pieces to see just what removing all the skulls, etc. would involve.  With a little effort it seems like it just might work
All the Barge pieces minus the figurehead pieces and the crew and passengers.
      The first thing I did was to glue the front middle and rear hull sections together using Gorilla Superglue Gel.  I then used coffee stirrers and toothpicks to lay down a new deck and trim in the middle hull section to cover over the bone strewn deck that is molded onto the model. 
    I then cut off the two skull decorations on the front protrusions of the rear deck piece, and replaced them with two round wood beads.  When they were dry, I glued the rear deck and front deck into place.  I then painted the hold interior on the front deck with Ceramcoat "Black".
When the Black was dry I glued the hold cover over it, and then worked on putting together the rope and anchor assembly.  I then glued the barrel assembly to the other side

      After that, I worked on gluing in the rear deck bracers.


    I then began trimming the vertebrate spines off of the rear deck roof, and trimming the skeletons off of the roof supports.

     Next, I glued the rudder into place, and then the mast.  I left the skull on the mast, figuring it looked like some kind of trophy or oddity the crew came across, rather than strictly saying "necromancer's boat". 
     When these ware dry, I glued the roof supports to the deck, setting the roof in place to keep them aligned while the glue set, but not actually gluing the roof.  I don't want to permanently glue the roof until after I have painted the underside.
      After the roof supports were dry, I worked on fixing where the skeletal mermaid figurehead was supposed to go.  I used a bit of bamboo skewer to make a bowsprit, and a little nail in the center of the rope circle to make it look like it was actually hanging from something.
      Lastly, I cut the skulls off of the ends of the railings, and once de-skulled, glued them into place
   And here is the finished boat; ready for painting!   I'm very pleased with how it turned out, and think it will look suitably like a regular workaday barge.  Hopefully I will get it painted in time to use it in our June Ghost Archipelago game.

Monday, February 25, 2019

Goremaw, Great Worm: Bones 3 Figure

     This past week I decided it was finally time to finish up the Goremaw Optional Add-On figure I got with Bones 3.  I've been messing with the figure for at least a year I think.
Straight from the Bones 3 Kickstarter shipping box.
       I prepped the figure in the usual way; soaking the parts it in a dish of water with a couple drops of dish-soap added, then giving them a light scrub with a soft toothbrush, and then rinsing and drying them.  I then assembled the figure using Gorilla Superglue Gel.  After that, I traced the base onto an old CD.  I then created a paper mask for the area the base covered on the CD, and taped that on the CD.  Next, I sprayed the CD with Flat White primer.   When the primer was dry, I removed the mask, revealing a base sized area that was unpainted; and using hot glue, affixed Gormaw's base to the un-primed area of the CD.
     I then used some regular white glue to glue some coarse sand onto the area of the base where the body of Gormaw joins it.  This was to help hide the joint, and to make the area when the body is emerging from the ground look a little more rough and churned.
     I looked back on my blog, and it was back sometime before July 30, 2018 that I actually applied the first paint to Goremaw, and posted a photo in a "miscellaneous" post here called: Project Avalanche.
     Anyhow, at that point, I had just applied a first coat of Anita's "Violet" to the body.  I later followed up by painting his underside with Folk Art "Milkshake".  I then mixed a little of the "Violet" and "Milkshake" together and painted the area along the edges where the scales and underside meet to help give a natural blending to where the two colors meet on the body.   After that, I painted the base of the teeth with Americana "Antique White".
          Next, I painted the open mouth with Crafter's Acrylic "Tutti Frutti".  Here again, I mixed some of the "Violet" and "Tutti Frutti" together to blend the area where the two colors meet on the body, to help make it look more natural.  I then painted the teeth themselves with Americana "Bleached Sand", and the spine hooks on the body with Ceramcoat "Black". 
    Then, I painted the base with Americana "Mississippi Mud".   I let everything dry for awhile, and then I went back and applied some Citadel "Reikland Fleshshade" wash to the inside of the mouth.  When that was dry, I applied Citadel "Agrax Earthshade" wash to the rest of the body and the base.  Another drying period, and I came back and applied Citadel 'Nuln Oil" to the very center of the mouth, and to the undersides of all the body armor plate joints.
      When all the washes were good and dry, I started the highlighting.  I began with the body armor plates, drybrushing them with a mix of the base "Violet", Apple Barrel "Apple Lavender", and just for the heck of it, some Folk Art Color Shift "Purple Flash" thrown in.   Next, I gave the underbelly a drybrushing with the base "Milkshake"; and then a little of the "Milkshake with some Americana "Snow White" added.  After that, I highlighted the spine hooks with Citadel "The Fang".
     Next, I worked on the mouth; first highlighting the inner maw with a mix of the base "Tutti Frutti", and some Apple Barrel "Apple Light Pink".  Then I used a little of just the "Apple Light Pink".   I then highlighted the base of the teeth with Americana "Buttermilk", and the teeth themselves with Crafter's Acrylic Light Antique White".
     I then turned to the base, drybrushing it first with Ceramcoat "Territorial Beige", and then with Folk Art "Butter Pecan".  I then gave it a very light drybrush with the "Bleached Sand".  Then, looking at it, I felt the cracks between the chunks of earth did not have enough shadow in them from the "Agrax Earthshade" wash to look like really deep fissures; so I went in and applied Reaper MSP "Brown Liner" directly in all the crevices.
       I let the figure dry overnight and the next day I gave it a coat of Americana "DuraClear Matte" varnish.    Then, when  the varnish was dry, I used some white glue to flock the base, trying just to apply it to the tops of the chunks of ground, and not in any of the fissures.  Another overnight dry, and I sprayed the beast with Testor's Dullcote".  When the Dullcote was dry, I repainted the inside of his mouth with Americana "DuraClear Gloss Varnish".


   I'm really happy with how this big fellow came out; and I'm glad to have him done before I get more big figures in Bones 4.  Often these large figures seem like such a hurdle, but this turned out to be a really easy figure to complete.  The only challenge was spraying the Dullcote and hitting all the deep crevices in the armor plating.  Even now I can see areas where in the deep down recesses it's still a little shiny.

Monday, July 16, 2018

Ogre Guard, Ogre Smasher, Ogre Clubber: Bones 3 Figures

     I enjoyed painting the Merrow figure a couple weeks ago so much, that I was in the mood to tackle some more similarly sized monster figures; so I pulled the Bones 3 
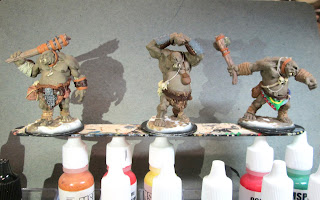
Ogres set out to paint this past week.  I decided, since they were basically all so similar, to just go ahead and paint them all at the same time.
     I prepped the figures in the usual way; soaking them in a dish of water with a couple drops of dish-soap added and then rinsing and drying.   I then glued them to 1.5" black-primed fender washers with Aleene's Tacky glue.  I then glued the figures to a  tongue depressor with a couple drops of the Elmer's glue each.

       I looked in my old 197? D&D Monster Manual to see what it had to say about the coloration of Ogres; and it described them as having anywhere from black-brown to "dead yellow" colored skin.  So I split the difference and began by painting them a 50/50 mix of Americana "Bittersweet Chocolate (a very dark brown), and Americana "Moon Yellow" (A mid-toned greyish yellow).  The end result turned out to be a mid-brown with greenish greyish overtones, and I was pleased with it.  I then painted the section of chainmail on the leftmost one with Ceramcoat "Black", and when dry, I drybrushed the chainmail with  Folk Art Metallics "Gunmetal Grey"
     Next, I painted the fur loincloth on the leftmost one with Crafter's Acrylic "Cinnamon Brown", and on the center one with Americana "Asphaltum".  The on on the right had a loincloth of layers of cloth, and as I thought about what colored cloth an Ogre might wear, I was struck by the angular shape and overlapping layers of the cloth, and how they could be painted to resemble flags and banners.  I really liked this idea, so I tried to painted the loincloth to look like it was assembled from the banners and flags of defeated foes.  I thought there was something humorous in the ultimate insult in defeat of having your personal banner rubbing against an Ogre's unmentionables!  :-D   While I had the bright colors out for the flags, I also painted the shield on the lefthand one's arm, and the righthand one's hip.  I then painted the keg on the belt of the lefthand one, and the back of the shield on this arm with some Folk Art "Teddy Bear Brown".  After that, I painted all the clubs with Americana "Mississippi Mud".
     I then painted all the belts, an the leather parts of the wrist guards on  the left one and the center one, with Accent "Real Umber".  Next, I painted the ankle wraps on all of them, and the wrist wraps on he righthand one with Ceramcoat "Territorial Beige", and the pouches on the middle one and the righthand one with Reaper MSP Turkey Brown".  On the lefthand one I painted the padding on his right wrist brace with Folk Art "Gray Green".
     Next, I painted anything that looked like leather straps with Americana "Terra Cotta", and then painted any large corded ropes with Folk Art "Butter Pecan".  I then did smaller strings with Folk Art "Barn Wood", and then all the skulls and any other bones, and the Ogres' teeth, with Americana "Antique White".  After that, I did the stone in the righthand one's club with Folk Art "Dapple grey", and then I painted any of the larger metal pieces with Americana "Zinc".  I finished the main painting, by doing their nipples with Vallejo "US Olive Drab", and then I went around and any odd thing that hadn't been painted yet got done with Folk Art Teddy Bear Brown".
     When everything had had a chance to dry, I gave the figures a complete wash with Citadel "Agrax Earthshade" wash.   When the wash was dry, I painted their eyes, and then highlighted their teeth with Crafter's Acrylic "Light Antique White".   Next, I mixed some of the same colors I had used to paint their skin, "Moon Yellow" and "Bittersweet Chocolate", into a slightly lighter tone by adding a little more of the "Moon Yellow".  I then used this color to highlight their skin.   After that, I painted the center one's eye patch, the lefthand one's side whiskers, and all three's belly hair, with some Ceramcoat "Black".  When the "Black was dry, I highlighted it with some Citadel "The Fang".
      Next, I highlighted the wood of their clubs with Folk Art Barn Wood", and then highlighted their ankle wraps, the wrist wraps on the third one, and the keg on the lefthand one, with Reaper MSP "Ginger Cookie".  I then highlighted the loin cloth fur of the first one with Americana "Sable Brown", and the center one's with Folk Art Butter Pecan", and finally on the third one I added highlights to the flags.  After that, I highlighted their belts, and the leather parts of the wrist guards, with some of the "Teddy Bear Brown".
     I then highlighted all the leather strapping with Accent "Golden Oxide", and then highlighted the big cord on the righthand one with the "Antique White".  Next, I highlighted the skulls with Americana "Bleached Sand" followed by some "White". After that, I highlighted the smaller cords, and the wrist pad on the right hand of the lefthand Ogre, with Folk Art "Porcelain White", and highlighted the stone in the righthand Ogre's club with Folk Art "grey Green".   I then splotched the stone with a little Ceramcoat "Black Cherry" to give a slight bloodstained look.   Next, I highlighted all the pouches on all of them with Reaper MSP "Olive Skin Highlight", and while doing so I noticed there was hand sticking out of the righthand Ogre's pouch, which I painted with some Americana "Reindeer Moss Green".
    Next, I painted all the metal parts with Folk Art Metallics "Gunmetal Grey", and when dry, I gave all the metal, and the pouch hand,  a wash with the "Agrax Earthshade" wash.  When dry, I highlighted some of the metal with Ceramcoat "Metallic Silver".
    Lastly, I painted the figures integral bases with the "Bittersweet Chocolate".
     I let the figures dry overnight and the next day I gave them a coat of Americana "DuraClear Matte" varnish.    Then, when  the varnish was dry, I used some white glue to flock their bases.  Another overnight dry, and I sprayed them with Testor's Dullcote".


    I'm generally happy with these.  They ended up being a bit of a speed paint, as I was attending Historicon this past weekend; so I had to get these all done before I left on Friday, so some corners were cut.  But they'll look good enough when on the game table, and that's what counts.   I'm particularly happy though with how the loin cloth made of the banners of defeated foes turned out. :)