Showing posts with label Falaise Gap. Show all posts

18 September 2016

Closing the Gap: The Crossroads

Yesterday we finally got in our next game in our Falaise Gap campaign. It had been 4 months since our last game, both myself and Mike had busy summers, but oddly enough we really had no problem with the rules. They seem well imprinted now. This was our seventh game in the campaign, I (Canadians) had won the last two games and was clearly looking for a victory to clinch the campaign. Famous last words!

I packed up the car and headed off to Rhode Island, it is a bit of a drive but it was a nice day and I find the drive quite relaxing. Added to this was I was driving my new A7 as well as anticipating an excellent lunch that I knew Mike's wife Paris would provide.

It was my choice of scenario, and the only one we had not played was The Crossroads (Scenario 5 in the campaign book), this had a significant number of buildings but I felt we probably had enough houses. This is scenario 3 from the main rule book, Attack and Defend.

By now in the campaign the Canadians had almost sealed up the Falaise Gap, all they had to do was seal off the centre of St Lambert sur Dives and the Germans would be prevented from retreating to the east. Defending the town were hardened German Falischirmjägers,  these are a strong force with 2 LMG's per squad. The Canadians morale was high though and all though having suffered about a 15% attrition rate they planned to attack with vigour.
Canadians attacking from the right
The terrain, the forest filled the whole triangle and blocked LOS.
The German defensive position
Looking from the point of view of the Canadian advance.
The end of the patrol phase, the Canadians got 3 free moves
The 3 Canadian JOP's
The 3 German JOP's
How it looks on the scenario map
My initial steps were to lay down smoke in front of the German positions and then advance section 2 through the forest  to capture the isolated German JOP. I moved section 2 to support this and provide covering fire. I also advanced my Sherman down the road to provide HE support against the German FJ's deployed in hard cover in the houses. I had 18 support points while Mike had 7, so I knew it would be very unlikely that he would select an AFV. I had selected a Pregame Barrage as well as Allied Air Support. This made it quite difficult for Mike to deploy his troops in the first turn and the air support took out one of his LMG teams, things were looking good for the Canadians. I had also selected a Vickers HMG team as well as an extra 2" Mortar team. I like laying down smoke.

Everything was going according to plan, I waited until I had a CoC dice before capturing the JOP, so I could end the turn and force a Morale Test. I planned to split section 2 so the Germans had to divide their fire. Best laid plans!

Things were going according to plan, but immediately after capturing the JOP, Mike got a series of double phases (maybe 4-5), with these double moves he was able to chew up the Canadian section 2, causing me to take a morale test for breaking and then another for being subsequently destroyed before I could get them off the field. Additionally Mike was well prepared for my Sherman with what I understand were multiple Panzerfausts. Two FJ's jumped out in the road and fired this powerful weapon and kaboom my Sherman was knocked out. Bu now my morale had dropped to 5 and German morale was still at 10. I made one more attempt but lost another team and dropped to a Morale of 4. My command was falling apart to I made a tactical withdrawal.
Lots of smoke!
Here is the position after game 7. The campaign is no longer than 9 games, if the Canadians have not defeated the Germans by then the Germans have essentially made it through the Falaise Gap and escaped to Germany. Mike had an impressive victory moving the Campaign Tracker to 9, the only way I could win now was to reduce this to zero, as I lost my opportunity in this game to win 3 games in a row. I had essentially lost a full section. The Germans had lost 2 men, there was no way I could win, so I surrender the town to the Germans. A German campaign victory. Congratulations to Mike on a very well played defensive victory.
Well it was a great campaign, Mike is a real gentleman and an absolute pleasure with whom to game. All there is to decide on is which campaign we shall play next.

04 April 2016

Closing the Gap: The Belfry

This past Saturday we played our 6th game in our Falaise Gap campaign. We decided to play at the Hobby Bunker this weekend, I believe Mike had some purchases to make. This gave me a bit of an advantage as Mike had to drive all the way from RI, and the traffic was quite bad so I had almost an hour to study the layout and put together a plan for my attack. In phase 2 of this campaign with the German Fallschirmjäger counterattack on St Lambert sur Dives, the initiative lies with the player who won the last game. This was the attack and defend scenario from the book as laid out below. The church belfry lying to the extreme left of the terrain was a variable JOP available to either side and was 2+ points in the campaign tracker. I felt this was going to be quite tough for me as the Germans had an 18" advantage in their initial set up. Of note is the fact that we made the top of the belfry the actual JOP, it took a phase to enter the building and then another phase to climb the belfry. Only 1 team was allowed to climb the belfry at a time. There were 3 doors to the church one on the road, and one on each side of the building. 

The Terrain as played with the German defensive line in the foreground and the church to the left
Things turned out well for the Canadians with the Patrol phase, I got 4 free moves and was able to capture most of the middle ground. The middle German patrol marker is in fact 2
The position of the German JOP's
The Canadian JOP's. The one close to the church as well as the one in the foreground were critical to a successful attack.  Mike was a bit unlucky in the Force Morale throw and ended up with a starting Morale of 8 while I had an 11. I think the Germans had a Panzerschreck and a Sniper as supports (5) and the Canadians took Allied Air Support, a Sherman, HMG Team and a Medic. So the game starts..................
I first bring on a HMG team, as I wanted to cover the two houses, to support the HMG team I also  brought on my Section 2. Mike brought on a sniper and placed him on the second floor. I then brought on my Section 1 and they made a run to church. Mike cleverly put his 1st FJ squad on the ground floor of the house protecting them from the HMG team and Canadian 1st section but giving them LOS to the belfry. I then advance the Bren team to the belfry. They immediately come under fire from the 2 German LMG's. I bring on my Sherman to hail HE on the house.....................
The Canadians have captured the the belfry JOP and are 2+ in the campaign if they can win this scenario. They come under a hail of fire from the German squad 1 and are broken and add 5 shock to the rifle team. They all bail out of the church. Mike brings on the dreaded Panzerschrek and fires at the Sherman, he gets 2 shots off before I can take out the team with the HMG and the rifle section behind the hedge. I lucked out there, but I did improve my chances by obscuring the hull behind the hedge. The Sherman starts to fire at the first house but is pretty ineffective, but the HMG team and the Canadian 2nd section are able to start to fire on the German 2nd squad. We retire to the Vietnamese Restaurant for lunch.............................................
We return from lunch, the situation is looking grim for the Germans. I am able to get my heavily shocked Sec 1 from the church and bring on my SL and with some good CD the pinned status is removed and they can get out of the church. I am lucky on the Morale test table and stay at 11. Mike is less lucky he loses a point for the Panzerschreck team and I am then able to start to cause damage on the on his 2nd squad it is not long before his JL is wounded and his team breaks, the Germans morale is at 6. Mike ends the turn and withdraws from the table. A Canadian +4 victory! I did take some photos this game.............................................................
The Sherman 
Rifle Section 2, with the HMG team as well as the SL and Medic
The retreating Germans, these are some beautiful AB figures that Mike had commissioned from Dani Dunbar in Australia. They are actually his Panzergrenadiers rather than his Fallschirmjägers, because of the lack of available FJ supports. He really is a terrific painter.

The tracker as it now stands as you can see there were very few losses on either side in this game. It does look a little grim for the Germans but their squads are mostly intact so the campaign is not over yet!

07 March 2016

Closing the Gap: Outflanking

Yesterday we got together for our somewhat delayed 5th game in our Falaise Gap campaign. This is the first scenario in phase 2 of the campaign where the German Forces counterattack the Canadian Forces who have now have defensively positioned themselves is St Lambert sur Dives. The Germans are now the attacker and have a choice of which of 3 scenarios to play. Mike picked Outflanking which is based on scenario 5 in the CoC rulebook: The Flank Attack. I felt this was going to be a tough game for me as the Germans have a fresh platoon of Fallschirmjägers with 2 LMG's each. The Canadians still had there original platoon and although there were 6 reinforcements, were still down 8 men from platoon strength but also suffering from a loss of command with 1 SL and 3 JL's newly raised from the ranks (4 out of 5 leaders with 1 reduced CI each).

This is the first game I have every had at my house, which made things very easy as the terrain did not have to be set up the day of the game (Mike has a great terrain table in RI, but is missing some terrain pieces so we still had to set up on the day of the game). So when Mike arrived we were all set to go.
This is a very interesting scenario in that the Attacker has two sets of patrol markers while the defender has 1 set. The Canadians could set up anywhere in the shaded area while the Germans Launch from the long axis and the short axis of the table edge. The only requirement is that each of the 3 sets of patrol markers daisy chain within 12" of each other.
I was able to mimic this pretty well on my table as you can see below.
Final position of JOP's. Canadian sector in the near left of photo.
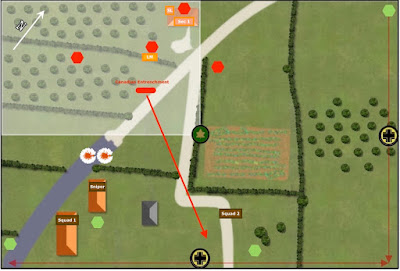
I think though I will use the graphic from the campaign booklet to illustrate the game.
I believe neither of us played this very well, but here are the position of the Patrol Markers at the end of the patrol phase.  The Germans never really got to move their right flank set of markers as the Canadians locked their 3 down pretty quickly.
Position of JOP's, as well the 1 fixed defense. I felt it was critical to have LOS to the entry point on the road , as I was pretty confident that a German AFV was part of Mike's supports.
So we started the game from the above positions. My basic strategy was to not to deploy my forces until they were in a good position and in close range to have a good chance to take out the Germans. As I was severely undergunned (my sections were all undermanned and I think the best firing dice I could muster was 10d6, while the Germans had I believe 19d6 firing from all their FJ squads, remember also that I really had little ability to remove shock as I was down 4 CI's to start the game). I also wanted to have CoC Dice in hand so I would have some maneuverability. I had 9 supports and Mike 12, I took Allied Air Support (Mike threw a 6 so that came to nothing, I was hoping to take out a full squad of his FJ's before the game even started), 1 entrenchment, a UC Bren team with JL and an extra Piat team. Mike took a Panzer IV, a sniper, and some Panzerfausts. I do not remember exactly how the game played out but the gist is as follows. I should also note that we both diced poorly on the Force Morale and started with a FM of 8 each:
Mike put down his 1st squad and sniper down first, in response I put down my Light Mortar team. Mike then put down his 2nd squad, at this point I got the first of many double phases, so I put my largest section in the second floor of the house as well as 1 of my SL's in order to maintain LOS for the LM team and immediately laid down some smoke to block LOS for the German sniper and Squad 1. I then took a shot at squad 2 who was in the open but no real success.  Squad 2 moved into cover. At this point I really did not want to deploy much else until Mike declared his advance and I had acquired some COC dice.
Mike deployed a PZ IV, and fires at the house, but fortunately only 1 man killed.  I then again start to get some double phases unfortunately one of them a triple 6, so the turn ends and the smoke is removed, but I get a clean shot at the Pz IV and amazingly enough I knock it out on my first shot with a Piat! Also along the way I am able to wound a German JL and his Morale falls to 5. Unfortunately on the next turn his 1st squad is able to open up with 16d6 on my LM team and then my Piat team, fortunately both of them are forced to withdraw.  I get my SL and rifle team of Section 1 out of the house but leave the Bren team on the second floor on Overwatch. I usually forget to do this but it does work as I got to fire at the German 2nd squad whenever they fired. I also tried covering fire for the 1st time. Effective! We have probably gone through 5-6 turns now with very little damage to either side.
We seem to be in a bit of a stalemate, I am getting all the dice but really can do nothing with them. The Canadians bring on their UC Bren team, I immediately disembark them and send them behind the house. The Germans bring on their 3rd squad. More double phases for the Canadians. I slowly advance the UC Bren (purple line) through the orchards to get them to my forward entrenchment. The Germans are at 5 Morale, all I need is to knock it down one more and their command starts to weaken. I take a shot no real effect, but 2 FJ squads open up and they are killed, my morale sinks to 5. What seemed an easy victory is now in doubt. I then recognize (with some prompting from Mike) that there is an unprotected JOP on my left flank, the Section 1 rifle team does a bit of a loop (sky blue) and takes of to the left to capture assisted yet again a double 6 and the protection from the hedge rows. The Germans withdraw, a Canadian victory. No change in the campaign morale tracker though, but I do get an extra support for the rest of the campaign unless the Germans regain this position.
Well it was a fun game, a bit weird though in that I had so many double phases of little value. I did figure how to use covering fire though and I can see it's utility to suppress an enemy section while moving a second section into position. Very little attrition on either side, the Germans lost 6 men and the Canadians 2 and the updated tracker is below.
We are hoping to get our next game in this coming Saturday, we will return to the Hobby Bunker for this one. Need to spread the Lard!

31 January 2016

Closing the Gap: Bridge over the River Dives

We played our 4th game yesterday in our Crossroads: Closing the Gap campaign at Mike's House in Rhode Island.  It was a very pleasant drive and Mike's wife laid out a fantastic lunch of oxtail sliders and some French onion soup. Really a great day out aside from the fact that my tactical abilities (I am  not sure if I actually ever had any ability) abandoned me completely. Anyway on to the game.
This was the last scenario in Stage 1 of the campaign. In stage 1 you move from scenario to scenario with the Canadians as the attacker. Their general instructions are to take the village. I had won 2 games and Mike one. This is played as scenario 6 from the rulebook: Attack on an Objective. In stage 2 of the campaign the Canadians are in the village and have to defend it against a counterattack from German paratroopers. Anyway I had 12 supports and Mike 6. I took a Sherman, a Vickers MMG team and 2" Mortar. Mike took a extra Panzerschrek, an adjutant and a sniper.
Looking from the Canadian entry point, the objective is the bridge on the far left.
Another view from the Canadian right flank with the bridge objective in the right farground.
Concentration of buildings on the Canadian end.
Patrol phase was a little unexpected with the Germans taking my left flank and me taking the centre.
Position of the JOP's which I felt favored the Canadians
A Brief Synopsis of the Battle: I started the game off well with multiple (I think 4 double or treble 6's. I initially laid down section 3 and the 2" Mortar team with the plan to lay down some smoke and advance my troops across the open field when I got my next double 6. Mike put his squad 3 down on the objective. I then plopped down the HMG team and Section 2 to protect my left flank as well as putting down the Sherman and Section 1, both to advance to the objective. Mike had placed his squad 2 where the Panzerschreck marker is and had advanced into cover. So good so far but then I made my first blunder by advancing the Sherman up the middle road rather than the road on my right flank. I thought I was protected by the smoke, but I missed that Mike could lay down a Panzerschrek on my left flank. Despite an obscured view, he threw a 9 and had a hit, 13 d6 against 7, I believe he had +7 hits, up goes the JL and the tank and I end up taking -4 on my morale for the 2 tests. I think I then got rattled. I had been hesitant for reasons unknown to advance Section 1 and 3 towards the objective. I had also left the Vickers without a leader to remove shock. Despite initially causing significant casualties to the German squad 2 and taking out squad 3, the HMG team started to take casualties and unfortunately now I was completely bereft of 1's on my CD. Then I made blunder 2 and for some reason that escapes me, I decided to have section 2 with the SL exit the house where they safely were in cover. By then Mike had started to get double 6's and my dice had failed me. He laid down squad 1 who mowed down my section 2 including the JL and the SL, my morale dropped to 2. The game was over. Mike played a good defensive game putting down his troops when they were most needed. My tactics were poor and I forgot all about using overwatch and tactical markers, so I lost. But still a great game.
The Panzerschrek is a vicious weapon.
Well both my CO's as well as the men's opinion of my leadership has taken a plunge.  I did get 6 replacements though and I feel ready to take on the fresh unit of German Fallschirmjägers. On to scenario 5 of an excellent campaign.
Well we now switch to stage 2 of the campaign, I am looking forward to being the defender, my favoured position.

21 November 2015

Closing the Gap: Panthers on the Prowl!


Major Currie's has now advanced his forces to the centre of St Lambert. He has taken some loses, almost 20% of his men and one of his Shermans. He now has to face some heavy armour.....the Sd.Kfz. 171 Panther.
This is a challenging scenario for the Canadians, they have to force the Germans to withdraw or suffer a massive Morale Failure. The Germans positions start at almost the the centre of the board, there is lots of hard cover. 
Here is our starting positions. Fortunately for the Canadians they get to throw a d6 for some free moves.
Luckily I get a 5, which allows me to lock down Germans almost immediately
Here we can see the 6 JOP's. The Canadians are within 6" of two houses and thus can deploy into both houses at the crossroads that give an excellent LOS on the German positions. German Morale is at 9 and Canadian Morale (had to take a -1 as the men's opinion was low) is at 8 at game start. 
Mike has taken a Sd.Kfz 250 HT with a JL and a LMG team in addition to the Panther, I take a Medium Mortar, a HMG Team, and Achilles (there is no other way I can attempt to take out the Panther). I also take a medic to protect my SL. Unlike our last game my dicing is pretty good and I can quickly place the FO with a infantry section and a SL in the stone house that controls the crossroads. I also plop down my 3rd section behind the wall. Mike places Squad 1 in the stone house. My Bren team behind the wall takes some shock, but fortunately no kills. My SL is the activated he calls up the mortar. The Canadian Section in the house fires at the German squad and scores a kill. Mike throws to check if the leader is hit, he fires a 1 and then tests to see what happens. He fires a 6, the JL is killed! A good start for the Canadians. Mike then places the Halftrack with the LMG team on the road but can not get a clear shot, he brings in a LMG team and fires at the Bren team behind the wall as does his leaderless 1st squad. The Bren team is now at significant shock. Time to move off the wall and retreat into the wood. Mortars are called. An aiming shot is off 100 yds. The HT now moves into position and fires at the Canadian section in the house. One man is killed. No other casualties. Back to the Canadians, more good command dice. The barrage lands and the German squad in the house take more casualties. The Panther is hit but suffers no damage. The HMG team in the the other house fires at the LMG team behind the house, they are all killed. The German morale is down to 7. Aside from the LMG team in the HT, the Germans are all under the barrage, the HT fires and misses. Back to the Canadians, the Barrage is again activated but is moved 100 yds. to the right, the HT takes damage and is now under the barrage. Back to the Germans, they decide to make a tactical withdrawal and leave the town centre to the Canadians................ game over. A Canadian Victory!
Well my men's opinion has gone up. Overall a good victory but the German morale on the campaign tracker is still quite high, it would have been nice to get a crack at the Panther and drop the German morale by another 2.