Showing posts with label Tutorials. Show all posts

01 April 2013

Rank and File: A Playtest

Well for our playtest, I went with a brigade aside with my new Brunswickers versus the French. I am trying to test all the rules I can, but have not used any cavalry. I have stuck with the rules as written here with no modifications. I have also decided to use a couple of very large units just to see what would happen. In my armies I have generally 4 and 6 stand battalions, I believe this might be a bit small for this set of rules. I also should at this level, being using 1 stand artillery batteries but I just do not like this look. So a reason for doing this play test is to see what happens, so I can make some adjustments.

So you can keep track, the caption refers to the photo above it. All phases are bolded red, while the turns are bolded blue. First up is the French:

30 January 2012

My Army Painter Method

I have finished my main unit (I have painted an extra unit in secret that will be revealed at the same time) for the Les pinceaux de la guerre contest at La Bricole and I thought I would put all the photos in one post for ease of review. The unit is the 6th Neumark Dragoons and the figures are from Calpe.

08 March 2010

Playing Aids

Lately, I having been playing around with multiple projects, sometimes I get more done when I am unfocused. I recently received a larger shipment of Front Rank and Calpe figures, for the start of my Prussian project, but in that shipment were some Austrians as well as my first limbers and caissons. I am still experimenting with Austrian white uniforms and Army Painter and I have finished one of 4 limber/caisson sets that I received. I will put some photos up when all 4 units are done.

In the meantime though, mostly because I am just not ready to start the Prussians, I have been playing around with wargame playing aids. Generally, you need some way to mark casualties, unit status and the fire status of artillery and infantry. None of markers are original, I got the ideas from other blogs and TMP. I had been using coloured paper chits and cotton wool, I was really keen on neither.

I have been using 20x40mm bases for casualty markers, these are the same size of my infantry bases and what I do is add one to the affected unit when they suffer a casualty, as you can see each has a different numbers of cannon balls (bb's) to make the loss of Unit Integrity etc, I find this works quite well and looks quite tidy. I may add some casualty figures to the same size bases with the cannon balls, when I get some. I understand that the Perry cavalry have multiple casualty figures in their boxes.

To measure unit status: Disorder, Rout, etc, I am using flag poles with different coloured poles and the pennants placed at different heights. For Field of Battle, only 2 indicators are required. Here I represent disorder by a yellow pole and an high pennant, and rout by a red pole and a lowered pennant. If I play a game with a third state, I shall use another colour with the pennant at 1/2 staff. I used 20x20mm Citadel bases with a lances from Foundry stuck in the base. I then terrained the base in the usual fashion.

For fire markers, I used pyramids of brass bb's for artillery markers on 20mm diameter round Citadel bases and ammunition boxes for infantry on the same bases. The bases were painted and flocked. I place one of these markers on a unit when it has been fired.
I believe they all came out pretty well, and am happy with the result.
The last thing, I have been recently doing is trying to do a small trial scenario of Republic to Empire. I find the writing in this rulebook quite dense and I am having some difficulty getting even the first move made. I admit that I am quite new to wargaming, but I found the the writing in Lasalle, Field of Battle and Le Feu Sacre quite clear and I could easily play a game after 1-2 read throughs. I am not going to throw in the towel yet though, as the rules appear to be quite interesting.

Here we see the set-up with 2 battalions of French infantry moving toward a bridge held by 2 units of Portuguese infantry and a 1/2 battery of foot artillery. Time to push on and give it another go...........
Position in Turn 1, French with MOVE orders after a 16" advance and 4MP. Colonel Tiff believes the French should be allowed to immediately attack!!
(15025)

05 October 2009

Basing

Just a brief note on my basing technique. I mix up some pumice gel with brown paint.Patient voltiguers waiting for their base to be done.
Apply the stained pumice gel and then touch up the base with the same colour paint.
Dry brush with bubonic brown, maybe I could be a little more aggressive here.
Then bleached bone.
Important step, is the mixed flock. I use the leftovers from my terrain projects, so it is a mixture of everything. I apply brown stained white glue, especially to areas that are not well covered with the pumice gel (usually between the feet). Place the base in the bag and then shake off.
Then a bit of "german grass".

02 October 2009

Painting with Washes

It is with some reluctance that I put these images on my blog. The Victrix figures are quite nice but the effort of glueing them together was onerous. I had gone over them removing mold lines before they were sprayed, but when I started to paint them there were still multiple pieces of flash and what was more troublesome there was significant defects in the castings. In some areas, it looked like someone had taken a blowtorch to the figures. I wonder now if I had got an early box of figures, if I remember correctly Victrix had some production problems early on with the French Infantry box, I wonder if the box I received was reflective of this, as I had pre-ordered them. I find it hard to reconcile these figures with the descriptions of others.

Additionally, these were the last figures I had painted of the box of Victrix French (around 60 figures) and I was getting pretty tired of them by now. Notwithstanding this, I had taken the photos, so I will post them. My technique definitely can be improved and any suggestions would be welcomed. Please remember though that I am interested in painting units, rather then a figures and am not a modeler. A nice unit of figures is my goal in as few as painting steps as possible. I feel a white primer with a wash is an effective way to quickly paint figures so they have somewhat of a layered look with a single step.

I usually paint 12 figures at a time, glueing them to a painting stick and then spraying them with an automotive white primer. Although the French uniforms I have seen in museums are quite dark, I feel that on campaign they would have faded quite a bit so I like a blue-grey colour to give the infantrymen a lighter blue. Here I used an very thinned down GW Shadow-Grey as a base coat for the jacket. The GW wash is too blue I find. I try to be neat, it is ok to go over on an area that is going to be painted with an minimally thinned acrylic paint, but if the adjacent area is going to be painted with a wash any areas would have to be repainted with white before I applied the wash. I apply the wash and roll the figure to let the thin liquid settle into the crevasses.
I then wash the flesh areas with a GW Ogryn Flesh. I find this wash is excellent and as far as I am concerned the flesh area are done now in one step.
I then paint the shakos with a thinned GW Badab Black and the shako covers with GW Devlan Mud or GW Gryphonne Sepia. I do add a second full strength black wash to the shakos, but this time avoiding the shako chords. I also paint the metal parts with the the black as a base for the metal paints and the boots of course.
I then reverse the figures and use the same 3 washes on the shakos, the ammunition pouch and the water bottles. I also paint the hair with the flesh wash. Sometimes, a second wash is required as the first coat does not give a dense enough colour. I am pretty well finished with the washes now.
I then use a 3/4 thinned GW Blood Red on the collars, cuffs, the thing that hangs next to the ammunition pouch and the buttons.
The figures are then again reversed and 3/4 thinned acrylic paints are applied to the rifle (Khemri Brown), the water bottle strap (Calthan Brown), bayonet sheath (GW Terracotta), rifle barrel, bayonet and shako straps (GW Boltgun Metal) and finally the cuff flaps (GW Enchanted Blue).
I then start to repair the white, fixing the edges and the straps and applying some white to shakos.
The figures are reversed the whites areas are repaired and the pre-painted knapsacks are glued in place. I use the GW black and sepia washes on the knapsack and the blanket roll. Once glued in place I touch up the knapsacks and the metal work and sacks with various colours. I also start to apply a brass paint to the musket and the buckles on the straps.Continue with the brass to the buttons and the shako plates.
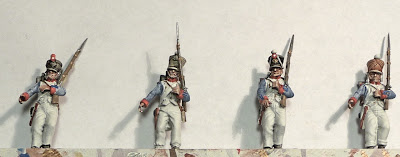
I then paint the straps on the knapsacks and the shako pompoms. I then used a very thinned black wash to shadow in the crevasses and to delineate the straps on the front of the figure, I also use it to delineate the equipment. I then put a very thinned second coat of Shadow Grey on the coat and if the relief is not good, I will dry-brush on an highlight of GW Ice Blue.

The final step is the wash over the white trousers and here is where I clearly need help, as I am quite unhappy how these 12 figures came out. I uses a thinned Devlan Mud and it did not work this time, it just looks a mess up close. Any suggestions using washes would be appreciated. On the table, though it does give a nice campaign look...c'est la vie! It took 7-8 hours to paint these 12 figures.

(7019)

19 September 2009

Wavy Flag Tutorial

I like a wavy looking flag and I just could not get the effect I wanted from rolling the flag. After looking at the Flagdude style I decided to try to micmic it. I had a bunch of GMB flags, so adaption was required.

I cut the flags and use a glue stick.

I attach them to rigid poles temporarily.
And soak in some water for 30-60 seconds.
The tricky bit is scrunching them up, as you can see the paint is slightly cracked in the upper flag. You have got to be careful.
Let them dry standing up, I wait at least 12 hours.
I then slide them off the wires and slide them on the already attached flag poles. Use a tiny bit of super glue to attach them.
I then paint the edges (GW enchanted blue and blood red are good matches for GMB french flags). Attache the points (I can not find my Front Rank eagles which is pissing me off) and I think you have quite a nice effect.
Le deuxième bataillon/82e Ligne command group
(6456)

13 August 2009

Photographing Miniatures: White Balance

I am not an intuitive photographer, at times I am not even sure what looks good. I use a Panasonic Lumix 10x optical zoom, 9 megapixal camera. It is nice and compact; but I feel the pictures, I take, could be better. I wonder if I could get some help with white balance. I am curious on what you think is the best setting. The halogen setting seems to capture the colour of the blue background most accurately, but I wonder if the green is right?

Below you can see my trial set up for photographing miniatures. I am using 2 lamps with 100w Daylight CFL bulbs. In the ceiling, there is a halogen spot aimed at the table. I think I need 1 more overhead light, but I am still trying to find something that is inexpensive.
iA: This is the automatic setting on the camera.
What follows are the manual settings (macro, no flash, spot focus, auto ISO), with variable white balance.
Average White Balance
Daylight
Halogen
White Set (I am not sure what this means)