Showing posts with label buildings. Show all posts

Tuesday, September 23, 2014

Bamboo Huts

Back in 2004, the editor of Minitaure Wargaming dot Com created two 25/28mm size bamboo huts with burned out versions.  You can find the article here: http://www.miniaturewargaming.com/index.php/mwg/comments/bamboo_hut_paper_models/ which includes a download link for the pdf files.

I had downloaded the files but had not done anything with them for a long time.  Then Lori Brom announced the theme for Colonial Barracks 2014 as "And Two Battalions of Marines."  So I thought, dust off my Between the Wars "China" Marines and see what sort of scenario I can devise.  I decided on a rescue mission as the Marines go in to help some missionaries fleeing from a notoriously unstable warlord.  For that scenario I needed a trading station along a river as the end point in the rescue.  Ah ha! I'll use those bamboo hut models.  Crank up the printer and pull out the glue, let's get building, boys!

The two bamboo huts were quickly printed and construction began.  I used artist's matte board sandwiched between the outer and inner walls to stiffen them.  The walls, floor, and roof were all printed on 110-lb card stock.  The outer floor supports were made from Q-tip sticks (cotton buds for my European readers).  The smaller hut (3" x 3" roughly) would be the traders' living quarters and the larger (3" x 4" roughly) would be the trading post itself.

The smaller hut with the walls all glued together.  I made two sets of walls and glued one inside the other to have a passable interior.  The white box underneath is part of the foundation and will be painted to disguise it.  The two figures are 28mm Foundry Darkest Africa explorers mounted on washers that have been glued to 1" square 3mm bases.

The foundation has been painted and the outer floor supports are installed.

Glued to a masonite (hardboard) base and some added scatter for grass.

The larger hut is not quite as far along as I ran out of time before my game to test the scenario last Saturday.  It has a stair added and will get an overhanging front roof section to provide cover for the trade goods.

The trading post along the river with a docked steamboat and a beached amphibious plane.  The smaller hut is to the left and the larger to the right.  The steamboat is one I made from plans in an old Foundry article.  The amphibious plane is a actual 1936 Keystone Loening amphibious plane that was issued as a coin bank.

Here's another view of the smaller hut with the Keystone plane (and an unusual visitor!).  The plane is very useable for all sorts of Between the Wars and Pulp settings.
I made the roofs on both buildings removable so figures can be put inside.  At some time I think I'll make corrugated metal roofs for both so I can vary their appearance.  These were easy to construct and look very realistic.  More later as I get the trading post building finished and the bases with better scenics.

Monday, July 21, 2014

Residential Houses - Finished

This past weekend I finally completed the two residential houses that I have been working upon for a couple of weeks.  From previous posts you will recall that these are paper mache "box" houses that I bought on sale at a local Michael's craft store.  Clad with paper brickwork adorned with doors and windows and paper roofing shingles, they are mounted on a 5mm foam core base.

Brick paving was added to the back in the form of a small patio and a walk to the back gate.

Here are the backyard walls with Missus Maude and Charlotta looking at the improvements.

On the fronts, I added iron rail fencing made from plastic sewing mesh that was suitably cut and trimmed and a cobblestone sidewalk.

The rears with all the brick paving in place, plus the walls and the rear cobblestone pathway intersected by the brick alley.

The front fencing has now been painted a gloss black and looks more like the wrought iron it is meant to be.

Grass has been planted in the small front yards and down the sides ...

and in the back yards.  The back yard walls have finally be glued into place.  The two houses are not glued into place but are held fairly securely by the front and rear stoops and the front fences and rear walls.

The final product in a sunny setting atop an old tree stump in my back yard.

And the rear view.
 In addition to finishing the two residential houses, the East Bergholt town hall was secured to its base, also 5mm foam core.

The borders were covered with cobblestone sidewalks.  The town hall still needs its sign over the front door.  The back door may become the town constabulary entrance if I can't find a suitable building for them.


More anon as I still have a fourth "Michael's" building to clad, many more paper buildings to cut out and construct, and some more "wilder" hedges to make, probably using this technique that was posted on The Miniatures Page:  DIY Bocage Hedges .


Monday, July 7, 2014

Progress on Paper Mache Houses from Michaels

Back in January 2014, I was lucky to find four large paper mache houses on sale at one of our local Michael's craft stores.  Michaels Houses   Some time after that I discovered a web site with a wealth of building and scenery photographs.  CGTextures   You have to sign up to use the site but it doesn't cost anything.  Check it out and I'm sure you will find many useful images.  Even with the most basic imaging software (paint.net), I was able to add various windows and doors and maneuver bits and pieces around to make the appropriately sized skins.

From that site I was able to construct "skins" for the houses.  A month or so ago I finally started applying the "skins."  This is a report of the progress as of about a week ago.


Here is the roof section of one of the houses with the brick wall skin around the base and the roofing shingle skin being applied.  It was a challenge to work the shingling around the dormer but I had printed enough sections so I could piece it together.  Although I used glue sticks (background) for the main building wall sections, I used white glue for the shingling and the chimney skin.  It seemed to work just as well as the glue sticks.


Here is one of the houses almost completely clad in its "skin."  At the time I took this picture I still had to print some more corner moulding for the upper section.  That has been done and it looks much better.  This building will eventually be my town hall for East Bergholt.  The figure is a 28mm Battle Honours early WW1 British officer who is being used as the lieutenant colonel commanding the Anglican coalition forces in south-west Suffolk in my Very British Civil War universe.


And here is a second building (on left) being clad in its skin.  I cut and moved the wall pieces higher towards the divide between the lower building part and the roof part which, I think, makes the buildings look better.  The piece I trimmed off the top was then glued along the bottom.  This second building and a third similarly clad are being mounted on a piece of foam-core to serve as a small set of apartment buildings for my town.  They will have walled back yards with a brick patio and some flower beds.

The second and third buildings now have their complete "skins" applied.  I still have a fourth one to do which will hopefully happen later this week.  Another progress report will be forthcoming.

Cheers!

Tuesday, January 28, 2014

Houses from Michaels

Last Monday I was out in northeastern Jackson metropolitan area and stopped by the Michaels store.  While there I found a clearance area containing a number of different size and shape paper mache boxes.  There were four in the shape of two story houses which I bought for 99 cents each.  Even if I botch the "artwork" to decorate them as houses, they were well worth the expenditure.

A Royalist officer and a BUF commander pose in front of a newly acquired house.   As you can see from the ruler, it is about 6" tall to the ridge of te roof and 7" to the top of the chimney.  The roof comes off so that things can be placed inside, which also means we can put troops inside.  I'll decorate these with  doors, windows, and other trim.

A view with the roof removed, showing the front dormer and the side chimney in better detail.

Two of the houses side by side, each being about 5-1/2" wide and about 4-1/2" deep.  I think they will look good both as stand alone buildings and as row houses.
More later as Campbell's Construction Company works its "magic" on these.


Thursday, October 8, 2009

September 2009 Painting

Since I was preparing for two "big battalion" games this month (one on September 19 and the other on October 3), I didn't get much painting done - just 10 "Olley" points. But I did construct two rather large paper buildings, including a walled cemetery and graves for one.


This figure is a mounted officer from the (sadly) out-of-production Spanish range from the London Warroom. He is a very nice casting, waving his hat to encourage the troops, and sits very well on his horse. For my two games, he played a role as commander of one of the Reichsarmee brigades in the Imperium army.


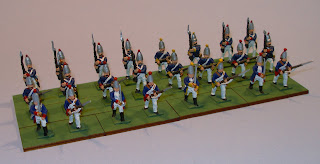
During September, I painted 8 of the 24 figures in the unit of Hessian grenadiers. The other 16 have been painted for a number of years. The 8 new figures are all in the front rank and are Miniature Figurines SYW figures. The rest of the unit are Miniature Figurines (the advancing poses) and an unknown (to me) manufacturer (the march attack poses). This battalion is actually part of my American Revolution army but was drafted to play the role of a converged Reichsarmee grenadier battalion.

Later edit: According to DC, in his comment, the march attack figures are from Garrison Miniatures.


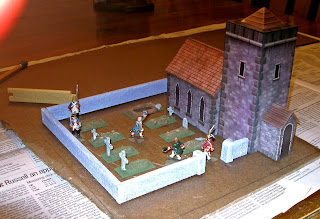
You've seen this church before as I posted an "under construction" entry earlier in September and it was featured in The Affair at Alt Kirchendorf, the first "big battalion" game I ran on Saturday, September 19 (see earlier posts for the 3-part battle report). Please see The Old Church posting for more details.


Here it is "in action" with its cemetery garrisoned by a company of Carpanian grenadiers.


The other paper building was the cannon foundry at Eisenmuhlen (which means iron mills in German). This building is actually in two parts which can be used together or separately. As was the church, the paper walls were glued to a foam core sub structure. The roof on the one-story part is removable. The cannon are a pair from RAFM.


And here is a shot of it on the battlefield of The Affair at Eisenmuhlen, which was the "big battalion" game I ran on Saturday, October 3. There will be more pictures of it in the battle report, which is still to be posted.

For October, I've already started on a third company for the Regiment Eisenmuhlen (RSM95 British infantry). I also will, finally, begin work on my 28mm French and Indian War figures and hopefully begin some work on the Regiment Royal Eccossais, using Old Glory figures.

Tuesday, July 8, 2008

June 2008 Painting

Almost all my painting time in June was spent getting ready for the big Zulu game I was running at our regional convention, Bayou Wars (see previous post). Many, many movement trays had to be cut and painted, several hills made, and the "Royal Kraal" (also on previous posts) constructed. So I did not get a single soldier painted.

But I did get a few little trinkets at Bayou Wars. The first being a pre-painted European style house, with a removable roof, that can be used almost for any period from Medieval to Modern.


Here you can see a SYW Russian (Courland) artillery officer and three of his artillery fusiliers outside the house.
And the same group of figures are posed here, with one of the fusiliers now moved inside. The roof is deliberately askew to show its removability.

And I also purchased this fine pavillon for a headquarters tent. It was unpainted and I decorated it in the colors of the Markgraf of Carpania, one of my SYW imagi-nations. I don't have any individually mounted Carpanian infantry painted right now so I used a couple of Courlandian artillery fusiliers to show the scale. It is slightly undersized but not so much as to be obvious.

I will get back to full painting mode this month as I've already started on a batch of senior officers, ladies, and other civilians to decorate the rear areas and a company of 15 jagers for the Markgraf of Carpania's army. Most of the civilians are Old Glory (from the Island Governor's set) and the jagers are Old Glory AMR Hessian jagers.

Well, enough of this. Back to the painting desk.

Thursday, June 19, 2008

Building the "Royal Kraal" - Part 2

Once I had all the wall sections put together and painted a dark gray, I then glued them to the base using Liquid Nails. Larger poles delineate the corners and the gate.

As I said in Part 1, the huts are paper mache bird houses from Michaels that have had the door enlarged and some basic painting done to simulate thatched roof and walls. Several "true" 25mm Ral Partha Zulus are posed at the gate to give some scale.


After the Liquid Nails had dried, I then dry brushed the walls with a light gray to simulate weathering and painted the exposed base with a darker brown. I was going to add some flock and ground cover, but I ran out of time. That will come later.


And finally an aerial view of the kraal.