CRUD Operation in REST API using PHP
Last Updated :
10 Sep, 2024
A REST (Representational State Transfer) API allows communication between a client and a server through HTTP requests. PHP, a widely used server-side scripting language, is well-suited for creating REST APIs due to its simplicity and rich ecosystem. This article provides a step-by-step guide on building a REST API in PHP, covering various approaches, detailed explanations, syntax, examples, and output. Additionally, we'll discuss the prerequisites, provide a structured folder setup, demonstrate the process of creating and testing a basic REST API, and include steps for creating a database with sample data.
These are the following topics that we are going to discuss:
What is a REST API?
A REST API (Representational State Transfer Application Programming Interface) is an architectural style that allows communication between different software applications over the HTTP protocol. REST APIs use standard HTTP methods such as GET, POST, PUT, DELETE, etc., to perform operations on resources, which are typically represented in formats like JSON or XML. REST APIs are stateless, meaning each request from a client must contain all the information needed to understand and process the request, with no session state stored on the server
Steps to Set Up XAMPP
Step 1: Download and Install XAMPP
- Download XAMPP from Apache Friends.
- Follow the installation wizard to install XAMPP.
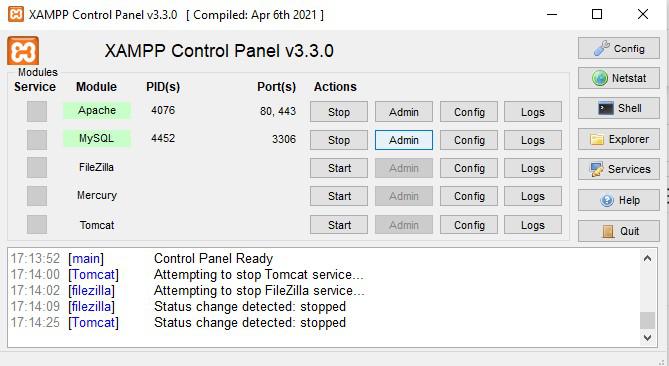
- Once installed, open the XAMPP Control Panel and start the Apache and MySQL services.
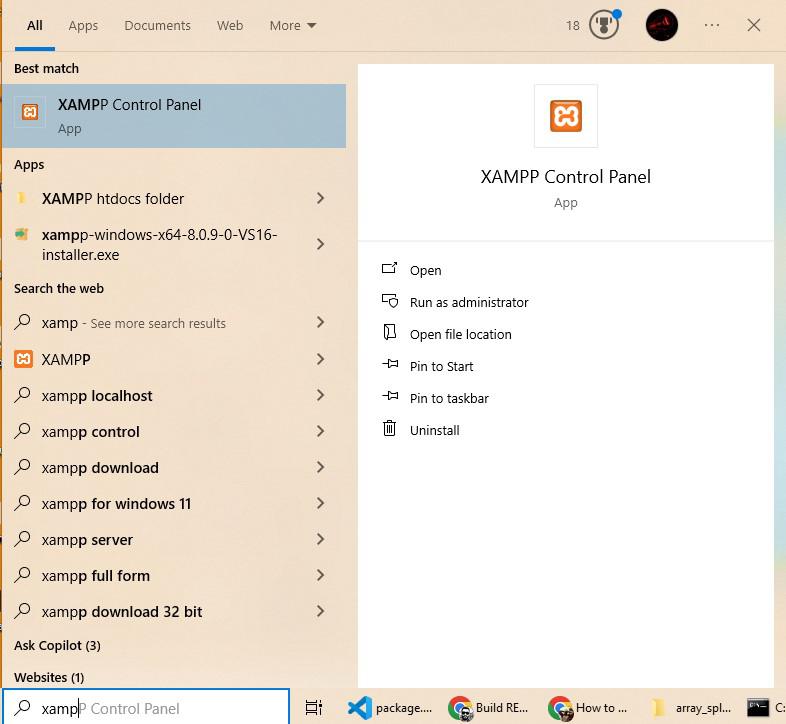 Type in search box xampp Control Panel and click on open
Step 2: Create a MySQL Database
Access phpMyAdmin
- In the XAMPP Control Panel, click "Admin" next to MySQL. This will open phpMyAdmin.
- In phpMyAdmin, click on the "Databases" tab.

- Create a new database called myapi_db.
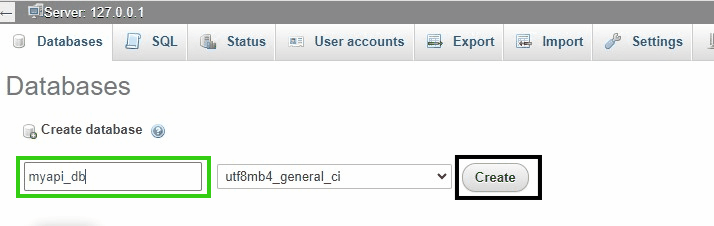 Enter database name myapi_db and click on Create button.
Step 3: Create Table
- After creating the database, select myapi_db.
- Create a users table with the following fields: id, name, and email.
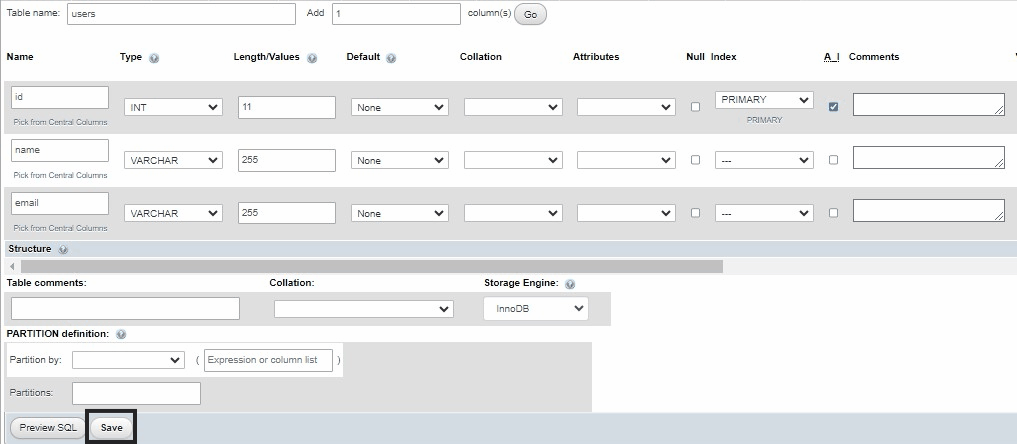 table model
- After save we will insert sample data into our users table:
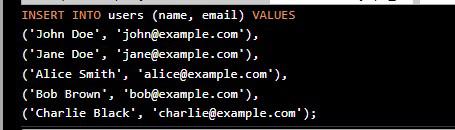
INSERT INTO users (name, email) VALUES
('John Doe', 'john@example.com'),
('Jane Doe', 'jane@example.com'),
('Alice Smith', 'alice@example.com'),
('Bob Brown', 'bob@example.com'),
('Charlie Black', 'charlie@example.com');
- Copy above query and paste into your database console and press Ctrl+Enter.
 command
- After inseting sample data into users table:
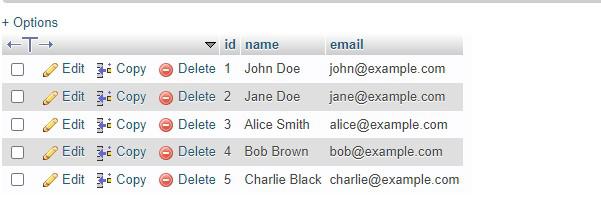 Table
TableSteps to create the PHP REST API
Step 1: Create Project Folder
- Navigate to the htdocs folder inside the XAMPP installation directory (e.g., C:\xampp\htdocs).
- Create a new folder called my-php-api.
Command:
mkdir my-php-api
Step 2: Create a Database Connection File
- Inside the my-php-api folder, create a new folder called config.
- Inside the config folder, create a file called database.php.
PHP
//  config/database.php
<?php
$host = 'localhost';
$db_name = 'myapi_db';
$username = 'root';
$password = '';

try {
    $conn = new PDO("mysql:host=$host;dbname=$db_name", $username, $password);
    $conn->setAttribute(PDO::ATTR_ERRMODE, PDO::ERRMODE_EXCEPTION);
} catch(PDOException $exception) {
    echo "Connection error: " . $exception->getMessage();
}
?>
Step 3: Create the API File
- Inside the my-php-api folder, create a new folder called api and a file called users.php
PHP
// api/users.php
<?php
require_once __DIR__ . '/../config/database.php';

header("Content-Type: application/json");

$method = $_SERVER['REQUEST_METHOD'];

switch($method) {
    case 'GET':
        // Handle GET request (Retrieve Users)
        $stmt = $conn->query("SELECT * FROM users");
        $users = $stmt->fetchAll(PDO::FETCH_ASSOC);
        echo json_encode($users);
        break;

    case 'POST':
        // Handle POST request (Create User)
        $data = json_decode(file_get_contents("php://input"));
        $sql = "INSERT INTO users (name, email) VALUES (:name, :email)";
        $stmt = $conn->prepare($sql);
        $stmt->bindParam(':name', $data->name);
        $stmt->bindParam(':email', $data->email);
        if($stmt->execute()) {
            echo json_encode(['message' => 'User created successfully']);
        }
        break;

    case 'PUT':
        // Handle PUT request (Update User)
        $data = json_decode(file_get_contents("php://input"));
        $sql = "UPDATE users SET name = :name, email = :email WHERE id = :id";
        $stmt = $conn->prepare($sql);
        $stmt->bindParam(':name', $data->name);
        $stmt->bindParam(':email', $data->email);
        $stmt->bindParam(':id', $data->id);
        if($stmt->execute()) {
            echo json_encode(['message' => 'User updated successfully']);
        }
        break;

    case 'DELETE':
        // Handle DELETE request (Delete User)
        $data = json_decode(file_get_contents("php://input"));
        $sql = "DELETE FROM users WHERE id = :id";
        $stmt = $conn->prepare($sql);
        $stmt->bindParam(':id', $data->id);
        if($stmt->execute()) {
            echo json_encode(['message' => 'User deleted successfully']);
        }
        break;

    default:
        http_response_code(405); // Method Not Allowed
        break;
}
?>
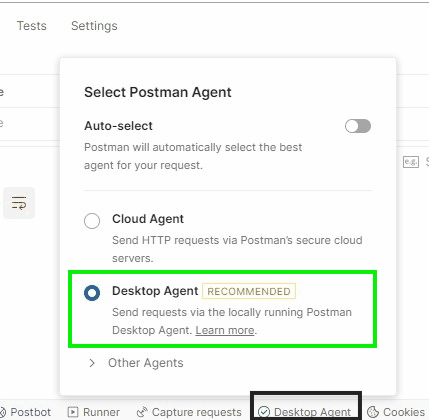
Test the API Using Postman
Now that the API is ready, we can test the CRUD operations using Postman. Before sending request using postman we have to set up desktop agent because we are testing locally so follow the given below steps:
- Access Postman in your browser.
- Click Postman Agent then select Desktop Agent.
1. Testing the GET Request (Read Users)
- Open Postman and create a new request.
- Select the GET method and enter the URL: http://localhost/my-php-api/api/users.php.
- Click "Send" to fetch all users.
2. Testing the POST Request (Create User)
- In Postman, select the POST method and enter the URL: http://localhost/my-php-api/api/users.php.
- In the "Body" tab, select "raw" and "JSON" format.
- Enter the following JSON:
{
    "name": "New User",
    "email": "newuser@example.com"
}
- Click "Send" to create a new user.
3. Testing the PUT Request (Update User)
- In Postman, select the PUT method and enter the URL: http://localhost/my-php-api/api/users.php.
- In the "Body" tab, select "raw" and "JSON" format.
- Enter the following JSON to update the user:
{
    "id": 1,
    "name": "Updated User",
    "email": "updated@example.com"
}
- Click "Send" to update the user.
4. Testing the DELETE Request (Delete User)
- In Postman, select the DELETE method and enter the URL: http://localhost/my-php-api/api/users.php.
- In the "Body" tab, select "raw" and "JSON" format.
- Enter the following JSON to delete the user:
{
    "id": 1
}
- Click "Send" to delete the user.
Conclusion
In this article, we demonstrated how to build a simple REST API using PHP and MySQL, covering basic CRUD operations. We used XAMPP to run our local server and MySQL database, and Postman to test the API endpoints. By following the steps outlined in this guide, you can easily extend the API and add more functionalities based on your project requirements.
Similar Reads
CRUD Operation in REST API using PHP
A REST (Representational State Transfer) API allows communication between a client and a server through HTTP requests. PHP, a widely used server-side scripting language, is well-suited for creating REST APIs due to its simplicity and rich ecosystem. This article provides a step-by-step guide on buil
5 min read
REST API CRUD Operations Using ExpressJS
In modern web development, REST APIs enable seamless communication between different applications. Whether it’s a web app fetching user data or a mobile app updating profile information, REST APIs provide these interactions using standard HTTP methods. What is a REST API?A REST API (Representational
7 min read
Best Practices For REST API Testing
REST, or Representational State Transfer, is a type of software architecture that is commonly used for building web services and APIs. A REST API is an application programming interface (API) that uses REST principles to expose data and functionality for client applications to access. REST APIs are
8 min read
How to generate API documentation using Postman?
Postman is a popular API testing tool that is used to simplify the process of developing and testing APIs (Application Programming Interface). API acts as a bridge between two software applications which enables them to communicate and share data. In this article, you will learn how to generate API
2 min read
Using Curl to make REST API requests
REST APIs are essential for modern web applications, enabling programmatic interaction with data and functionality. Curl is a command-line tool for making web requests, often used directly from the terminal. For example, curl -L ip.ba3a.tech fetches IP address details in JSON format, just like visit
5 min read
How to get form data using POST method in PHP ?
PHP provides a way to read raw POST data of an HTML Form using php:// which is used for accessing PHP’s input and output streams. In this article, we will use the mentioned way in three different ways. We will use php://input, which is a read-only PHP stream. We will create a basic HTML form page wh
2 min read
REST API Introduction
REpresentational State Transfer (REST) is an architectural style that defines a set of constraints to be used for creating web services. REST API is a way of accessing web services in a simple and flexible way without having any processing. REST technology is generally preferred to the more robust S
4 min read
Download file from URL using PHP
In this article, we will see how to download & save the file from the URL in PHP, & will also understand the different ways to implement it through the examples. Below are the approaches to download file from URL using PHP: Table of Content Using file_get_contents() functionUsing PHP CurlUsi
3 min read
Create and Send API Requests in Postman
Postman serves as a flexible tool, simplifying the system of crafting and checking out API requests. In the world of software, APIs(Application Programming Interfaces) are the constructing blocks for packages to speak with each other. In this article, you will find out how Postman turns into your go
4 min read
Stock Market API Integration in Node.js
In this article, we are going to build a simple web application, in which we would learn how we can integrate a simple API with NodeJS and fetch data from the server using that API. Here, we will learn about what API is, how to get data from the Server using that API and all the stuff related to tha
15+ min read