Douglas Miniatures Logo

Douglas Miniatures Logo
Showing posts with label WW2 Normandy. Show all posts

Friday, 20 June 2025

The Battle For Donville - Rapid Fire

 Bob Black came over for a quick game earlier in the week and after a beer and a light lunch we went to the war room, where I had set up a scenario borrowed from the July 2025 Miniature Wargames (credited for the map):

Essentially, US forces in the shape of an infantry company are holding the vicinity of the central farm, while elements of 17th SS Panzer Division, supported by Stug IIIs, Panzer IVs and the 17th Artillery Regiment.

The US forces have advance warning of the German attack and rush to send reinforcements to the area.

Here is the table, looking at the central farm area, viewed from the north.  The US infantry can be seen lining the hedgerows around the farm, a single Sherman has arrived and there is a machine gun covering the diamond shaped field within the small copse.  An FOO team has also turned up and moves towards the taller of the three buildings:

German infantry arrive, emerging from a wood on the western edge of the board and move towards the farm:


Bob, playing the Germans, sends his first Stug III rushing up the road and straight into the field adjacent to the farm. The Sherman takes aim - and misses.  The Stug fires and the Sherman is destroyed:

A US bazooka team flanks the Stug from the hedge, but they are out of range. Now the US troops are in trouble, with an assault gun in the area of the farm and nothing to deal with it.

Meanwhile the German infantry begin to work their way through the hedgerows:

Some enter the field and are mown down by the concealed US machine gun:

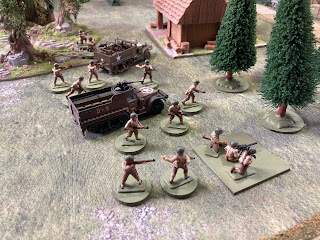
To add to the US woes a second Panzer Grenadier company with heavy weapons dismount from their half tracks and follow up behind the Stug:
The Stug, meanwhile, crashes through the hedge and engages the US infantry, some of whom retire into the farm buildings. German artillery hits the farm and HE rounds from the Stug cause casualties. 


The Panzer grenadiers close in, but they come under fire from US artillery and small arms:
The US machine gun is taken out by German artillery and heavy fire from the hedge, allowing the German troops to close onto the farm:

Most of the US defenders are either dead or wounded and the farm is quickly cleared and occupied by German infantry.  The Stug takes up position in the farm to cover the approach road:

To make matters even worse, a second Stug arrives and rumbles up the road to support the Panzer Grenadiers in the field, who have taken heavy casualties from flanking fire:
This final US defence is soon disrupted as the half track pours machine gun fire into their position. Despite three shots from the Bazooka team, all miss and the half track causes havoc:
At this point the first US reinforcements, in the shape of armoured infantry and heavy weapons company arrives:
But, it is too late.  The Germans have two tanks and a half track in the farm, with the remnants of two infantry companies.  Also, the US FOO spots more Panzer Grenadiers approaching the farm across the fields:
Outgunned and with the Germans in control of the farm and key road junctions the US commander calls it a day and withdraws what he can save.  This was a resounding win for the Germans.  A very interesting game that played well with Rapid Fire rules.  The loss of the Sherman early on was a major disaster and spreading the US infantry out too widely was probably a mistake, putting the Bazooka team out of range.


Friday, 27 October 2023

WW2 Rapid Fire Game

 I have been itching to have a go at Rapid Fire, having bought the rules last year.  I have watched a few games and understood the basics.  Will came over a few days ago and it seemed like a good opportunity to have a play.

For the game, I cobbled together a US infantry battalion and a battalion minus of German troops.  The US had four Sherman 75mm tanks and the German two Panthers.

The Germans occupied a small village and crossroads in bocage/Normandy type terrain.  Each side had a mortar platoon, a couple of heavy machine guns, anti tank teams as well as rifle companies:


The Germans concealed themselves in some of the buildings and their two tanks covered likely amour approaches


A full company lurks behind a hedge, with an anti tank team. The Germans have an OP in the tall building. A machine gun covers the road.
The US forces start in a farm complex, with their OP in the roof of the arched building.  Sherman tanks are lined up along a track:
The action kicks off with the US advancing on their right, quickly bring down mortar fire on themselves:

Shortly after, the four Shermans advance with two entering into a field.  A Panther moves forward and quickly knocks one out.  Mortar fire still rains down on the US infantry, but does not cause many casualties.
A third Sherman attempts to move around the flank, supported by more infantry.
However, the second Panther advam]nces and quickly destroys this Sherman and effectively prevents the infantry advancing.
A bazooka team creep forward to try and take out the Panther on the road and they attract some more mortar fire. Supported by two Shermans the Bazooka eliminates the threat from the Panther, leaving it burning in the road.
With the threat from the Panther gone, US infantry can now move across the wheat field and flank the German machine gun covering the road
The German machine gun withdraws and once again mortar bombs rain down on the US troops in the wheat field.
One of the German anti-tank teams moves down the road to counter the US advance in the centre but attracts the attention of the US observers and they too suffer from a mortar bombardment.  Also, the second Panther reverses back to the road and moves over the the area of the crossroads to deal with the remaining Shermans.

With the second Panther out of the way, US infantry that were held up are able to advance, but they run into another German machine gun and infantry in one of the buildings.  They suffer casualties and are effectively stopped in their tracks.

Meanwhile, the second Panther appears on the road and destroys the two remaining Shermans.  In the far distance US infantry work their way through the orchard but are ambushed by more concealed German infantry, taking more casualties.  The US infantry in the wheat field push through the hedges and enter the fir wood but they too come under heavy fire from nearby buildings and the second German machine gun.
US mortar fire stops the machine gun from being too effective, but with all of the US tanks destroyed, a Panther on the loose and at least two companies of German infantry in the village, with mounting casualties, the US attack falters.

This first attempt with these rules worked quite well once we had got to grips with them and the game moved quite quickly.  The Shermans made little impression on the Panthers.

We set up a new battle and swapped sides.  Initially the US did well however, once the panthers appeared on the scene the result was very similar.  US troops left the field tail between legs leaving their burning tanks behind.  It would be interesting to play again with less powerful German tanks.

The figures used are all by Valiant Miniatures and the tanks are Italeri Fast Builds.