Showing posts with label Dutch-Belgians. Show all posts

Thursday, 18 June 2020

Waterloo Day!


It is June 18th and in tribute to the holiest of days for the Napoleonic fan [ ironically, as it the anniversary of the start of his final political defeat ] it is usual for the wargamer to show his Napoleon model or complete a re-game of the battle or some such.  However, I thought I would show some of the ‘unknowns” of the battle : the Dutch-Belgian Cavalry.

My Dutch-Belgian Waterloo contingent

Now any casual Napoleonic military historian knows of the heroic charges of the French horsemen led by Ney to confront the Allied infantry in square; or the charge of the Scots Greys immortalized by a dramatic painting by Lady Butler.

 But, but, but there were a whole lotta other cavalry at the battle - or at least that is what the orders of battle show us.  What about them?  Well, for starters, the winners get to write the history as the saying goes and the Duke of Wellington, being the winner - OK, then, on the winning side - made damned sure the British were the winners. Oh sure, the Prussians many have helped but calling the battle “La Belle Alliance”as suggested by Blucher? Certainly not,  when a nice English sounding town name of Waterloo was only a few miles away.  However fully a quarter of his army was German, and he did not even mentioned the numbers of Dutch and Belgian soldiers he offered to the gristmill of combat.  It is to those unsung which I offer photos of their cavalry units I made from plastic.  [ mainly 28mm Perry, but some on Fireforge medieval horses and details from various components ]

The 3rd (Dutch) Carabiniers 

The 3rd (Dutch) Carabineers were in Tripp’s Heavy Cavalry Brigade and while many illustrators have suggested they wore a rather impractical large bicorne headdress, Dutch historians suggest they might well have had the the elegant metallic helmet often shown with the more popular 2nd Regiment.

The 2nd (Belgian) Carabiniers 


Next up are the 4th (Dutch) Light Dragoons of Ghigny’s Brigade
4th (Dutch) Light Dragoons
held in reserve at the start of the battle along the Brussels road.  Now, what did they do in the battle?  The British writers do not tell us. However they do offer that the nobel Englishman Earl of Uxbridge,  the overall cavalry commander - and given that role only the day before! - ordered some Dutch-Belgian units to follow him in a charge which they did not.  Thus the label of cowards were attached to all D-Bs.  But if a man you did not recognize, speaking an incomprehensible language suddenly arrived demanding you commit your life, would you immediately agree?!
Anyway,  they are a handsome lot and pretty on the table.


Lastly we have the 5th (Belgian) Light Dragoons who are recorded in combat at Quartre-Bras earlier in the campaign against the very similarly attired French 6th Chasseurs also in green and yellow. Reforming from that combat - or retiring or retreating or routing - all depending upon the narration given, were unfortunately fired upon by friendlies due to the uniform resemblance.  But we know they fought as did probably all the other Dutch-Belgian units and they certainly will in my future Waterloo tabletop battles.

Thursday, 1 November 2018

Torso Lust


You have some lovely left-over torsos.... and some cavalry trooper legs extra from constructing plastic horsemen ....and you are thinking they would make a wonderful second unit, but you have no further horses…..

Perry Miniatures cleverly offer separate horse sprues and so I ordered some of the British Light Dragoons horse sprues that I might create the 5th (Belgian) Light Dragoons for the Waterloo campaign.  The Perry horses sport plain blankets without the usual shabraque (the long pointed saddle cloth of British full dress) so can be used for other units dressed without that piece of kit.

However, once they arrived, I noted/remembered that the models do sport the historical British trait of ‘docking’ or trimming the tails of their horses.  But the Belgians did not.  So out came the “green stuff” epoxy putty to fill out the tails.  I also needed to cover the ‘indent’ in the front of the right-side region of the saddle where the British would store the carbine but that I did not use, as the Belgians would instead attach the carbine to their shoulder strap in French fashion.
Rather fuzzy photo but the elongated tails and saddle "repair" work can be noted

These are on the a-list of units to paint…..

Saturday, 15 September 2018

D-B Heavies

Dutch-Belgian Napoleonic heavy horse...ironically in lightweight plastic....

While yes, Perry Miniatures do have the Dutch-Belgian Carabiniers in metal, I rather fancied doing them in plastic so upon spotting a Perry French Dragoon box on sale at the local store, I could not resist converting these into a couple of companies for the 1815 Hundred Days campaign.

While many sources suggest the helmet was only worn by the 2nd (Belgian) contingent, I went for full-on regulations mode and gave my 3rd (Dutch) Carabiniers spare French plastic versions modified with addition of the badge plate on the front and plume. The bicorne is the suggested head gear but these helmets could have been worn and are far more handsome!

The existing French valise version has the greatcoat folded on the top which was removed and the greatcoat was added using ‘green stuff’ around the shoulder on most, which was a common D-B trait apparently.  The Perrys, for production sake, attached the cartridge box to the valise, but a minor point to glue to the appropriate location on the torso.

The French Dragoon saddlecloth, sheepskin fur and basic uniform was close to identical to the Dutch-Belgian version so no changes required other than the colours of course. (perhaps the valise should be rounded instead of square but I consider that a minor issue).  Many of the sources do not indicate the fringed epaulettes on the Dutch as the Perrys put on theirs, so the existing shoulder straps are fine.

As the intended use is with a group of fellows doing primarily French and British for Waterloo, I am having fun creating the rarely thought of Dutch-Belgians to add a bit of different color to the affair.

addendum:  Found the following Knotel illustration (famous military uniform author) for the Dutch heavies, in this case the other Dutch regiment often also shown in the bicorne rather than the helmet I have opted.


Wednesday, 29 August 2018

Painting gone rampant


Coming off the painting table quickly from the last couple of days. First off, an elite company of French CaC with the fringed epaulettes. Perry plastics.


The Netherlander 4th (Dutch) Light Dragoons of the Waterloo Campaign were a bit more interesting build.

Within the Perry British Light Dragoon box of plastics one can build either the earlier 1800-1812 types or the later 1812-15 uniform. The troopers horse is the same for both (the officer’s saddlecloth comes with the end either pointed or rounded for earlier or later era) Thus, you get an early and late uniform together with different headdress for the changes during the years.

I noticed a great similarity between the 4th Netherlander LD of 1815 and the early British uniform tunic both showing ‘hussar’ lacing so began with the earlier torsos adding spare French hussar campaign trousers from which I removed the large side buttons leaving a wonderful leg seam. Painting hides much of the scraping to a large degree.  I used a brighter dark blue uniform color to add to the distinction from other British and French units and which I have seen in several illustrations.

The later British uniform added a sabretache and portrayed by the Perrys in addition, thus leaving the earlier era scabbard-only, which is perfect as the Dutch light dragoons did not use them.

The headdress is the 1809 Russian infantry shako with the nice long cords and on which I glued a plume removed from spare mirliton headdresses.


The big drawback from using the “second-set” of figures from the box is the lack of horses to mount them upon.  Yes, Perry does offer horses separately but I had a group of Fireforge medieval horses available on which I added green-stuff as front blanket roll to make them a bit more Nap.
I made an error of not allowing for a rear saddle valise/portmanteau under the sword slings (the belts holding the scabbard) so I did not add.  But I did make a few GS forage sacks for variety.

Why the medieval horses?  Well I had picked up them up, along with half-built riders at a Bring&Buy.  At the time I had little interest in another collection of medievals ( I bought them anyway…the hoarder within me, I guess…) but looking at pile of plastic for fantasy but nicely caparisoned horses  ( again, hoarded away....) I decided that, while not fitting perfectly, the riders could be ‘glued’ on with GS forming the saddle.
Thus those medieval riders lost their plain mounts for covered versions and I gained 12 additional Napoleonic horse and, with the add-ons provided, created another two units for what is essentially free.

And their missing saddlecloths? Well, the story is: the colonel seeing them dirtied and water soddened from the heavy June rains, had the men remove these expensive items.  My take anyway!

Tuesday, 21 August 2018

Summer game - Albuera


The “Summer Game” this year included a surprise major flank attack.  Always tough to do on the tabletop.  Must keep it secret (or else what is the point…), have the players accept that: “whoops, things are not quite how you might think they are” and still make it still interesting for the players to make a fair game of it.

Luckily for me, as “Game Master / Scenario Designer / Deliverer of Information”,  I had a good group of wargamers who readily accepts such trials with aplomb.  In this case, the Battle is Albuera, the Peninsular War/ Spanish Napoleonic affair, in which the outnumbered French under Soult, sought to out flank the British/Portuguese/Spanish army to relieve a British siege - or as I suggested ‘take Brussels’ as I substituted the afore mentioned with British/Hanoverians/Dutch-Belgians/ Brunswickers from my Waterloo collection.
My Dutch-Belgian militia playing the part of Spanish troops now in an about-face from their original position to face the very wide French flanking maneuver.
Westphalians on the Albuera river bridge.
 Unlike Godinot's efforts they
did not advance against the town.

To keep the subterfuge, I renamed all the commands.  For those who might want to follow at home, I list the OOB:
Allies
Colville = Cole (some British, some Hanoverians/Portuguese)
Cooke = Stewart (with the best of the British regiments)
Clinton = Lumley (with all the cavalry)
Alten = Hamilton (Hanoverians playing Portuguese)
Chasse = Zayas (with the best of the Spanish)
Perponcher = Ballesteros (with the rest of the Spanish)
Brunswick = Lardizabal (the black clad lads as the Spanish vanguard)

French
Junot/Westphalians = Godinot
Reynier/Saxons = Gazan
Bertrand/Italians = Girard
Morand/French = Werde
Pajol with the cavalry = Latour-Maubourg

The element ratio to actual troop numbers is a bit different for this battle as it is a bit smaller than our usual affairs so 1:1,000 for the infantry, 1:800 for the horse and 1: 1 battery for the artillery.  The experienced Ron and James  (who drove all the way from Oregon to participate!) were amazed at how few artillery shot they would have, especially after the cannon heavy affair of Borodino a few games ago)
Duchy of Saxony "helping" the French...a good excuse to get these boys on the table.  (converted plastics) 

Now for readers familiar with this historical battle, I did not have the player place their commands in the actual positions but allowed a rather ‘free-form’ affair.  To be forthright, I did describe much of the pre-game scenario set up to suggest the French would attack all along the river.  To add to the surprise for the British/Allies, I shifted the centre of the battlefield, as indicated by the bridge and town of Albuera, a bit to the right so leaving the tempting large area of their left open so subtly suggesting (?) the attack from that side whereas the historical attack, and that I allowed for the French players, was to the other. Not to have them cover the “corners” too closely I suggested they heed the military axiom that “he who defends everything, defends nothing”.  However, the Allies commanders ( James and Ron ) did spread themselves a bit thin as the frontal divisions covered much of the table. In their defence, they have played enough of my scenarios to know I will have surprises!  James said their plan was to have the Netherlanders and Hanoverians do all the initial fighting.   “To let the foreigners do all the fighting and then have redcoats come in finish the job and get all the glory. Instead, it was the Brits who took the blunt of French flank attack and we (shamefully) needed the arrival of Germans to save the day. The French very well could of had the better of us, but for stiff upper lips and all that…”
Birds-eye view of the initial French flanking maneuver. Much deeper toward the Allies rear than the historical attack.    
View of the French masses with the cavalry leading.  The French commander admitting that he left himself little maneuvering space.
As I did allow each side to plan in secret, even I was surprised by the British blocking force in front of the French cavalry. 

And indeed the French (et al) almost did collapse the British.  However, inexperience with the rules by the French players and a spirited defence allowed the British to recover and bring in fresh troops into the fray.
Alten's Waterloo uniformed Hanoverians (playing Hamilton's Portuguese) slowly, with Ron's poor move dice unfortunately, finally prepare to come into the battle.

The British army now virtually facing in the opposite direction but still allowed to maintain formations as the French fail to pin much of their army.

At a certain point Peter who controlled the majority of the flanking attackers for the French, did not think it prudent to continue the battle and so withdrew the majority of the force before it would collapse completely.  This left Jim, who controlled Junot’s/Godinot’s command, dancing around at the bridge, to accept the result and so end the battle.  James and Ron sighed in relief but British American (!) pluck saved the day.
As in the real affair, the French attack simply ran out of steam.

Monday, 30 April 2018

Battle of Ath (fictional)

The third battle of the fictional100.5 Days Campaign.
The Prince of Orange with his Dutch-Belgian aide. (Perrys)  Nominal commander of the Allied effort.  His tactical advise was not heeded but probably should have been.  The small independent Allied commands suffered as a result.
The Prince of Orange was nominally in command of the contingent of the Allied army consisting of the Dutch-Belgian divisions of Perponcher and Chasse, along with the British and Hanoverian brigades of Alten and British and KGL brigades of Clinton together with Ponsonby’s Heavy Horse. He was ordered to attack the seemingly small contingent of French sitting on the village of Ath.  Through intelligence confusion, it was thought the French were that of d’Erlon’ infantry and the weaken Exelman’s heavy cavalry corps from the battle at Leuze but it was indeed the corps of the determined Vandamme and Kellerman’s heavy horse ready in a defensive position holding Ath.
The early French movement by Kellerman and Quiot's Division to the left.
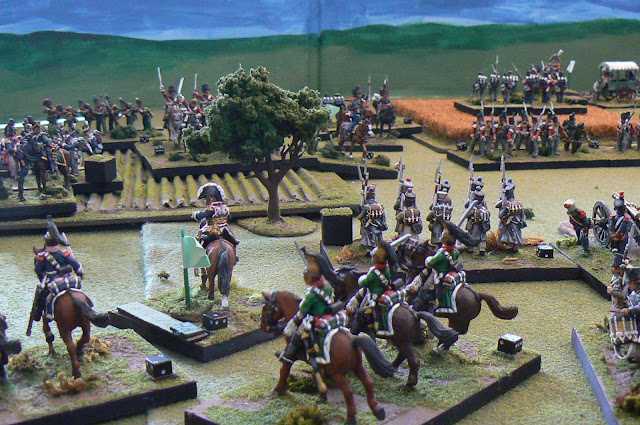
The early Allied advances.  On the right, already Perponcher's command is failing.  Ponsonby's small but strong British horse can be seen to his left wearing red coats and the Union Brigade's Scots Greys noticeable on their grey mounts.
Chasse's militia with orange flags are moving purposefully to the village of Ath (upper left of the photo).  Alten's command in line in the centre with Clinton's small contingent behind.  They would make no headway against the fire of the French guns (deployed on each side of Durette's division in the middle)
Given his military record, the Prince of Orange, offered no command assistance due to the experienced British divisional commanders stubbornly would not heeding his advise not to attack such a strong French position and numbers.
 [Ed. Note: I rolled for this eventuality as, while I had laid out the battle and even had DaveB’s agreement to the French deployment, I actually felt the Allies would not win such a game and so wanted to withdraw but was out-voted by the dice!]

Perponcher on the Allied right was to advance forcing Kellerman to counter thus giving Ponsonby and the British Heavies and chance to counterattack with advantage.  In the centre, Alten would try to pin the French centre with Clinton following up.  Chasse’s weak division of Dutch-Belgian militia would serve to pin the French force of Donzelot’s division in the village.
Chasse's Militia advance.  The figures are plastic conversions made from British bodies and French arms and packs!
Rather poor command by Perponcher this day (my poor dice rolling of his command PiPs throughout the game…) had his command already strung out and his rather strong artillery contingent was hurt as Kellerman’s horse artillery deployed far to the front, playing upon the limbered artillery and destroying two batteries which prompted Perponcher to deploy them too early.
Belgian line of Perponcher's command.  Plastic conversions by me from Perry British bodies, Victrix French arms, with Victrix British heads and one of Prussian. Packs are French.  The shako plates are close enough for me to be untouched. "Button-counters" might disagree.
On the Allied left, Chasse’s small division was better handled and immediately assaulted Ath as more to avoid the worst of the French artillery canister fire than in engaging in the urban fight.
However they found some success and fought tooth and nail with the veteran French within through most of the day only to be spent by the early afternoon.
Kellerman (the lone cuirassier wearing the bicorne hat - left-center) directs his cavalry. The green flag on the base is our command 'step-down' indicator which represents a half pip on the black die on his base.
Kellerman’s Horse made slow progress moving to the left against Perponcher’s Dutch-Belgians which held up the French infantry reserves of Quiot’s Division moving to that sector.

Ponsonby was observing these moves but was unwilling to move toward the French guns.  The French numbers in guns would tell in the battle and would influence much of what happened in the battle.  The early success of the artillery already weakened the Allied artillery strength concentrated in Perponcher’s command and the Allies had very little elsewhere to counter the French numbers.

Because of it’s concentration, the Dutch-Belgian artillery did have some success, notable singularly causing the loss of a cuirassier element but Kellerman’s command shrugged at that morale loss ( I rolled the required 6 on the command morale!) and continued to harass the Allied right flank commands.   Perponcher’s infantry was forced into square but some already battered, succumbed to the French horse.

In the middle, in face of massed artillery fire, Alten’s Division sustained heavy casualties and decided to finally heed the PofO’s opinion and turned his command away from the French guns’ canister range. Clinton, behind Alten, halted and thus the Allied attack in the centre faltered.

Ponsonby’s horsemen wanted a chance to attack the French dragoons and to perhaps grab victory however unlikely (I rolled for the likehood than that of a controlled withdrawal…very realistically given the British cavalry’s historical record!) However the LifeGuards failed to defeat the French veterans and the Union Brigade wisely did not follow but held.
the last important combat of the battle between the British Life Guards of Ponsonby's command and the green clad French dragoons of Kellerman.
At this point, the battle was very much in the French favour.  It might be noted that the brave Alten brought forward his only viable brigade to support Ponsonby’s failed attack of the French left, but Perponcher’s contingent was now spent as was Chasse. Ponsonby withdrew the rest of his horsemen to be prepared to play rearguard along with Clinton’s fine division unhurt in the middle but unable to make any impression on the main French force.
Kielmannsegge's Brigade of Hanoverians.  Each of the different uniforms represent the individual battalion sized regiments which constituted this formation during the historical campaign.

In the late evening, Allied elements were breaking while the French command morale was holding (the result of my rather lopsided die rolling I am afraid. However, the slow disintegration of the Allies was a logical result nonetheless and the morale chart will always reflect this) The Allied commands one by one started to withdraw. The French continue to hold Ath and the Allies withdrew, Ponsonby’s cavalry holding a successful rearguard action against the now weakened French horsemen.
The 52nd Light Foot Regiment and 95th Rifles of one of Clinton's brigades unengaged in this battle.

Vandamme toasted to the victory.  History will record that he did not immediately report his achievement to Napoleon.  His chief-of-staff would suggest the gathering of casualty numbers and dealing with the enemy dead as the reason. Nevertheless, the length of the engagement would not allow either side to offer contingents to any of their other forces in the area.

Analysis: Because of the lack of overall command in the Allies camp, each small division had it’s only a small command morale amount.  And while mathematically the modifying number is proportionally equal regardless of strength, the unified French commands did not suffer the potential morale loss as do the small Allied commands.  Interesting to note for fictional play rather than historical commands which is our usual staple game.

Saturday, 23 September 2017

Plastics = Conversions!

Reminiscing about past activity...a birthday at this stage of middle life, kinda encourages this behaviour I find... a couple of days ago,  had me looking at my 'old' collection of Napoleonics.  Full of vigour for this new effort to create the forces at the Battle of Waterloo, the Netherland 28th Infantry Regiment, Nassau-Orange, had a somewhat different uniform and I remember having fun creating its unique look.
the Netherland 28th Infantry Regiment, Nassau-Orange
The torso is Perry British with all the chest lace scraped away.  Their arms are Victrix French Chasseurs overcoat types, the shako Russian 1809 types with new plumes taken I think from extra hussar headdresses, and their packs are French.  So with different colour scheme, they look the part.

As I want them "transportable" the lightweight plastic is a great consideration. And great entertainment creating unique units from extras bits from other sources.

Thursday, 22 December 2016

Another Napoleonic ambulance

Following a rather fun production of a Russian Field Station (link), I sought to do a "the after-effects of combat"  for each of my Napoleonic armies.  What this says about my phycology vis-a-vis playing war but having enjoyment with toy soldiers is something I do not want to contemplate - mainly as it takes away from the fun! But it is something interesting to look at and eye-candy to place within the blank spaces on the tabletop.

This Belgian ambulance started as the Perry ACW version ( link )  I coveted and which I saw the possibility to convert.  Surprisingly little was needed.  Of course the heads needed to be replaced as to provide the appropriate headgear.  I added tails and turnbacks to the tunics along with epaulettes and cuff-flaps. The Belgians often tucked their trousers into the half gaiters so the pants, together with  the era's mens fashion having them wear loose under shirt and suspenders, has the original ACW fellow standing at the back of the wagon not out of place and thus without need of change.

The wagon, perhaps confiscated from a hapless Brussels civilian, surrounded by the Perry casualty pack, sets the scene of the clean up of the carnage of Waterloo.


Friday, 29 May 2015

Battle of Waterloo - Enfilade 2015 - the player's deployment

Having completed the historical affair, we reset for the "what-Napoleon-could-have-done-with-his-deployment" game.

French Commanders:
Ron - Lobau,  Reille and Milhaud
Doug - D'Erlon with detached Guard guns
Bob - Druout and Kellerman

Allied Commanders
Stephen - Perponcher and Picton
James - Uxbridge and Prince of Orange
Seth - Clinton and Brunswick

Having a better grip on things, I recorded the players and their commands, and as was playing this time, had a bit better grasp upon the events.  But only a bit better mind you.
The view high above the Allies right flank from the west.  For those viewing from the upper bleachers, Hougomont is in the near middle with La Haye Sainte, and Papalotte in the middle and upper middle respectively.  Allies to the left, French on the right. 
Milhaud's Cuirassier Division deployed just to the east of La Belle Alliance 
For this battle, James took the Allied commands of Uxbridge and Prince of Orange while Steven, our newest "recruit" and fresh from deployment in Afghanistan and in his second game, took Perponcher and Picton, with Seth taking Clinton and Brunswick's forces.
The French were Bob with the Guard and Kellerman's heavy horse; Ron with Reille, Lobau and Milhaud and myself with D'Erlon and much of the French artillery.

The French planned to have the Guard swing around Hougomont to assault the Allied right flank rolling it up along the crest line while Lobau's corps will take on any reserves in the area and D'Erlon will  hold the attention on the Allies left with pinning attacks and heavy artillery bombardments.
The left wheel punch by the French but the Allies still holding the ridge ( represented by the road ) as it is difficult to coordinate combined arms attacks in the confined area this battlefield offers.  No doubt in the back of Wellington's mind.
Reille's forces under Ron's command.  Both he and I had very poor dice luck this game.
The French plan was perhaps good but our dice luck was extremely poor.  I rolled four 1's in consecutive turns for maneuver and thus could not bring up much of my numerous artillery to any thing like full effect ( I guess the ground was STILL muddy ! )  and even with hits, these were brushed away by equalling rolls by the Allied players.  Sigh.
The Allies withdraw from the crest to avoid the French random artillery fire - ineffective as it proved firing blind over the crest line and unable to maneuver to the crest.  The columns of French moving seemingly without much enthusiasm due to my pathetic dice.
On the French left, the Guard detached half of the Young Guard and a portion of the Old Guard to screen Hogoumount from their advance, with Kellerman's cuirassiers sweeping out around the French left. As they approached the ridge, the Guard cavalry took advantage of several mistakes on the part of Clinton and beat back the Foot Guards from the crest line, combining charges with barrages from the Guard horse artillery and bayonets from the Young Guard. Though they were pushed back quite a distance from the crest line, Clinton managed to re-organize and establish a new defensive position a short distance away. As Clinton was being pushed back from the ridge, Kellerman's cuirassiers found the Brunswick infantry exposed in open ground outside of Braine L'Alleud.   Brunswick attempted to stem the tide of cuirassiers around the allied right, and in the process made a powerful claim to assume the name "Die Hards" from the Battle of Albuera fame. Despite catastrophic losses, the Brunswickers refused to quit the field, merely falling back to a position where they could support and be supported in turn by Clinton's Foot Guards. At this point the French center and right had been pushed back from the ridgeline, and the assault was largely spent. The screening force around Hogoumont was still fresh, but likely too little to late, and the French acknowledged that the First Empire had likely well and truly run its course.
Lobau's Corps.  The green labels can be removed and replaced with other commander names for other scenarios. The black dice record combat effectiveness.  Paperless. Just the way I like it!
The French left earlier at the start of the battle before it went downhill :-))
The Allies kept commands tight, unlike in the historical affair.  One does wonder about Wellington's command structure, and it would suggest he allowed all his commanders only local control and was predicated on the idea that he would arrive in time to control in any disaster. It seemed to work however.  The hand is moving the Dutch 6th Hussars representing the Merlen's Brigade of light horse.
One of my infantry brigades in square - note the cube marker on the right - having bounced the Netherland horse (in the distance ) but now about to receive close fire from the Royal Horse Artillery supported by the Belgian heavy horse et al.
the action from Action 5 News 'copter!


Like the veterans of Napoleon some thirty further years into their lives as old men looking back at the good-old-days, we wargamers remember only the glory of the battle, won or lost, on the war-game table some days after the event.