Showing posts with label fictional battles. Show all posts

Sunday, 9 April 2023

an Austro-Hungarian Landwehr action

Brought out my only "Austrian" Napoleonics for a quick solo game,  The "Hungarian Militia" are now sporting proper shakos while their former headdress of corsehuts hats now are adorned by the "Austrian Landwehr" wearing grey uniforms. The scenario was simply to have the French get to the brewery, load up the wagon full of beer and get back down one of the roads. The Austro-Hungarians were to approach from the east to stop them from doing so.

They are up against my dismounted French Dragoons.  I wanted to use the dragoons on the table as I recently added a horse-holder group from Brigade Games.  As not sure of the compatibility with the existing Perrys ordered only one group; and while the uniforms are early vs late war, the sizing is close.  

The discouraged French dismounted dragoons (indicated by the newly dug grave marker!). Showing the Brigade Games horse-holders 

The rules I made up on the fly, were a simple 6+ activation with 6s hitting or combat, with units in cover needing an extra hit to kill and the Landwehr in close order 5,6 =hit in close combat.  This simple system worked well as I couldn't be bothered to put down my beer to find the proper rules. 

The confident French marched from the west while the sweeping advance through the woods on horse quickly stalled from good musket fire from the Hungarian militia along the wicker fence line forcing them off their horses and into cover. There they would remain pinned.


The other south unit of  Hungarian militia also kept the French elite company pinned. The Landwehr urged on by their aggressive officer on horse, moved down the road from the east in close order (their permanent formation as I have the miniatures in very close together on their bases!) to charge into the dismounted dragoons and put them into flight.  The other French lost heart and the Austro-Hungarians celebrated a grand victory. 

As it was the Austrian Landwehr unit's first battle being newly recruited and all ( in other words: painted), it was indeed a surprising outcome.

Austrian Landwehr in close order down the road. "Victory is at hand!"


Tuesday, 1 November 2022

War of 1812 Fictional affair

Having concluded one of the interesting Campaign battles between Craig and KevinA using PeterM's campaign rules, the troops and terrained tabletop had me bring out my bigger battalions for a long-neglected War of 1812 solo-battle. 

Canadian Militia (in early war green tunics) deploying within the village. The regulars of the 89th Foot can be seen in the distance.

I can quickly describe the action: the Americans with two units of Kentucky militia (poor) and the 28th Infantry (also recruited in Kentucky and also poorly trained....) came up against two units of Canadian militia and the 89th Foot. The mounted Kentucky Rifles leading the American advance were in scout mode which covered the American advance but when ordered into formation decided their duty was done a sulked in the rear for the remainder of the engagement - rather unfortunate dice rolls for them were made!  

While the Canadian militia are rated poor, the 89th Foot is good.  Not having played the rules for awhile, and that they are based on random dice for unit control, nevertheless the outcome was what might be predicted.  The Americans marched up (mostly in column so to actually move!) only to be frozen in place and decimated by musket fire. The Canadians even had the gumption to move against the rattled militia, routing them and their friends with them.  The American regulars of the 28th, not having much resolve, so followed as the British 89th, having poured several volleys into them, rolled high enough to advance and have these Americans follow their fellow Kentuckians back across the bridge so confidently crossed only a short time before. 

The Americans marching on the road from the bridge crossing. The American horsemen seen behind the trees would soon call it a day and leave the infantry to do the fighting.... The simple terrain was left over from the campaign I have been hosting.

The lead Canadian militia unit, upper left, is advancing upon the shaken Kentucky militia in their hunting  jacket attire. The other Kentucky militia is aggressively advancing but needing to be in march column which will soon face fire from the 89th Foot ( at right ).  The buildings are my old home-built models.

The 89th Foot.  These have been around for awhile as the flags are hand-painted a requirement before all the nice printed flags became available.  I have the 21st Fusiliers yet to paint because I have the regiment's hand-painted flag done and ready to be used for many years now!


Monday, 7 February 2022

a Natives raid on Nateville


The Abenaki raid on Nateville.  


Gleaned from email correspondence between Nate and Mr. Brewster, and CC’s to me, apparently the natives got restless as it were and attacked Nateville while the bigger battle of Towe's Field was being fought (see my previous post).

  I have dutifully come up with the following:

----------------

While the large battle of Towe’s Field was occurring, some of the Abenaki warriors took it upon themselves to do a raid on Nateville.   

The local volunteers of Nateville had gathered to guard the town, while some were unwilling soldiers, many were pleased with the task.  The screams of war cries broke the afternoon air as a small band of warriors emerged from nearby and attacked the volunteers. The Volunteers were pushed back by the onslaught but either side did much damage. The natives followed up the charge but the Americans held their composure despite their timidness to fight.  It was the tired and hungry natives who decided their gambit had failed and they melted back into the fields.  

skirmishers or lights troops are offered additional cover despite being "in the open"

This was a very small affair using "Rebels and Patriots" rules, and with both sides fighting at half effect, so little loss (few dice throw and my traditionally poor rolling anyway, made for very few hits!)

This was an interesting game having only 1/2 effective units which makes each dice rolled that much more critical and actions proceed quickly.    

Friday, 4 February 2022

Battle of Towe's Field (fictional War of 1812)

The Battle of Towe’s Field Final Battle of the Nateville Campaign. 

We have a first hand account by an American Engineer with the US 31st Infantry Regiment.
the photo shows William and the author finishing chopping down a log for work on the "bridge of boat(s). The US 30th Infantry Reg't is starting to cross, drums a drumming. As the American military used the old fashioned "reversed colors" for musicians, these Americans indeed wore redcoats. A supply was even provided by a captured British shipment! 


 “Dear Father, Were the battles of the revolution such as this? I thought my regiment a splendid unit but it did not perform well today. Nor did any. But I did my part. William and me we were tasked to cut down some trees along the river bank to allow the captured boats to ferry the Combined Light company in the very early morning. The lack of boats and lack of oars made for slow crossing. The officer of the 30th was impatient to cross.(my regiment crossed by the bridge while I was here…I do not understand the logic of the army….) William suggested we could build a bridge on the boats. (1) The officer, a new graduate of West Point, an engineer student, thought this a grand plan and soon had his regiment tearing down the nearby fences. I only a few hours we had a nice looking crossing. When Bill and I returned from refreshing ourselves, the regiment had passed and we had no orders. Thinking we did out part and exhausted, we went to the local mill and its second story afforded us a grand perch to view the battle."
The author's position is in the Mill, the large building on the left near the river.


"Father, we were looking towards the enemy lands. To our left is the bridge with an artillery battery deployed on our side of the river, and the Kentucky horse crossing first followed by the 31st Infantry. closer to us was our boat bridge with a hill on the other side of the river on which the Lights deployed. To our right, the 10th Infantry made crossing by a narrow ford, They had artillery support. We could see the enemy had made field works and used abattis (sharpened tree branches facing out) This was in front of Brewsterburg, the same town we attacked before."

 view from the Canadian side in front of Brewsterburg:
note the RIP grave marker.  This is my indicator that the unit is now at 50% or under strength, which for Rebels and Patriots, is a very bad and indeed grave situation for the unit's morale.

"The battle started in the plowed field of Cardon Towe’s farmland. Our Lights were surprised by having early opposition from some grey-clad fellows with fur caps. They stood on the far side of the field and seemed to get the better of the Lights who then broke and ran. This was earlier in the battle as they came past us before our boat-bridge was completed. Many were very wet and without arms. The 30th’s officers made some attempt at halting them and their men jeered them but as they were fully employ with us, did little. It was rumored that the officer soiled his pantaloons during the firefight" (3) "In our view, off to the left, the Kentucky boys seemed to freeze the Redcoats in place allowing the mounted riflemen to shoot up the artillery in the fort. The artillery over there kept up a steady pounding of the fort also. Why the redcoats kept in place we could not fathom but we admired their courage." William made the observation that every one of our regiments seemed to be glued in place trying to cross the water. It was, William said, “were be like they ‘fraid of drowning” This lasted several minutes. (2). While the infantry came under scrutiny after the battle, the artillery was commended as the ‘B’ Battery firing into the field works did good work as was ‘A’ Battery mentioned already. The red capped locals manning the works and the sheds nearby took a pounding to be sure but only retreated very late in the day but gave enough time for some more redcoats to come up in support to face the 10th who finally attacked. William later spoke with a man of the 10th who said the officer insisted on keeping close order but unwilling to engage in frontal assault had them slowly move around the abattis and into the volley fire of the British regulars. This broke them."
"Back on the left, a rocket battery was set up. We done never seen these before and Will and I were in stitches, laughing most hardedly at the smoke trails going this way and that, usually over the grey-coated unit who were most distressed at the fiery things going close over their heads. Not one came near our boys. We could clearly see a mounted officer ride over and gesture for them to stop. Father, it was particularly funny!"
the hex marker shows the direction of the rocket...not good for their side, eh?


 "While the rockets didn’t come near the Kentucky horses, the artillery from the fort did and soon they galloped back to the bridge. While they tried to calm the jittery horses, my 31st which had moved past in grand style to form a close order assault column, was hit by well-aimed close range canister fire which suddenly turned our parade ground into a carnal house. I lost many friends and think myself fortunate to be here than there, truth be told. The rest of the regiment turned to flee but there was no where to run. The horses blocked the bridge, the river was deep. More losses" (4).
"While this tragedy was occurring, the 30th moved up but was met and defeated by the grey-clad unit- we later were informed this unit was the French-Canadian “Voltiguers” and a unit of redcoats who also poured a well-aimed volley into them. Of the redcoats, we learned this was the same unit that captured our ammo supply some while back. "

" At this point the battle seemed to just petter out. The British would not, could not(?) advance; our boys in confused huddled masses. Our leadership it was said, had lost faith that any of the units could be reformed. Were your battles of the revolution like this too? "

 "Your loving son, "

 ————————- 
Editors notes:
 The General would be sacked the next day. But his After-Action Report would explain that the limited crossing of the river would not allow easy retirement of the easily spooked American troops, making traps and causing traffic jams for units entering or exiting the fray. Due to this terrain, high command deemed it impossible to conduct any more offensive actions in the area. With the Canadians not wanting to invade over the border formed by the river, the Nateville area soon will become a backwater of the war, with units slowly dispersed elsewhere. Peace thus has come back to the residents of Brewsterburg and Nateville. 

 ————————— 
Footnotes:
(1) Nate’s ‘orders’ for the American attackers were to gain boats and cross mid-river. I took the opportunity to create a ‘pontoon’ with a boat as the support. 
(2)No Activation was made for these units all on the crossings for three turns straight! 
(3)The “Rebels and Patriots” rules has a delightful “Brown Trousers” effect for a unit’s command. 
(4)The rules have any unit unable to retreat in full, take losses equal to the measurement not moved and as the river and the Kentucky unit blocked the road back, the unit was essentially destroyed.

Tuesday, 14 December 2021

“Nateville Campaign” the first engagement


My new wargaming pen-pal offered to create scenarios for me to play out for which I am using one of my War of 1812 collections. This is the solo-play of the first of the engagements. The set up can be seen at:link to my previous post of this campaign

While Canada was, at the time of 1812, very much British territory and all those (well most anyway) would say they were British citizens, this particular miniatures collection has only military units made up of people who were of North America and has no British Regulars.  It is based on an all-Canadian, both French and English speaking inhabitants, who fought the Americans along the Chateauguay River in 1813. Thus, I will call them "Canadian" throughout the narrative. 

 The Canadian raid on the Town of Nateville had party of Abenaki Natives, the Canadian Fencibles (Regulars) and supporting Sedentary Militia downriver of the main force of Select Embodied Militia (SEM) (well-trained militia), and Voltigeurs (well-trained, experienced light infantry) to cross the main bridge to take out the American ammunition caisson to hamper the forming American invasion of Canada.

The engagement thus formed two distinct areas of operations which we shall call "the left flank" and "the centre" at the bridge or town.

The day started on the left with the Abenaki crossing the river together with the Fencibles.  The American Combined Light Infantry (a unit of those companies of the various regiments who were considered to be light infantry trained.  Some debate as to their training or even if they had distinct uniform differences) quickly formed up into close order to meet the oncoming Fencibles who would forego any shooting and use the bayonet charge.  A bloody melee ensued causing casualties and disorder on both sides. 

The Fencible charging the defending American Lights (in blue uniforms), the British officer on this flank directing the attack.  During the entire battle the American commander did not emerge from his headquarters in the town. (I would have him on a separate activation as the raid was to catch the Americans by surprise)

Meanwhile at the bridge the Voltigeurs were in mid-stream fording the river when they heard much screaming and stopped frozen in place - well, they failed to advance for whatever reason! - as the American Volunteers ran passed in front of them in rout away from the charge of the 3rd SEM.  The American Pioneers simply put down their tools and surrendered.

The rout of the American Volunteers from the 3rd SEM (left) and watched by the grey-clad Voltigeurs (bottom) in the river.  The artillery can be seen on the hill.

The rout of the Volunteers did clear the field of fire for the American gun on the hill, but in the haste to load the cannon they inadvertently reversed the cartridge...or because I rolled a poor 4 on their activation dice?...

In Nateville, the bulk of the US infantry seemed obvious to all this fighting as they did nothing. At this time I had now rolled under 4 pips - on two d6 - for four successive activation rolls!  Do note that for Rebels and Patriots rules activation for a unharmed unit is only 6+ on two dice.  Perhaps the dice did have a bias this day as the Canadians favoured well than the American rolls.

The brave 3rd SEM kept up to task and quickly proceeded up the road to Nateville and a double-sixes activation roll brings into action the reserve of the 1st SEM unit. 

The 30th US Infantry moving up (slowly....) to support the Combined Lights 

Back on the left, both the US Lights and the Canadian Fencibles reform after their combat but the Natives continued musket fire causes further disorder to the Americans.  The fight would continue until the action in the town was resolved to signal the Fencibles to give up their fight with the American Light company who gave a surprisingly good account of themselves.  Both units sustained 30%+ casualties.

But it was on the road to Nateville that the battle hinged. The 3rd SEM, not seeing anything of the Voltigeurs (yes, yet another failed activation from this unit.  It was to have two more in turn and thus play no part in the engagement) saw the gun on the hill as a distinct threat and poured a devastating fire upon it causing half the crew to go down and breaking the morale of the artillerists.

The marker to the left indicates 50% casualties on the artillery unit.  A grave morale situation indeed in the Rebel and Patriots rules.  

The officer with the 3rd SEM at the ammo wagon. 

The sounds of gunfire finally drifted to the town and eventually all three Infantry Regiments started to move in its defence.  

The final moments of action as the wagon is alight and the Canadians (in red) about to depart. The American units could only fire off a single weak volley of fire. 

With the new reinforcing 1st SEM moving up to the bridge to secure the route of retreat and ignoring the plight of the artillery, the heroic 3rd SEM continued up the road to find the prized ammunition wagon just ahead of them with the teamsters desperately trying to move out of harms way.  The SEM officer also could see the masses of the 10th and 31st US regiments emerging from the camps towards him.  He decided to risk a further run up the road might get his unit up to the wagon to disable it or alight it and hope the following 1st SEM would help his inevitable hasty departure. And indeed fortune favoured the brave as a fortunate Attack Activation roll of 10(") and a quick thinking musketeer jamming his weapon into the spokes of the rear wheel had the wagon come to a stop. A lit cloth was deposited under the lid of the wagon and the unit made a hasty departure under rather poorly aimed gunfire by the oncoming American regulars to the sound of a mighty explosion.  The American ammuntion supply was destroyed and the Canadians made their escape.

Casualty count:

Americans: Combined Lights  4 figures out of 12, Artillery 3 of 6, Volunteers 1 killed, 4 missing (rolled for), Regulars - all three units 0 of 18 each.

Canadians: 3rd SEM 2 of 12, Fencibles 5 of 12, Abenaki 0 of 6, Montreal Sedentary Militia, Voltigeurs, 1st SEM all 0 of 12.  


Saturday, 4 December 2021

The 'Nateville' War of 1812 campaign #1


A new wargaming pen-pal suggested the following to be a idea of a scenario:

“For you, Doug H,  I'm thinking some War of 1812 action to blog about.  A solo campaign that i can feed a bit.

The Americans are preparing an offensive and are gathering supplies and mustering troops in a town.  The Brits have caught wind and have decided to launch a spoiling attack before their own reinforcements arrive.

Scenario #1.  River crossing raid.  A smaller British force with Iroquois allies launches the spoiling attack versus the inferior quality but superior numbers American force.  A bridge (defended) and/or boats can be used to cross the river.  The river is only partially defended, then the heights to cross (also partially defended) before the town can be reached.  The majority of the American troops are in/near the town.  The British objective is to destroy the ammo dump and retreat without catastrophic casualties.  Terrain is wooded with a few farms and the major road to and from the town, bridge, and table edges.

-American activation.  Units are unaware of the raid and can not activate unless they make a successful roll.  Roll modifiers include LOS to British units, or being x distance from a firing unit”.  

------

I therefore came up with the following table set-up for my upcoming “Nateville Campaign”:

the War of 1812 theatre of operations around the fictional border town of Nateville, Vermont in the year 1813.

The American volunteers guard the bridge while the Regular Pioneers (stand on the left) do repairs on the bridge strengthening the timbers to allow the artillery to cross supporting the upcoming invasion of Canada. The artillery is in guard position on the hill in the background before the town.  Little that they know the Canadians have other ideas than to accept the invasion with little activity of their own....

The object of the Canadian raid: the important American ammunition supply. A unit of American regulars form up in front of their tents. Of note: the horse teams are Perry British but I replaced with Old Glory early war American heads.  The wagon is a Warbases MDF version of a Napoleonic baggage wagon painted in the light blue color of the American equipment during this time.  These Warbases wagons are quite good and easy to put together.

More American regulars camped on the far side of "Nateville, Vermont".  Of interest are my wooden tents. Yes, indeed they are made from wood found abandoned at a construction site in a nice triangular shape ready to be cut into tent sized portions and carefully sanded edges to give that 'canvas-draped-over-a-pole' look. The rest is just paint.

Further to the east of the bridge, the Abenaki natives (left), the Canadian Fencibles (Regulars near the creek), and French-Canadian militia (at right in the red caps) are ready to surprise the American 'Combined Lights'' Battalion (near the cabin).  The bridge is at the upper right ready to be assaulted, and  Nateville is in the distance. Most of the buildings are scratch-built by me.

I think I will use the Osprey Publishing rules "Rebels and Patriots" for the games.  Hopefully soon, but currently I find I am drifting from one 'project' to another in rapid fashion worse than a Ritalin-deprived butterfly.  

Saturday, 28 November 2020

Another unrecorded event…

The Bridge at Trabazos 


Long story short; I have been tasked to provide the battle narrative for an ongoing Napoleonic campaign - in other words, play out the battles with miniatures.


The Anglo-Portuguese commander wants the bridge destroyed, the French commander expects to deploy north of the town getting there via the bridge over the Druro River as part of a larger Peninsular War fictional battle.


Not really having the ‘proper’ troops for this engagement, I went small scale by using my ~40mm Flintloque figures to play out this portion of the battle as a very minor skirmish.

I gave the French two fine “companies” of infantry to approach the bridge while the British Engineers prepare to blow it up.  Each turn the Engineers roll a d6 until 16 is reached and it will be wired for detonation (and upon a die roll, of course!)


Defending the Engineers are a ‘company’ of the 9th Foot of the 5th Division. While a veteran regiment, the Captain is a martinet hated by the ranks. (a bad roll for his ‘personality’)  Alone in an isolated village away from the army commanded by an officer who had no idea what he was doing, with the temptation for loot and discovery of drink it was too much for the soldiers who, despite the efforts of their sergeant, left their post by degrees.  However the captain, excited by his first meeting of the Napoleon’s army (he had purchased his position and had absolutely no military experience), did not realize about the desertions.

The 'martinet' of the 9th. Note the sergeant with the halberd to the left of the officer already turned around to chase after the would be looters. 


However some defence of the town came from a small band of Guerrillas defending their homes who were of sterner stuff and fired upon the first company of French halting them and mortally wounding their officer.  This confident action (rolling 12(!) for activation) and subsequent roll of 6, activated a small contingent of Portuguese.

The  "Portuguese" 

Early in the action showing the French. The 9th Foot is across the river, the British Engineers on the bridge.


Meanwhile, as the French advanced, the 9th’s Captain marvelled at the French Colonel’s uniform and his flowing hair astride his charger galloping on the bridge in the glory of war. “Fire!” he yelled.  The loud percussion he expected was met with silence. 

Now, sir?” was the only sound. The single trooper left with him looked up from his knelling position in a questioning frown.


The Guerrillas switched focus to the stagnant first company to the company lead by the mounted officer, but these French did not react to the resulting casualties. Ensconced behind a shielding wall, the raw soldiers of Portuguese remained in place and unwilling to engage in gunfire. But the large Engineer sergeant, a huge Irishman, declared to the oncoming French officer, “You be not stopping us you Froggie bastard!” and using a rusted shovel as a club, engaged with the Frenchman.  Seeing the following French soldiers, he looked over his shoulder and exclaimed, “Work faster!” to his fellow engineers.(my dice rolls were good but still 1 short!)

The Engineer sergeant on the bridge


Alas, his heroism was in vain, the horse evaded the shovel and a well-placed sabre met his brains. A following French soldier toppled an engineer into the water below and another used his hanger blade to cut the cords to the barrels of artillery powder suspended under the bridge. The Guerrillas and Portuguese then melted away.


Of course this story will never make it into the history books.  All that may indeed be mentioned is…the French IV Corps, 1st Division crossed over the Druro and deployed north of Trabazos…. 


Actually my "Calabrese Legion" troops.  Converted from Flintloque figures into something resembling the proper Napoleonic War troops..sort of... Full of 'character' they are.  ~40mm scale (ish). So outrageously cartoonish as to be cute.


Thursday, 17 September 2020

a 'Gain the Hay' Campaign engagement

…despite two small ‘victories’ against the French in the previous 'few hours of this campaign' played out using the Osprey "Rebels and Patriots" by WillB as the French CO,  the Nassau forces (historically a small German state adding its military force to Wellington’s Allied Army in 1815)  had decided to fall back to this picked second position defensive hedge position beside a small woods to protect the hay of the nearby field from French use…


The French dismounted cavalry advance against the Nassau defensive line along the hedge. The Nassau Lights are in the woods off-camera to the right.   The hay stacks can be seen in the distance. 


The French...well, me actually...decided on the direct approach, to forego any firing as their carbines were less effective and not having the range of the Germans and their muskets, and lead with his two weakened dragoon companies; with the under-strength Elites - from previous casualties- on the right to face the Nassau Lights ensconced in the woods;  and the 'foot' cuirassiers positioned close to the rear to be the ultimate fighting force to penetrate the Nassau line at the hedge.
The assault goes in

The cuirassiers are in morale trouble indicated by the heavier strapped knapsack marker indicating permanent negative modifier and the plainer knapsack of a second negative.

His elites were met with strong musket fire and quickly put hors-de-combat.  The other French units advancing until, as a body, they all halted. (for all three units I failed their activations); however, the German musket fire was very ineffectual during this time (my 36 dice with no hits at all!). 

 While the dragoons finally took the low hedge, the Nassau 3rd Line Company calmly and without disorder, put a volley into the poor dragoons, all but destroying them. The remaining French were forced to concede due to casualties sustained overall, and had to withdraw.  

Their horses will not dine on the hay tonight.

Sunday, 6 September 2020

Solo WaT in Japan

I had only a few full torso WW2 Japanese infantry left on the sprues and since a few weeks ago now I was still on the “What a Tanker” infantry anti-tank theme, I thought I use them to create essentially a suicide AT squad armed with some ‘lunge mines’ supplied. Two of them have those weapons on a long stick, one has his in the hand (I used the pole elsewhere!) and the fourth is using a rifle to keep the tank commander ‘buttoned-up’ making it harder for the target tank to see these infantry threats. So to explain these new Japanese warriors AND, more critically, the use of an old British Matilda tank, AND further, to show off my new Japanese Plasticraft building, I have this Alt-History story: April 1946, U.S. President Truman was not delivered the atomic bomb and so had to defeat the still defiant Japan the old fashion way. Operation Coronet is almost two months old with Tokyo and adjacent areas secured but pockets of resistance needed to be removed. While a relatively small part of this operation, the Australian contribution was tasked toward one of these areas. Sergeant Forlorn’s old Matilda tank had become separated from its infantry support and had entered a small village seemingly untouched by the destruction of war…. Inside the Matty stopped before the village, a conversation rages: “Where are the bloomin’ infantry?!” “lost them back a ways” “Why didn’t you bloody say?!” “you seemed happy looking at the cherry blossoms” “Well, step on it and get past this bloody village!”
The engine of the Matty sputtered and then roared to life (rolling doubled ones for first Move Dice followed by rolling 10 inches for the Second!). Hearing the tank, Ieko sprang from his position behind the house’s corner while yelling “For the Emperor!”, slipped on the wet ground [I only rolling 3(inches) with 2d6] yet reached the tank and aimed his thrust with the mine held in his hand to the side of the green monster.
His aim (double sixes! …my rather erratic and dramatic dice rolling trend continues…) adds 2 more Strike Dice to his attack.
“Its a Kamikaze!” is all the C.O. who was in the open hatch could say before the sharpshooter with the rifle put a bullet into his head. [ I must say my rolling of the dice in this case was perfect for this event to occur] The Matty is now down to three Command Dice but luckily the driver was composed enough [actually I rolled a Drive Dice] and the tank went into reverse and the gunner acquired the shooter but could not do more. Seeing that his chance to finish off the tank was fading as it slowly reversed away from him, Ichiro sprang from his hiding spot positioned behind the straw fence near the sharpshooter and ran up the road. “Bansai!” His sacrifice shook the tank crew further having one further Command Dice lost.
Kenso, in the door of the rice barn, needed to be much closer and so hoped to move into a better position without being spotted but his nerves …and my dice rolling…prevented his feet from moving.
Meanwhile the Matilda slowly moved backward from the village. Kenso finally called to the Emperor for help and I rolled a 1,2,3,4,5,6 combo! Kenso acquired the location for the tank, ran as few have [ I rolled 20 (inches) on 4d6 !] - having converted the Wild (6) into an extra “Drive/Move Die - which had him reach the distant tank and thrust his lunge mine [successful aim roll] but alas, the blast, while killing Kenso, did little to the armour of the Matilda.
The sharpshooter, lowered his rifle (not rolling the dice for him to fire) and mourned the loss of his comrades, as the green beast moved away….

Thursday, 27 February 2020

40K Battle of the Comm-Tower


ChrisO having run a game of the Lord of the Rings the month before (the poor boy can only afford the time for one game during a month with work, wife and kids and their sports) converted Warhammer 40K stats to that for a favourite LotR rules so to have a go with our old 'veteran' 40K troops — four of us providing the troops not having brought out these guys for some 20+ years!
the defences with my Russian looking Valhallans (the effort was deliberate!) ready -but the dice not willing - to shoot up the oncoming Space Marines
Interesting scenario but, as usual, the dice rolling made things a bit one-sided as the Imperial Guard ‘patrols’ were not as effective,  not allowing the defenders of the communications tower to start shooting earlier and not having our reserves did not enter at an earlier turn;  and that, due to poor dice rolling (especially by me… as usual…) we could not hurt the oncoming Space Marines.   [Yes, it was a  40K “good vs. good” engagement.]
my depleted numbers vs 'the monster tin-can" ( photo by ChrisO )
the comm-tower to defend

I was happy to get my Valhallans (Russian looking chaps) on the table together with the slightly more recently painted plastic Cadians who I made into futuristic-ultra-modern  “United Nations Peacekeeping Force”  by scraping off all the Imperial Eagle logos and painting the armour bits in bright blue over camouflage uniforms. ( you can see them in the photo above ).  Can’t take this 40K stuff too seriously…….
my squad of dismounted tankers


Sunday, 16 February 2020

Saratoga’s Battle of Long’s Redoubt


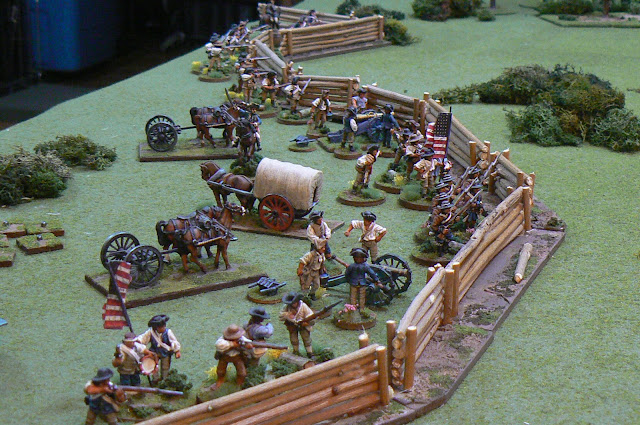
the Brunswick array moving to positions towards the American log emplacements

This is a fictional and solo affair using my newly reconstituted “Saratoga Campaign” Brunswick Germans (and units of historically attached Hesse-Hanau) against American opposition.
In this case my entire German force will be assaulting the Americans behind formidable log emplacements.  I place the units almost by random, looking for natural start positions for each side THEN decide what might happen.  In most of my readings of historical battles, I don’t think the actual Generals did things much differently….

Turn 1, Brunswicker
The very first activation rolls a double-six!. So with that bonus, the Brunswick dismounted dragoons earn better discipline for the battle (spoiler: it really does not help) Next the Light Infantry advance.  Then, of course, I roll the opposite of bonus, double ones, which consulting the chart has the Rhetz Regiment commit friendly fire upon the backs of the Lights causing disorder. The other Brunswick units advance without incident however the artillery is bogged down in the rear.
The Brunswick Dismounted Dragoons 
Turn 1, Americans
The American heavy gun opens up on the advancing Germans and while causing casualties, the Germans would continue their forward progression.
The American position
The German advance
Turn 2, Brunswicker
Despite their increased discipline the dismounted dragoons were still occupied on patting themselves on the back to move this turn.  The Lights continued to advance even with their disorder and the rest of the Brunswick army continued their advance - - except for the artillery no well to the rear.  Must be a broken wheel perhaps.

Turn 2, Americans
The the Lights now in range, the American light artillery on their right end of the line fired at short range causing more casualties but again the Lights shrugged them off. The heavy gun in the middle was apparently reloading and the light gun on the far left was still out of range. But now the American militia opened fire as did the 2nd NY Regiment and this proved too much for the Lights who bolted.

Turn 3, Brunswicker
Again the Dismounted Dragoons rolled double-sixes for the activation (its either really good or really bad with these guys!) causing unknown fire upon the American right but this did not faze that militia unit (rolling 11 for morale!)
While the rest of the Brunswick force marched in steady line to the final fence to cross, the artillery again fails to move. It will be relegated to the rear for the upcoming battle as it cannot now be of any support to the assault.

Turn 3, Americans
Some of the American artillery again fires and while causing more casualties, the German morale survives.

Turn 4, Brunswicker
During this turn the majority of the army readied themselves forming up in close-order while the Hesse-Hanau unit moved to the left.
The heroic Hesse-Hanau Regiment

Turn 4, Americans
While the American artillery took advantage of the tighter German formation and causing significant casualties, Brunswick morale is high.

Turn 5, Brunswicker
All units (!) begin their advance through the open area cleared by the Americans in front of their log defences.

Turn 5, American
Militia fire forced the Dismounted Dragoons to retreat.  Now in range of the skirmish rated militia units (at only 12 inches) and the lone regular unit of the 2nd NY, the Riedesel and Rhetz Regiments were taking particular punishment and both are now under 50%. But morale continues to be good.
The large Brunswick units showing their casualties even at this early time of the battle.

Turn 6, Brunswicker
While the Rhetz unit stopped to doff its disorder (at 50% it will now ALWAYS be disordered to some degree) the Riedesel Regiment rolled double sixes (my dice in solo games always seem to be hot or cold) thus earning itself two activations so with that went at the double at the American position. Unfortunately being at half strength it failed to make much impact (only 3 dice) .  Not all was bad for the Brunswickers as the Hesse-Hanau charged and got into the American position.
Riedesel's failed assault

Turn 6, American
Not all was good for the cheering Hessians as the displaced militia responded with shooting and the light artillery pivoted in place.

Turn 7, Brunswicker
Seeing the units in his immediate area at half-strength or unwilling to move (both full strength units failed to activate) the Brunswick commander contemplated ordering a retreat while some of his army was still in tact but continued failures in activation and the lateness of the day had him/me give up on the assault.  While the main army was to retreat the Hessians took the American light gun without casualties.

Turn 7, Americans
The units around the Hessians all failed to activate and even the heavy artillery could not load a round against the retreating Germans.

Turn 8, (Darkness)
The lone fighting unit for the Germans - the heroic Hesse-Hanau finally wore out and also failed to rouse themselves to further action.  That would make seven, yes 7 failed activation rolls in a row!  I think the dice gods are telling me to go to bed.  Thus the Brunswick direct assault on Long’s Redoubt failed with heavy casualties.
The pink colours of the Hessian showing their position inside the American defences

I used the “Rebels and Patriots” rules which follow the “Rampanty” style of play including activation.  Great for solo play as the units absolutely will not follow orders and do their own thing which is great for the narrative, probably realistic in a way, and certainly does not allow favouritism for one side or the other <grin>