Showing posts with label Grid systems. Show all posts

Saturday, December 21, 2024

A Naval Excursus -


Hex grid as pencilled. The white lines is just the overhead 
light reflecting off 2B pencil


Interrupting the Roman Civil War narrative is this little item - what I did today. This was based on a discovery I made a couple of days back that a hex grid with cells 60mm between opposite edges is very convenient and easy to make. The measurements required are 30 and 60mm in one direction (north-south, say) and 17.5, 35 and 70mm in the east-west. The only tricky one is the 17.5, and that is the one least used.

Horrible photo, but you get the idea


Some time ago, a visit to the city Art Emporium yielded a 102cm by 83cm sheet of heavy card stock, coloured on one face. Although I would have preferred a lighter blue, I decided this would be used for naval games. Instead of across the board (a feature of my well used hex-board), the 'grain' on this one goes along the length, which accommodates exactly 17 of my 6cm hexes. The board measures 15 hexes across, with a small 10mm margin.

Looking down on part of the board. All my care doesn't obviate the 
occasional stapid mistuke.


This board accommodates better my 'very tiny' navies, and will, I think be suitable for actions with limited presence of carriers, or none at all. This does not mean my 5cm hex sheets have been superseded - I'll still use those for more ambitious naval operations...


In the murk and mist of the Omez Strait -
A Ra'esharn task force off to deal woe to someone.
 

I am now debating how to 'finish' the grid - black, darker blue (the sheet is pretty dark already), light blue or white. I was going to do white, but am now undecided. 

Roman Civil War update...

Meanwhile Curio has landed his army at Thapsus, in North Africa. Varus has shown up and is offering battle, like Afranius, hoping that a stream across his front will aid his defence against the aggressive Curio. The circumstances being what they are, it seemed to me that either side might be the attacker. So this was decided by a die roll, which, after 3 consecutive doubles, came down on the side of the Caesarians under Curio. More on this in due course...

Saturday, August 24, 2024

Revisiting Byzantiad - ideas for a rule set.

Some recent ideas from the ever fertile region of Mark Cordone, has, along with some of my own have bethought me to reexamining a rule set I proposed about 6 years ago, but in another context. The earlier rule set I added to a few articles I wrote concerning the Vales of Lyndhurst Chronicles authored by the late Barry Taylor. Some of the ideas I used there I incorporated into the 'Map Games' I began exploring about 18 months ago.

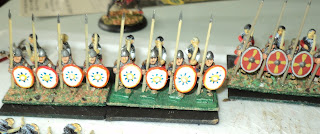
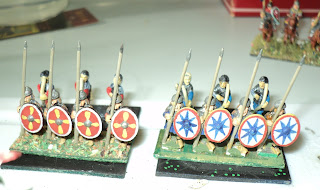
The 'new' skoutatos unit. Just 6 men in the rear rank
(spears and bows on double depth stands) gives a 
14-figure unit - more in keeping with the 700 of close order troops 
of the unit as a whole


The new context is Mediaeval, specifically, but not exclusively, concerning events within and surrounding the Byzantine Empire c.1000AD/CE. I have put together a rule set for a FP3x3PW Byzantiad, some ideas of which appear in Bob Cordery's 'Green Compendium'. In this posting I will lay out some ideas for a 6x6 or larger grid war game. 
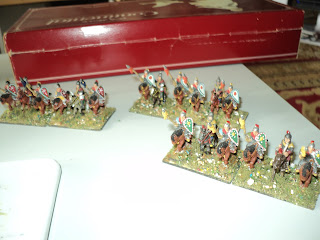
Most of my Byzantine horse are 'Tin Soldier',
as are the archers here. Of the provenance of the 
lancers I have no idea, or even why I have them.
Two stands  (the red shields) have had their shields
 repainted to form a new 2-stand unit


The occasion for this was that about a fortnight back, I was hunting through some boxes of stuff, and lit upon a weighty chocolate box of obscure provenance that, when opened contained a surprising surprise. Years ago, I sent off a consignment of surplus Byzantine figures to a fellow blogger in Australia (which, unasked, he reciprocated very generously). Now, among those figures were 5 klibanophoros figures. There ought to have been a sixth, but for the life of me, I couldn't find him. 

Well - there he was, in this box, with a whole bunch of works in progress. So much so, that I have been able to create a seventh unit of skoutatoi, and add a double-stand to two 3-stand units to form 4 2-stand units. I even found some armoured archers that I hadn't seen for at least 20 years!

I still have more than I ... erm ... need, but, having recruited many of these extra figures into my Byzantine Army, what is left over are oddments - like my orphaned klibanophoros dude. I do have a small number of trapezetai and heavy cavalry archers I'm not sure what to do with...

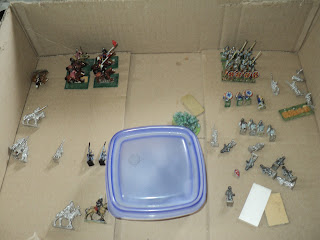
Scattered additional foot figures and 
trapezetai light horse. Four of the foot will become 
menaulion, the rest might fetch up as 
Armenians or something.

This led me to rethinking how my armies are organised. Central to the project, my Byzantines will be the benchmark, and cleave as closely as may be to the Praecepta Militaria of Nikephoros II Phokas. Although the older units and stands remain unchanged, I've placed just 3 archers in the rear rank of the new heavy infantry stands. The 14-figure 2-double-stand units represents the 700-strong close order body of a unit of troops. At 1 figure to 50 men, the skirmishing troops - slingers and javelin men - from each unit would be represented by a single 2-figure stand. These will however be brigaded together as 2 (or possibly 3) stand units.

The tricky ones are the menavlioi - a peculiar troop type capable of skirmishing, or standing in the front rank of the main body. At 4 figures the stand, they would represent 100 from each of 2 units. I have 2 such stands, and the figures to make a third. I could make a fourth, but I prefer to leave them slightly under represented. 

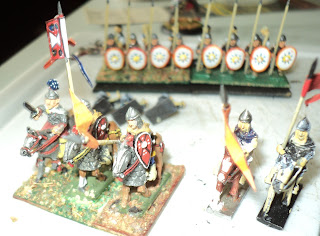
A 'general's' stand. Added to a 2-stand unit, it will 
add a SP. Integral to a 2-stand unit, it will add a 
SP to combat only. 


My Byzantine army won't include any of the more arcane specialist types. I'm none too clear what their artillery looked like (being unconvinced of the wagon mounted affairs), and I doubt if anyone makes fire syphoners, and I don't imagine them easy to employ on an open battlefield. Attacking or defending strong places, sound like their métier.

What about the enemies? I find I have enough Pechenegs for a DBA game, except that it is wanting a couple of War Wagons. I shall have to do something about that. Best represented are my Bulgars, but even that army is woefully dwarfed by my Byzantines. I might I think be forced to purchase a consignment of Barbaric types - Lombards, horse and foot, Bulgar heavy horse, Rus axemen, ... nothing too extreme, you understand... Many of the types can stand in for other armies, e.g. the Georgian and possibly Seljuk Turks.

For the rule set, let's start with a
Table of Troop Types:

The observant reader will at once notice that all the mounted units have been given TWO strength points (SP) only. For one thing, each stand represents 1 SP, each double-stand represents 2. The Byzantine heavy cavalry units comprised 300 men (theoretically, of course) - 180 lances and 120 archers arranged in 5 ranks. At 1 figure to 50 men, that gives us a 6-figure, 2-stand unit.  The exception is the unit of kataphraktoi (klibanophoroi, according to most sources, but I prefer the nomenclature of Nikephoros II). This unit formed a trapezoid something over 500 strong. Rounded, this allows us a 4SP unit. At the Battle of Silistria, the Emperor John Tzimiskes fielded two units of such kataphraktoi (as distinct from the heavy kavallarioi), but they were each only about 380-odd strong. I daresay I could split my unit into two separate wedges of 2SP each!

The battle reported earlier this month features 4-stand cavalry units, which look good, but I want to examine the smaller 2-stand units. 

Now, this list fits in with the rule set I have in mind. This could be played on a field 6x6 or larger of squares, or a field of hexagons instead. Note that in the above list, distance is determined in 'squares', but hexagons is implied if played on a hex field.

This will be a kind of hybrid Portable Wargames/ Command & Colours set, using my system of combat resolution. We'll start with this. In combat, roll as many dice per unit as its Strength Points. The results to be:

1 = hit on artillery, vehicles, war wagons fortifications or camp.
2 = hit on cavalry (optional retreat or SP loss)
3 = hit on cavalry
4 = hit on infantry (optional retreat or SP loss)
5 = hit on infantry
6 = hit on infantry

Now, though theoretically the Byzantines at least fielded artillery, they don't actually feature in my armies. However, my Pechenegs will have at least one war wagon, probably two for a DBA-sized game (12 units a side). 
  • Each unit rolls 1D6 per SP for all shooting and close combat. 
  • A general with a separate stand accompanying the unit adds 1SP for combat, and 1SP for the unit.
  • A general integral to the unit adds 1SP for combat only.
  • The number of combat dice might be added to or subtracted according to target or circumstance.
There are still one or two gaps and areas to play test.

1.  The menavlatoi. This really is a peculiar troop type, and might well be disregarded. DBM/DBA treats them as 'Blades (Exception)' Bd(X) - highly manoeuvrable, capable of standing in the front rank of the main body of its unit at need, but also may support the unit's sphendonistai (sling) and akontistai (javelin) skirmishers.  The chappies count as Bd(S) (superior) against 'knights' (as defined in the DB* rule sets), and as Bd(F) (fast) otherwise.  I was considering treating them a 'Axemen' but with just 2SP. Probably I should add another line to the list above: 
Menaulion 2SP, Move: 3, Weapon Range: (-), Close Combat modifier: +1 vs charging cavalry or cataphracts

2.  I have given the artillery just 1SP. One imagines that if any enemy actually makes contact with them, they wouldn't last long. But even just 1SP shooting at long range is likely to do some damage before the enemy get close. However, it may turn out to be desirable to add +1 to shooting at all but light troops (foot or horse).

3.  I want to look at extending the Portable Wargame unit activation system.  After rolling for initiative for each IGoUGo turn, the side moving rolls for the number of units that may do something
1 = median -2
2 = median -1
3 = median
4 = median
5 = median +1 
6 = median +2 
The result, if an army has, say, 12 units, is that it may move anything from 4 to 8 units, depending on the roll.                          

4.  Close Combat is initiated by moving the front of a unit to overlap a grid area containing an enemy. This counts as moving 1 grid area. If the combat remains unresolved at the end of the turn, it continues to be fought out in subsequent turns unless and until one or other side breaks off, is destroyed or retreats. The idea behind this is the notion of 'holding attacks' to pin the enemy down and/or to gain time to bring up reserves. The foot troops in particular are suited for this role; less so the horse.

5. At just 2SP, the horse will be pretty fragile for the most part, especially compared with close order foot. This is experimental, but I am hoping it will lead to more 'realistic' handling and effects.                                                                                        

Extra double-stands to be added to the other 
red and blue-shield units.

A play test to come...


Friday, August 2, 2024

Half-hexes...

An idea expressed in Arthur Harman's comment in Bob Cordery's blog has inspired me to look into a possible refinement of warfare in a hex grid.  It is - formally or informally - to divide hexes in half. This may depend upon the orientation of the hex field:


The above is the way my 'blank' map is presented in my files, but the action is as likely to go 'north-south' as 'east-west'. The 'N-S' orientation is where the half-hex idea seems to suggest itself, permitting a line abreast formation of units.
This alternate notion (the array rotated through 90 degrees) seems hardly distinguishable from a square grid, but there might be something worth examining here. We'll look at it later.


In the above diagram, the infantry move 1 hex, the cavalry 3. Beginning in the rear of a hex, an infantry unit may choose to end its move in either half of the next hex. If it stops in the 'rear' half, it can shoot at but not assault any unit in the next hex along. It it continues into the front half of the destination hex, then it may assault any enemy in a next hex. 

The cavalry above has been presented with a whole range of options, starting in the rear half of the corner hex: 
(a) advance on a straight line to the rear half of the third hex whence it can shoot at either of the two infantry units facing;
(b) advance to the front half of the third hex, whence it may (in the same turn) assault the nearer infantry, or shoot at the one occupying the rear half of of its hex;
(c) swing left in its 3-hex move to the near half of the hex flanking an enemy unit, whence it may assault it at once;
(d) swing left into the farther half of the hex flanking an enemy unit, whence it may shoot into it.
There are, of course a whole bunch of other options, but these illustrate what might be possible with this kind of grid system. Suggested for smaller hex-fields, this might serve to 'enlarge' the battlefield, without actually modifying the foundation rule set.

These four by no means exhaust the options available.


The above really is no different from a field of squares, except maybe as an aide memoire for determining whether a close assault or shooting is permissible (or possibly) mandatory. It does have the virtue, however, of permitting units to form a proper line. In some Portable Wargames rule sets, opposing units in adjacent grid areas are automatically in close assault. I like this system because the fighting being automatic (and contested) permits the use of holding attacks whilst reserves are mobilised. 


Having said that, there are other PW rule sets in which not only are close assaults between adjacent adversaries not mandatory, but are simply impractical.  The Sengoku set is one such, and, if memory serves, neither is the Pike and Shot rule set. The thing would not be workable at all for the type of 'Map Game' that has been subject now and then to my experimentation (e.g. this one).

The latter system might equally be practical in the 3x3 square grid game system - possibly also within larger square-grid arrays. I say 'might' as I have only the diagram examples in mind, and haven't formulated the ideas in words. However there is one consideration that has to be borne in mind: the 'half-hex' and 'half-square' grid system assumes the whole battlefield has a specific orientation. This probably works for battles that have a linear orientation,  but I can't see it 'working' for more fluid battlefields (but see my parenthetical comment that closes this posting). 

It also depends upon the size of the grid areas compared with the elements or units fighting thereon. I've used my Memoir '44 board for Sengoku games, and have since constructed a larger board. The elements fill the hexes pretty much, which means this idea is simply not practical. But it might be were I to use them on a larger board. E.g. such a system might have worked for my Bulgar-Byzantine battle (fought in April) that I'm half-way through writing up.

The 'half-hex' idea won't 'work' with these armies
on this board.


I have yet to give these notions a practical test, but another Bul-Byz battle suggests itself.


The 'half-hex' idea might well be practical with these units on
this board.


(I was about to close this posting off, but a further idea presents itself - a much more fluid application of the 'half-hex' idea.  This one I'll keep under wraps - hoping I don't forget about it - pending the impending border war between the National Association of Ideological Zealots (NAIZ) of Teutonia and the Confederated Community of Collaborative Peoples (CCCP)*.

*The attentive readers of this blog might recall that the CCCP has featured, in rather shadowy fashion, in some of my earlier postings. They might also note that I have not been consistent with the words represented buy the letter 'C'. Fact is, I can never quite remember how it goes, and until now not found a sequence that was quite the thing. The above might be the one that 'sticks'.)


Sunday, October 16, 2022

The Kavkaz Campaign

Having updated and up graded my TURQUOISE (Turcowaz) and GREEN (Izumrud-Zeleniya) armies in recent days, methought of a campaign in which to pit these longtime adversaries. At the far eastern end of the sea the Turcowaz called Karadeniz, lay a rich land, independent and known especially for its wine-growing. Until recently this land had lived an autonomous existence, somewhat protected by its mountain ranges, but also by its fierce fighters and, probably most of all, by its neighbours' fears that its superb vinous beverages might, with too much external meddling, be lost to the world. Even the supposedly abstemious Turcowaz were inclined to a certain ... lenity ... in respect of the existence and consumption of the products of Kakheti. 

In recent times, however, the ambitious Romanovitchskiy Czars had become disinclined to suffer the existence of independent states upon their borders. The latest of the House, Nikolai the Bibulous, something of a connoisseur of the Kakheti reds, roses, and ambers, had long harboured the notion of including the region - and the whole of Abasgia, withal - within his realms. He caused to be assembled two columns, one to march from the sea port of Sakhumi; the other from the Ciskavkaz towns, Pyatigorsk and Nalchik. The objectives were to take Tiblisi, and seize control of the whole valley between the Kavkaz Mountains and the Ktsia Range. 

Naturally, the usually indolent Sultan was moved in response to reports from his myriads of spies to order the mobilisation of military forces to oppose any such move by the Czar. Once more, he relied upon the bellicosity of the troublesome Abdul Abulbul Ameer, to direct operations in the Abasgian territory. Dividing his large army in two, he assembled the one at Trebizond, the other at Kars. The objective: to conquer the whole of the Abasgian valley, seize Tiblisi, and drive the Czar's army back across the Kavkaz mountains.

Such is the rather sketchy outline of the proposed campaign. First off, the maps.


A rather distorted map of the region to be fought over

I drew the above map roughly, distorting the east-west dimensions rather, because I wanted to get Trabzon (Trebizond) and Tiblisi both in the picture. The Kavkaz Mountains form a rather narrower range than the counterpart in our real world. Trebizond and Kars lie at the northeastern fringes of the Settee Empire of Turcowaz; The coastal town, Sakhumi, and the Kavkaz mountains form the southern frontier of the Czarate of Izumrud-Zeleniya.  This map was designed as the template for the hex map below...


Campaign Map of Abasgia.

Strictly speaking, the wine-growing regions lie east of Tiblisi, but that town really provides the only route from the west to reach them. Readers might recognise the region as modelled upon Georgia (the Republic thereof) but heavily distorted. I think this will be a fairly simple sort of campaign, though I do intend a naval dimension, which I'll expand upon in due course. My thoughts in that direction indicate a logistic support by sea for both (convoys of freighters and tramp steamers), but also a small sea-borne Czarist column.  
The entire navy of Rhumbaba. On loan to the 
Zeleniyan armed forces, they might choose to 
fly a different flag...


I thought of the Czar borrowing from the Hellenican navy, but that is starting to look a bit too much of a stretch. They may instead 'hire' the tiny Rhumbaba navy (small cruiser, torpedo boats and a possible armed merchant) for troop transport, supply, and possible raids along the coast near Trebizond. The Turcowaz Navy might send a protected cruiser (Hamidiye or Mecidiye) by way of escort for seaborne supply to Trebizond and any other sea port they might take and occupy.

One of the Turcowaz protected cruisers


At the moment, I'm looking both sides sending two columns, all quite disparate in composition. The Turcowaz is planning (that's a way around justifying any changes I may make to the campaign!) - is 'planning' to send a 'regular' column up the coast from Trebizond to Batumi and Poti. It will comprise the regular infantry and cavalry Divisions, two artillery regiments (each 2 guns) and a machine gun battalion. The 'irregular' column begins its march from Kars - a powerful column of Bashi-Bazouks, foot and a few horse, supported by an artillery regiment and machine guns. To rein in the possible Bashi-Bazouk tendency to excesses of behaviour towards the people and infrastructure of the region, Abdul Abulbul Ameer is to command this column in person. His known ruthlessness, incandescent temper and sharp readiness of scimitar seemed as likely a curb as any upon the excesses of indiscipline... 


Turcowaz and Rhumbaba naval units, in more 
halcyon times, rendering passing honours...


The stronger of the two Zeleniyan columns is to advance down the coast road Zugdidi. It will comprise 2 infantry and a cavalry Division, an artillery regiment, and the Naval detachment of machineguns and naval artillery mounted on field carriages. A much smaller column will leave from Nalchik and cross the Kavkaz mountains not far to the south. It comprises a single Division each of infantry and cavalry and a regiment of artillery.  

The quick witted reader will observe that these columns in no way are within supporting distance. Nor are they. Perhaps some concert of action might be achieved once these forces enter the theatre of operations...

The method of activating the columns and naval units is likely to be a variant of Bob Cordery's card driven campaign system outlined and exemplified in his book The Portable Colonial Wargame.  At the moment, I'm imagining the sides to be allocated a colour (RED for Turcowaz, BLACK for Izumrud-Zeleniya) and to each column a suit.  We'll see how that goes.

I reckon that will do for this posting ...

To be continued...


Saturday, September 4, 2021

Portable Waterloo - The Prussians


Les Prussiens sont arrivés!
The French reacted quickly to the arrival of the Prussian leading elements. Now, placing the formations on the edge of the board constituted the first move of any Prussian formation. This, aided by the French 'winning' the next initiative roll relative to the Prussian Corps, enabled the latter quickly to react to this incursion into their deep right flank. Closest to hand, Milhaud's cavalry corps at once engaged Prussian IV Corps Reserve cavalry, their weight and training compensating for their deficiency in numbers. Very soon they would be joined by Pajol's Lancers, and General Lefebvre-Denouette's Light Horse of the Guard - some 7000 horsemen opposing 9000 Prussian in equal numbers of horse and foot.  

French counter-action against the Prussians


Right on the edge of the battlefield, between Maransart and the Paris Wood, the French horsemen strove to contain the Prussian breakout into the open field - a struggle that, however prolonged, could have had but one outcome.

The battle elsewhere carried on uninterrupted. Lobau's leading Division (19th) had by now reached the Imperial Guard gun line, and the action around Hougoumont continued unabated. True, the assaults by 5th Division upon the chateau were repulsed with loss.  At this point, to keep back the British line, the French 3rd Cavalry Division charged the 1st Brigade of the King's German Legion (KGL) which had been detached from Clinton's 2nd Division to form line with the Guards Brigade behind Hougoumont..   
Fighting around Hougoumont.  Third Cavalry 
Division
charges 1st KGL Brigade.
West of the chateau, the clash of horse and foot had developed into a general battle. Jerome Bonaparte was forced to extend his Division into a line to the left, in order to contain the attacks from British light horse and foot. The flank was covered by Kellermann's heavy horse, his 3000 troopers taking on not only 6000 Dutch-Belgian foot, but 2500 light dragoons and hussars as well. For reserves in this sector, the French had only 2nd Cavalry Division, 1500 horse, at that moment taking a breather. The Allies had the whole of 4th Infantry Division, a good 6000 strong, unengaged, in reserve. From the French point of view, this was taking a lot upon themselves.
French west of Hougoumont 
try to push ahead, but numbers are against them

It was probably fortunate for Napoleon's army that the Allies' assaults upon Frichemont had been thrown back, although 3rd Division was still locked in combat with 2nd Dutch-Belgian. With the I Corps flank for the moment unthreatened, General Milhaud felt himself able to switch front to deal with the menace that had appeared to the right rear. Already, 'Napoleon', possibly over-reacting, was directing elements of VI Corps to the right. The fact was, I was expecting the Prussian threat to develop far more quickly than it did. But it might have been better to let Lobau carry on up the road with his whole force, probably with a Division of the Guard (the Chasseurs) and the Guard Heavies, and entrust the defence of Plancenoit to the Young Guard and the Guard Grenadiers.  
General view of the east end of the field...
The injection of 3 foot divisions, the Guard heavy cavalry and the VI Corps artillery park might well have proved a real test for the Allied centre. As it was that particular test never quite materialised.
General view of the west end of the battlefield


Eventually, the entire VI Corps available (a whole infantry Division and a cavalry Brigade had been detached to Grouchy's command, several miles distant) was directed eastwards. The Young Guard, meanwhile, entered the Plancenoit village, where they began to prepare its defences.

The Young Guard entering Plancenoit to 
prepare the place for defence.

The battle to the west carried on. Their horses blown (retreat results on the combat dice), Kellermann drew his troopers for the moment out of the fight, leaving 2nd Cavalry Division to take up the unequal fight on the flank. For all that 3rd Dutch-Belgian had by this time lost a quarter of its strength.  Jerome's Division was scarcely in better shape.  At the chateau itself, the assaults of 9th Division continued as those of 5th Division were renewed.  The garrison remained unmoved.
The back-and-forth battle rages on...

... both sides scoring successes.
Mixed fortunes attended the west flank fighting.  The French light horse unexpectedly threw back the Allied cavalry, but a lunge down the road by 2nd Division threw back one of Jerome's two brigades away from the chateau.  


On the east flank it was proving impossible to contain the pent-up force of the Prussians entering the battlefield.  The 14th Brigade, filtering though Maransart village unhinged the Guard light horse, who retired a short distance.  It seemed likely that the rest of the French horse would soon also be forced back.

Inexorable push as the Prussians press onto the field.
The Guard light horse have been forced back

The pressure there was compounded by sinister developments on the I Corps front.  Recuperating from their earlier repulse, 5th Infantry Division once again flung itself into Frichemont  village. This time the impetus was too much for the garrison, which fell back out of the village - just as the 2nd Dutch-Belgians to their right were falling back from the encounter with the French 3rd Division.  The action was becoming more confused and scattered.
Allies storm the French line and carry the 
Frichemont village.

Into the gap left by the retreat of the Dutch-Belgians, thundered Uxbridge with the Household Cavalry and the Union Brigade.  Here the French Corps Commander, Count D'Erlon had placed himself - this was to be a duel between commanders.  In the ensuing clash, Uxbridge got somewhat the edge, driving the French infantry back alongside the former Frichemont garrison.  
Frichemont changes hands...


These Allied successes open up the right flank of the whole of I Corps, and hence, the Army.  Into the uncontested defile between Frichemont and the Paris Wood rode the 4th and 6th Cavalry Brigades, to strike the right front of the embattled 4th Division.  At the same moment, Uxbridge's heavies seemed about to break through and ride down 3rd Division.  The fate of nations seemed to hang in the balance... though not for the last time!

...4th and 6th cavalry Brigades hit 4th Division as
it evacuated the village.

At that moment, the I Corps artillery happened to be on the flank, and at close range, of the Union Brigade. Hastily drawing out of the danger, the gunners left a gap into which 1st Division closed in upon the right front of the Allied mounted elite.
1st Infantry Division appears on the flank of the 
Allied elite horse.

Back went the crack British cavalry; forward once more drove 3rd Division, forcing them back well beyond the villages. At the same time 2nd Division counter-attacked from Papelotte, and followed up the Allied 6th Division as it in turn drew off from its sustained assault. The hard fighting around Frichemont had also exacted a serious toll upon the Allied formation. Having borne the brunt of the fighting, 8th Brigade was reduced to a handful of scattered survivors (all 4 of its SP having been lost), leaving the Highlanders only to hold the place.   
Unfortunately this bad photo was the only pic I had 
if this phase of the action...

So now, again, to the Prussians, battling to clear the Maransart-Paris Wood defile. The IV Corps cavalry were finding their heavier and better trained adversaries too tough to handle.  The leading unit of uhlans were soon scattered in charge and counter-charge (these being represented simply by vagaries of the initiative rolls in an otherwise IGoUGo game system). In the thick of the fighting, Generals Milhaud and Pajol were bearing charmed lives.  
The lead Prussian uhlan unit has been wiped out,
for no material loss...


The Prussians could not remain bottled up forever. Facing far superior numbers of infantry, the Guard light horse drew off, leaving the remaining 4000 horse far too few to contain the 12,000 Prussians forcing their way into the field.
Returning to the west flank, the to-and-fro battle continued, with heavy loss on both sides. The Dutch-Belgians had lost almost half their strength, but the French cavalry had also be worn down by a third of theirs.  And still the Hougoumont held out, against assault after assault by two whole Divisions.  The whole situation seemed deadlocked - which suited the Allies far more than it did their enemy. They had the numbers.
After a prolonged resistance, hope began to rise in French hearts as there seemed a perceptible falling off in the resistance the Hougoumont garrison was putting up. At last the attackers scored a hit that halved the defenders' strength. Surely they could not hold out for much longer?

VI Corps moving over to deal with the Prussians
Now might have been the time for a general advance up the Mont St-Jean road. But by now the VI Corps was being fully committed to the flank, and the Imperial Guard grenadiers and chasseurs were a long way off from putting their weight behind a final push...

To be continued... The Battle for Hougoumont, Prussians emergent, and plenty more action to come!

Thursday, May 6, 2021

In Darkest Aithops - The m'Butuland Expedition: Battle of Limpopo Bend

Something of an encounter battle, both sides advance
the m'Butu perhaps more eagerly...

 As the Azeitonian expeditionary force began to leave the jungle along the Limpopo River trail, they entered a region of scrubland as they approached the great bend in the river.  There awaited the m'Butu army.  Given time, Chief Barra Kuta might perhaps have refused battle, though where he could find a favourable battlefield east of Kachinga Town, might have been problematic, to say the least.  For the moment he could at least count on some superiority in mobility, especially in that final tongue of jungle forest that reached, seemingly, for the road.  But where the regular forces of the Azeitonians might have some difficulty negotiating a patch of scrub, the m'Butu's looser formations could pass through with ease.  

(Note: Although scrub patches offered cover for those within and concealment for those behind, the natives could walk though as if they weren't there.  With one exception, the colonists had to take one turn to enter such a patch.  The exception for the Azeitonians was a bunch of bush-fighting volunteers, who, for celerity of movement through hard country were to be the equal of the m'Butu.  I forgot to remind Paul of this - just this moment remembered it in fact - so I don't know whether that Militia group were these fellows or not).

For their part, a m'Butu regiment - amabutho Wa Nnabe - lay in wait within the jungle, ready to leap upon the flank of the column whilst the remainder of the army - the impi ya masoshe - awaited the enemy in the scrub.  
Campaign area.  The red lightning denotes where the battle
takes place, not far from the great river bend that gives
the battle its name.

Taking no chances, the Colonel brought his forces in a solid body, close by the road and the river.  However, one troop of horse - 'A' troop - rode forward of the main column to reconnoitre, and perhaps to spring any ambush.  Sure enough, the m'Butu responded, a band of about 40 warriors charging around a patch of scrub to engage at close quarters.  Though getting the better of the first clash, the cavalry quickly found themselves in trouble.

'A' Troop runs into warriors coming the other way...
Within moments, a second band burst through the scrub to join their comrades.  To the horror of their fellow soldiery, still barely within rifle range, they saw their lone troop surrounded by five times their numbers.  There was no hacking their way out; the troop died where they stood.  But the losses among the m'Butu were severe enough: 5 SP lost to kill off a 4SP stand.
'A' Troop surrounded by 5 times their numbers.
But the m'Butu are taking heavy losses.
It was probably fortunate that, apart from artillery and machinegun fire, the Azeitonian column was unable effectively to come to the rescue of the doomed 'A' Troop.  The leading units met the warriors' attack in a coordinated line. The m'Butu surged forward in a somewhat ragged line to engage the Colonialists in close combat with assegai and short ranged musketry from Wa Tusi.  Although successfully inflicting losses and driving back parts of the Colonists' line. the m'Butu were taking rather heavier punishment.  Barra Kuta himself took a hit bad enough to knock him back (rolling '11' in the effect dice for Army commander with the band that received incoming rifle fire).
'A' Troop finally overrun, as the m'Butu close with 
the colonialist column.
The action spread along the front as more m'Butu surged out of the jungle.  This brought more of the colonists into the fight - not quite the hoped-for effect, as the warriors found it hard to bring numbers against isolated bodies of troops.  Although the m'Butu were exacting a toll of casualties, they were rather getting the worse of it.  Meanwhile, the river boats continued chunking upriver, where their gunfire, aided by the artillery in the road, chased a native band out of a riverside patch of bushes, and cleared the open ground a considerable distance from the trail.  
Coordinating bush fighting ain't easy, even for the locals. 

Early attacks repulsed, the m'Butu pull back...
The main action going against the m'Butu, Chief Barra Kuta, blood streaming from a shoulder wound, called his men to give back.  This was no rout - rather a coiling back to draw the enemy on.  Fading back into the scrub and jungle, the m'Butu successfully placed some distance between themselves and the enemy.
...putting themselves as much as possible out
of rifle range.


The river boats advance...
They were not yet done; of that Col. Relaxado was persuaded.  This was the snake coiling for a strike.  On the other hand, there was nothing to be gained by standing still.  If the expedition was to go ahead, the column must advance.  The gun boat led the transport thrashing upriver behind the m'Butu flank.  Once past the riverside brush, the Solenta transport unloaded its cargo of rifle-armed sailors.  Greatly daring, the nearest m'Butu band charged alone through a hail of machinegun fire and chopped down several seamen before themselves finally being scattered.
The Azeitonian column yet to lurch into motion


Sailors disembark,.  The covering gunboat's machine guns
fail to discourage the m'Butu from attacking
This bold, self sacrificing action served to cover the gradual m'Butu withdrawal on the river flank, but, as the colonists slowly followed up, they merely kept their distance out of rifle range.  
General overview of the battlefield late in the action
As time passed, it became clear to Barra Kuta that his army had maybe one more counter-attack left in it.  As the Azeitonian left drew near to the jungle, where the Chief had placed himself in the position most crucial, several bands charged out of the undergrowth and threw themselves upon the lead element that had strayed perhaps too unwarily, and too close.  Or perhaps The Colonel had cannily hoped to draw the warriors out of hiding.
Final counter-attack of the m'Butu.
However it was, the m'Butu did some damage, and received some themselves - enough for them to call it a day.  Thereafter, the warriors made use of their celerity of movement to distance themselves from pursuit, and draw off from the field.
(Poor photo) the m'Butu withdraw 
alogether form the action.
This action was never going to have any other result but an Azeitonian victory.  They had the numbers; they had the firepower; they had the support weapons.  All the same, the m'Butu had given a good account of themselves.  Of 660 warriors who entered the battle, some 160 were killed and wounded.  The Azeitonians had some 900 or more troops, rifles against the few muskets the M'Butu possessed, artillery, machine guns and a gun-armed riverboat.  All the same, they could congratulate themselves upon a fine start to the campaign - the early victory being easy enough to feel this was a great adventure, and hard-fought enough (100 k + w, and no one would soon forget the fate of 'A' Troop) to bring a thrill of jingoistic pride.

(In game terms, the m'Butu had lost 24SP, a little over their 'exhaustion point', the threshold being reached during the final counter-attack.  Of these 8SP are immediately returned to the army (stragglers, grazed and the like; 8 are returned to the army after 1D6 turns (I call them recruits rather than, say, recovered wounded); 8 are lost permanently.  The latter 16 count as battle casualties; at 1SP representing 10 men - 160 men lost.  The Azeitonians lost 15SP up front, they being split 5, 5 and 5.  Ten SPs lost for the moment, the histories will relate how they lost 100 men in the expedition's first fight).

The early pull back enabled the m'Butu to put a few kilometres distance between themselves and the Azeitonians before halting.  Perhaps this made them complacent.  For their dilatoriness subsequently, they were to be asked a high price to pay.  That is to say, the Black card that terminated the Azeitonian moves proved to a string of one only: the Reds that followed went number, king, number, number, number before the next Black card turned up.  This was a fine portent for the colonists' expedition into m'Butuland; and an ill omen for Barra Kuta's realm...

A word on the figures, terrain and the rule set(s) used.


All the figures in this action, apart from the machine gun and the boats, were from Paul's ('Jacko's') collection - ESCI and HaT.  The boats were my scratch-builds, the transport from the fleet I made originally for American Civil War riverine operations about 25 years ago, and the gunboat specifically for this campaign.  The machine gun aboard O Ra Desvairado was a HaT Gardner gun.  The name of the gunboat, by the way, was a nod to the late George Macdonald Fraser: an incarnation of La Grenouille Frenetique, or, in English, the Frantic Frog, that features in The Pyrates.

The Campaign and Battle rule sets were from Bob Cordery's Portable Colonial Wargame - the latter being The Gatling's Jammed... 

To be continued...