Showing posts with label WWI. Show all posts

Monday, 7 August 2023

La bataille de la mission impossible: A WWI battle report.

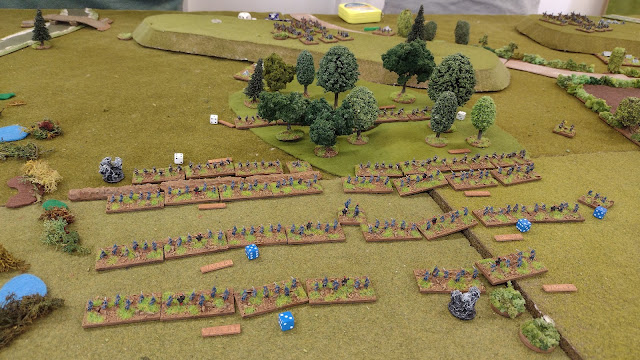
I've been very busy with home DIY recently but I've reached the point where I could take the day off for a game with my fellow Rejects down the Shed-o-War. So it was with great eagerness that I arrived at Stuart's on Sunday for whatever game he was running. World War One and his in-house ruleset was the order of the day and I was initially very happy with that because we have had some cracking games with these rules and his 6mm figures. Of course, I hadn't factored in being beaten before the game had even started by the scenario he presented us with and by the impossible French objectives. That's not to say I didn't have a good time of course (the usual banter and joviality were on top form as always), but having an outside chance to achieve victory, as opposed to none, would have made it better.

As is our way we started with a pre-game cuppa and picked sides randomly. Myself, Richard, and Steve were the French as this is an early war set of rules, we would be attacking the Germans across largely open countryside. Ray and Surjit played the Germans and while they were outnumbered about 3:1 their job was to hold as many objectives as they could by the end of the game. They started holding 24 points worth of objectives such as crossroads, buildings, woods, and hills, and it was the French player's job to take at least half those points by the end of the game. However, all but three of the objective points were in the last third of the 6' deep table. his meant that the French would have to move at double speed, unopposed if they were to even reach those objectives, let alone have time to fight for them. There was a dice roll at the beginning of the game for a French Double move (the Germans rolled to see if they could react to our sudden attack...they did, and we lost the extra move turn) but even that still left most of the objectives out of our reach, even without German troops trying to delay us!

I have to say at this point that I don't think this is a fault of Stuart's rules (although more on that in a moment) but of the scenario design. It's a pity because we had a great time and our artillery fire was significantly more effective than the German players for most of the game. In these rules, the artillery roll one d10 per gun to hit (hitting on a 5+ in the open, 7+ in soft cover, and 9+ in hardcover), and for each successful hit, the player then rolls two d10s for casualties. Rolling a 10 on the casualty dice counts as a double kill and forces the target unit to make a Courage test. I can say without any hubris that I was the uncontested master of the 10s throughout the game (my dice rolls were charmed) and still, it counted for nothing because the game was being decided on objectives captured and all those in front of me were too far away. And of course, there was also the small matter of the German defenders trying to slow down our advance.

This brings me to the one single bone of contention in the rules for this game. Stuart is of course tweaking and refining his WWI rules with every game and following our last WWI game, he made a small change to the Melee rules that I think was probably a mistake. I would say that of course because myself and Steve found the change to our mutual disadvantage, but let me explain and maybe you can draw your own conclusions. 

Melee is decided by a series of d10s. One for each base of figures still in play. Additional dice can be added for defending favorable ground, charging, etc. In addition, defenders usually hit on a lower dice roll than attackers so the 'favorable ground' bit is effectively applied twice. So for example, four attackers attack four defenders in a slit trench which is classed as light cover. The defender would get four d10s for troops, and +1d10 for favourable ground. The defender hits on a 6+. The attacker meanwhile gets four dice for troops, plus one for charging, but hits on an 8+. So in a straight fight, the defender in cover has an advantage. (There are other dice that can be added for trained or specialist troops but for the purposes of keeping this example simple, I'm leaving them out).
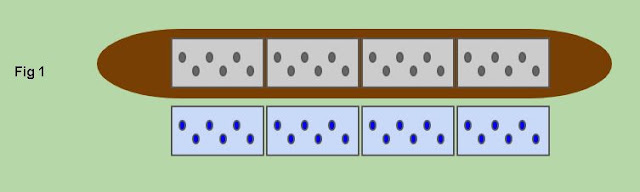

The wiley attacker will therefore bring as much firepower to bare on the defender before going into the attack. This may mean targeting the position with artillery or weakening the defender with rifle and machine gun fire before getting stuck in with Boyonets. In Fig 2 below, the defender has been whittled down before the attacker charges in. Now the defender only has three dice to the attacker's five, although the hit differential remains the same with the defender hitting on a 6+ and the attacker on an 8+. 
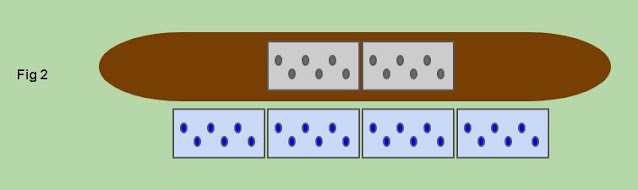

So the attacker is incentivized to bring as much overwhelming manpower to bare as possible, to swamp the defenders and take the position. So in Fig 3 below both the attackers and defenders have taken casualties but now the attacker brings two companies to swamp the defenders. In this example, the defender gets 3 dice for figures and one for the softcover hitting on a 6+, while the defender gets 6 dice for troops plus one for charging, still hitting on an 8+. The attacker still has a hard job but by bringing lots of troops to the melee, and with a bit of luck on the dice, stands a chance at winning the melee and taking the position. 
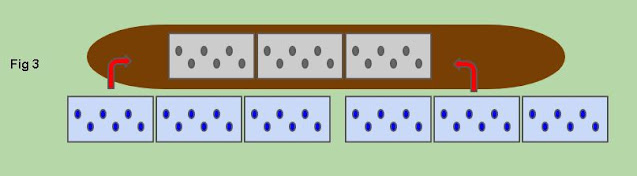

Now we get to the rule change that caused such consternation on the French side. In a previous game, the 'ganging up' tactic seen in Fig 3 upset the defending players and much moaning ensued. Stuart decided to change the rules meaning that only stands in base-to-base contact could be counted in the melee. In this example that would reduce the attackers' dice by three, making the assault significantly harder to win despite outnumbering the defenders 2:1. 

Now consider this extreme example in Fig 4. The defender has been battered by artillery and denuded by rifle and machine guns until only one of the original four defenders in the company remains. Meanwhile, the attackers have crossed the open ground unharmed and now attack the position with two full-strength companies. The recent rule change means the defender gets 1 dice for troops and one for the softcover, hitting on a 6+. Most of the attacker's troops are discounted so they only get two dice for troops in direct contact with the enemy and one for charging, hitting on an 8+. Despite being outnumbered 8:1 a defender in soft cover still has an advantage in melee. 


At this point is worth pointing out that in the open the cover advantage falls away and both sides would be hitting on a 6+, but even so, there is little point in trying to overwhelm an enemy position under the new rule changes as all 'additional' bases are ignored. 

As I am writing this I appreciate this may look like I'm really worked up about this (having written a few hundred words with supporting graphics) but I want to repeat that on the whole we enjoy Stuarts WWI rules and personally I had a great day playing this game. Putting aside the unwinnable victory conditions (every umpire can have an off-day when creating a scenario) my only criticism was this rule change, and I believe Stuart is giving some thought to changing it back to how it was. Hopefully, this article will help convince him to do just that before our next game! 

Thursday, 16 February 2023

The Battle of Bavai August 1914

It has taken me a few days to bring myself to write this post. I've been too busy crying into my sauerkraut with the muffled cries of "das ist nicht fair" occasionally being heard. But I'm jumping ahead of myself, so let's start at the beginning of this sorry tale. 

Over the weekend five members of Posties Rejects came together in the shed-o-war for a WWI game using Stuart's early war rules and his massive 6mm collection. Ray and Mark played a small British force tasked with holding back a numerically superior German offensive led by myself, Surjit, and Steve. Sides were determined as usual by picking from a metaphorical hat (bits of folded paper tossed on the table for us to scramble over!) and then the British players were taken out to see the battlefield and be introduced to their mission objectives. The German players sat and waited...and waited...and waited. We could only assume one of two things. Either they were crying into their warm beer over the situation they were handed by the umpire or were arguing between themselves about what to do. After the battle, we found that it was both, so potentially a good start for the German players. 


Order of Battle (lifted from Ray's Blog post for this battle, Don't Throw a One)

British
2nd Corps 5th Division BEF (C/O Ray, 2ic Mark)
13th Brigade
2/Kings Own Scottish Borderers
2/Duke of Wellington’s
1/Royal West Kent’s
2/Kings Own Yorkshire Light Infantry

14th Brigade
2/Suffollk
1/East Surrey
1/Duke of Cornwall’s LI
2/Manchester

9 Batteries of Field Artillery
2 Batteries of Heavy Artillery (off table)

5th Cavalry Brigade – attached
2nd Dragoons (Royal Scots Greys)
12th Lancers
20th Hussars
1 Battery of Horse Artillery

1 Ambulance
1 Field Hospital


Germans
1st Army 3rd Corps
(C/O Lee, 2ic Surjit, 3ic Steve)

5th Division
9th Brigade
   8th Grenadiers (3 Battalions)
   48th Infantry regt (3 Battalions)

10th Brigade
   12th Grenadiers (3 Battalions)
   52nd Infantry regt (3 Battalions)

11th Brigade
   20th Infantry regt(3 Battalions)
   35th Fusilier rget (3 Battalions)
   12 Batteries of Field Artillery

Additional units attached
   3rd Uhlans
   3rd Jagers
   1 Battery of Horse Artillery

Engineers and Pontoon Bridge
1 Ambulance
1 Field Hospital


The Action

The following is brief and I would recommend taking a look at Ray's post on this battle on his Blog Don't Throw a One for more pictures and some naturally biased analysis 😉

We were told at the start that this game was all about terrain objectives. The battle started with 30 points of objectives all in British hands. The Germans would need to capture enough objectives to win the game, so destroying enemy units was not necessary to win, although we would still need to force the Brits off objectives to claim them. Speed and the correct application of force where necessary were vital for the German players.  

The starting positons with virtually no British on the table and lots of German units primed and ready to attack. The Brits don't look very happy. 

My troops in the center were destined for some hard fighting.

The first nasty surprise of the day. One of two off-table artillery barrages. The brits would place the grid and roll a d10 for where the barrage landed (10 on a d10 moved the whole grid closer to their line). From the start, their artillery was very effective/lucky! 

The German offensive begins. Moving at double speed I instructed both my sub-generals to move as quickly as we could. This would mean applying overwhelming force to sweep away opposition so that the following units could leapfrog to the front and continue moving swiftly. 

On our right flank, Surjits Brigades move forward but some are pushed back by accurate artillery fire from the Brits. 

In the Centre, my troops push forward quickly overwhelming the first British defensive line and helping to clear defenders from the village on the crossroads. These were our first points for the villages, crossroads and the T junction seen in this picture. 

On the left flank, Steve's engineers are taking their time building a pontoon across the river, but the infantry Brigades under his command are sweeping forwards and keeping pace with mine. 

My Brigades push forward, largely foregoing a chance to fire their rifles in favor of the extra movement. But there were some strong points that needed to be overcome.

This building represented a small village. We needed to capture the village and the crossroads for the terrain points. For the units involved this was achieved in just one turn, while other units passed by and continued to advance on the British second line of defense. 

Steve's Brigades have likewise cleared the small village by the T junction and now push towards the center, adding their numbers to my Brigades also heading that way. The British players looked understandably flummoxed at this point. There was nothing they could do to stop us and both sides knew it!

Except over on the right flank Surjit seemed to be having problems taking a field. The British here were spared German artillery fire because Surj decided (against my advice) to target the British artillery on the hills at the back of the table. This lack of artillery support for the infantry advance would prove very costly indeed.  

Meanwhile, after what seemed like an eternity, Steve's engineers had finally constructed their pontoon bridge, and his Lancers and Jagers swarmed across quickly. There looked to be several possible terrain objectives and not a sign of any British troops defending them. Ripe for the picking? 

But of course, that wasn't the case. Dismounted cavalry and a machine gun stood in their way. Steve weighed up the possibilities and decided his lance-wielding Uhlans would charge...

Meanwhile, our offensive has reached the British second (and only remaining) line of defense. Again Steve and I used artillery and some rifle fire to soften up the opposition while other units leapfrogged to the front and charged the positions. The Britsh hardly put up a fight and were forced out of their slit trenched with barely any pause. 

However, over on the right flank two combined attacks by one of my Brigades and one of Surjits, failed to dislodge an increasingly weakened British unit in trenches next to the filed. And in the field, Surjit had not taken full control with the British fighting for every inch of dirt (and the terrain point it represented). 

Meanwhile, in the main town, a single British Brigade knows it cannot possibly hold its ground when the German offensive reaches it next turn. 

Over on the left flank, the Uhlans charge the dismounted cavalry and push them back easily.

A swift follow-up charge wipes the defenders out easily. One more terrain point for us and now there truly is nothing stopping us from taking the undefended village on the left or the undefended hill before us in the next turn of movement. 

The fight on our right flank grinds on, but British defeat here can only be one turn away.

But this is the point at which our host and umpire Stuart said the game had come to a conclusion. We assumed we had played out the set number of turns but we later found out that the end was rather more arbitrary than that, with the game scheduled (unbeknownst to either side) to end at a set time regardless of the situation on the table. The German players had taken a lot of terrain objectives and one more turn would have seen us take at least three more without any opposition. By my estimation, we would have gained an additional 4 or five points by playing one more turn...but the Umpire had spoken and both sides waited as he counted up the terrain points held or captured. 

The Germans had captured fourteen points out of thirty, meaning the British had held onto sixteen points to win the game! 


Moments before these two knew they had lost and had faces like slapped arses. Then Stuart announced. As you can tell, Ray was very happy with the result!! 
 

Analysis


What can I say that doesn't sound like sour grapes... The British put up a good fight, making us battle for every inch over on the right of our line. Their tactics were sound, but they were also impossibly unlucky with their dice rolls. They lost every initiative roll of the game and consistently failed morale checks for units following melee, far beyond the bounds of normal probability. They were understandably and justifiably unhappy, right up to the announcement of the winners! 

On the German side, I think we performed well. We kept moving (ignore the pro-Britosh propaganda on Ray's blog) and I don't see how we could have progressed any further across the table. Having cleared all opposition, one more turn would have seen us sweep up a load of terrain points for a decisive victory. But as is often the case, we had a great time and were not so much beaten by the opposing players, but by the Umpire. Such is the price of gaming in the shed-o-war, and I wouldn't have it any other way. 

Wednesday, 25 August 2021

Imperial War Museum North: A Unique Collection & Iconic Building

I recently visited the Imperial War Museum North and wanted to share a few of my pictures while extolling the virtue of a visit. This is an interesting and thought-provoking family museum and well worth a visit.


A very interesting museum and well worth a visit if you are in the area. Entry to the museum is free although there is a charge for parking. I rate this quite highly if you have a family group because there are artefacts and interactive exhibits that will appeal to all ages and levels of knowlege. 

Wednesday, 5 May 2021

Bombed out Buildings for WWII

Last week I posted a video of two resin terrain pieces from Ironclad Miniatures and I said I thought they were really nice looking models. I've now painted them up and I'm even more pleased with them. There is so much detail in these resin casts and that made painting them very easy. 


The models saw some action at the weekend and the Battle Report video from that game will be posted later in the week. 

Tuesday, 27 April 2021

Unboxing Ruined Buildings

I recently received some rather nice resin terrain from Ironclad Miniatures and shot a short Unboxing Video for my YouTube Channel, Miniature Adventures. The resin is very nice quality, with little cleaning required before painting, and is packed full of detail. 


I'm really pleased with these and hope to have them painted up and in action very soon. 

Wednesday, 4 March 2020

Battle of Fismes 1914

Over the weekend Postie ran a WWI game using his homebrew rules, Home for Christmas. This focuses primarily on the opening months of the war before the conflict got bogged down in trench warfare. We've played a few games with these rules, and ran a demo game using them at Broadside a couple of years ago, and they work really well. For this game, Richard and I would face Surjit and Ray in a very long and drawn out tussle. 

The Setup
The game is set during the Second Battle of the Marne and sees the French on the attack against a weakened and dispersed German force. When the game opens the Germans are massively outnumbered but unbeknownst to me and Richard (because Postie doesn't tell us these things) we had a lot of reinforcements that would arrive steadily during the game. 

Order of Battle
Ordinarily, I would type out the order of battle, but I have a growing list of things to do tonight and decyphering Posties handwriting isn't on it! 

The Action
The German positions are closes and we had a difficult choice to make. There were 12 objectives to hold on to, but they were scattered across the length of the table. Basically, all the hills, woods and buildings would be worth 2 points each to whoever held them at the end of the game. 

Our General (Richard von Elderman) hard at work planning the defence!

Meanwhile, we move all our gun batteries into position. Artillery will make a big difference in this game. 

Another Panoramic shot showing the entire length of the battlefield. My troops are on the left and Richard is on the right. We deployed most of our troops forward of the hedges and forests, fully expecting to be pushed back at some point. At least we planned not to be pushed into open country where we could be more easily targeted. 

The French begin their advance across the open fields. Our artillery drops a lethal barrage on them forcing a handful of regiments back, but only for a short while. 

Over on the right the French advance steadily and in numbers against Richards regiments. 

Artillery is now added to with direct rifle fire and the casualties mount. At least we were able to dig some slit trenches when we set up. 

View down the field of battle. 

I put a machine gun team and a company of men in this farmhouse. They were crucial to my defence. Later when Surjit tried to use his mounted troops to get behind my lines I was able to turn that MG on them with deadly effect, forcing them back. The team was eventually killed but they earned their stripes. 

Casualties build on both sides. 

Most of the French units are now inside rifle range and the game starts to hot up. It's not looking for Richards and I as we are seriously outnumbered. 

Phew! A whole Battalion of Reinforcements arrives behind Richards lines. 

Not a moment too soon however because the men at the front are being pressed hard and are likely to fall back soon. 

Over on the far left, way out from my apparent flank, there is a single building. Inside I have hidden one company of men. They are a bit of a sacrificial offering but they hold up the french advance here for several turns. 

Double Phew! Just as it looks as if my undermanned flank is about to be turned I get a Battalion of Reinforcements. Now I just need to get them into position. 

Richards Regiments are forced back into the woods closely followed by the French. The fight here turns into a bit of a stalemate with both sides reluctant to get into Melee. 

I start to move my reinforcements up to plug the front line and send one regiment to support the flank. With hindsight, I think it would have been better to have sent two to the flank, but at this point, I was expecting a French breakthrough in the centre. 

Another panoramic shot. Both armies are now on the German side of the table. Good, if the French players have to stretch to move there troops all the better! 
More reinforcements, this time another battery of guns. Richard can use these to best effect on his flank. 

On my flank, the French are starting to lap around the and of the line, now that they have finally cleared out my suicide company in the farmhouse on the extreme left. Those boys earned their medals! 

In the forest the French have pressed up close to Richards men but are not getting drawn into a melee. It's looking like a stalemate...but Von Elderman has a plan!

My regiments square up against the French and shot at each other across a hedge. It's a bloody affair. 

General Von Elderman does a voluntary withdrawal, pulling back a full 12 inches and getting to redeploy with a load of open ground in front of them. With two batteries of guns and four regiments training their guns on the open ground the French understandably do not want to come out of the woods. 

My flank is being turned and there is little I can do about it. From the very beginning we knew we couldn't hold across the whole length of the field and elected not to put troops at the end of the line (other than a single company in the building). Again with hindsight, I think it would have been a good idea to put troops in the forest but it still takes the French a long time to get to this position. I now need to make a decision, do I withdraw my gun battery from the hill and risk looking them or keep them here for one more round. Keeping them here denies the VP's for the hill to the French, but only for one turn. 
I shift one of my fresh Regiments into the centre and face off against the only remaining French Regiments here. 


General Von Eldermans perfect killing field. The French are not budging from that wood. 

Surjit and Ray look a bit knackered. Postie calls the game to an end, we've been playing for nearly seven hours and completely lost track of time. Now hove the German players done enough to hold on to victory? 

Analysis
Postie added up points for objectives and lost units and...drum roll please...declares the game a draw! Both sides are equal having fought each other to a standstill. While it would have been good to have had a clear winner the fact is we all enjoyed the game and both armies were largely spent by this point. Time to start digging trenches boys!