Showing posts with label Hanging Rock. Show all posts

Sunday, September 25, 2011

Hanging Rock (and other) Maps

One of the topics I've enjoyed reading and writing about is Thomas Sumter's 1780 campaign against British forces occupying South Carolina.

When I started researching Sumter's August 6, 1780, battle at Hanging Rock, South Carolina, I quickly noticed that the place that has been officially designated as the Hanging Rock battlefield (some hills on the western bank of Hanging Rock Creek, opposite the eponymous rock formation) was unlikely to have been the actual site of the battle to judge from statements in the source material (as explained here and here). I took this as carte blanche to determine where, in this area, the actual fighting took place. Eventually, I concluded that the battle most likely took place over a stretch of ground ranging from a plateau south of Hanging Rock Creek to a hill the northeast (as explained here).

I didn't regard this attribution as definitive because I didn't have access to all sources of information (noted here). And indeed, this year I've come across electronic copies of three old maps of the Hanging Rock battlefield that I wish I had earlier.

One map is attributed to Richard Winn, who was a participant in the battle of Hanging Rock. It can be found here.

The other two appear are in the Draper map collection, and were rendered in the late 19th Century (based, I believe, on local lore). They can be found here and here. (On the first link, north is at right; on the second, north is at top;

The maps partially confirm, and partially disconfirm, my interpretation of the Hanging Rock battlefield site.

All three maps appear to show that I was right about the placement of the main British camp on a plateau south of the creek.

All three maps appear to show that I was wrong about the hill on which British Loyalists were encamped. I concluded the hill was northeast of the main camp; these maps show the Loyalists on a hill northwest of the main camp.

I use the term "appear" because it's unclear how much confidence should be placed in these maps. The Draper maps are of a very late date, and the Winn map is wrong in at least one respect: it appears to show Hanging Rock Creek flowing west into the Catawba River, when it actually flows east into the Lynche's Creek.

---------------------------------------------------------------------------

This map is from one of last year's posts on Hanging Rock. The three red squares show places that I suspected to be part of the British encampment. #1 is Hanging Rock, #2 approximately corresponds with the Loyalist camp according to the Winn and Draper maps, #3 and #4 is a flat plateau bisected by the Camden Road; the Draper maps show the main British camp in this area.

---------------------------------------------------------------------------

The online Winn and Draper maps also provide insight into two of Sumter's later engagements. See the links listed below.

Battle of Fishdam Ford (November 9, 1780)

Battle of Blackstock's Plantation (November 20, 1780)

For more on the Draper Manuscripts, see here and here

Thursday, March 31, 2011

Looking for More Information on Hanging Rock

Last year I spent a considerable amount of time reading and writing about the battle of Hanging Rock, South Carolina, and turned that into an original, and rather detailed, account posted to this blog.

Recently, however, I came across a new piece of information that has led me to rethink some of my conclusions -- a map that is believed to have been made by Colonel Richard Winn, one of the American commanders at that battle.

The direct link to the map is here. It is one of several Winn maps hosted on John Robertson's Online Library of the Southern Campaign of the Revolutionary War website.

On the map, Hanging Rock is at center right. The map identifies the "Tory encampment under Col Brian," the "old field British encampment," and a "Steep Hill"

A map like this should make it easier to understand where and how the battle was fought, but unfortunately I find this map difficult to reconcile with some of the other statements in the source material and with the modern landscape. For example, the map makes it appear that the battle was not fought along Hanging Rock Creek (as has been supposed by myself and others) but along another creek that flowed south and west into the Catawba River. I'm willing to revise my conclusions (including a draft article I prepared), but it seems to me that other information is needed to help make sense of this map. Folks that are familiar with the area -- especially archaeological work that has been performed -- are encouraged to contact me about what they know, or to point me towards persons or sources that may be helpful. Emails can be addressed to me (Adam) at mini_awi "at" yahoo "dot" com.

Friday, January 7, 2011

Article on Hanging Rock

Recently, I described my work of the past year, but in so doing, I omitted one subject. Last Spring I spent some time turning my multiple blog posts on the battle of Hanging Rock, South Carolina, into the kind of article that could be submitted for publication in a periodical. This evening I placed a draft version of that article online, and you can find it here.

The article is intended to be a concise description of the battle of Hanging Rock. It is also a bit more polished than my usual writing. However, you won't much that's new if you've already read my past posts on this topic.

I'm not sure if I will do anything with the article or not. For one thing, the article desperately needs more and better illustrations, but I haven't taken the time to develop those skills. If it should at some point get published (after further refinements), I'll mention it on this blog.

Sunday, April 25, 2010

Sumter’s Brigade Reforms

Sumter’s brigade was broken by the battle of Fishing Creek (August 18, 1780). According to one participant, "the troops dispersed in every direction each taking care of himself." Sumter, on horseback, headed north. On August 19, he reached William Bratton’s house, near Williamson’s Plantation. From there, a handful of men saw him safely across the North Carolina border. He rode alone into Charlotte on August 20 [1].

Fishing Creek and Camden returned British control over northern South Carolina to the same state that it had been in June, before Sumter took the field. So unsafe was it in this area that "orders were then given out that there should be no assembling of companies even of a few men." However, Sumter's defeat also did not end the broader resistance to the British occupation of South Carolina. During Sumter’s campaign, South Carolina partisans organized in the western part of the state under James Williams and in the eastern part of the state under Francis Marion [2].

In North Carolina, now exposed to British invasion, a debate began over whether the conflict should be continued. Joseph Graham recalled that "several aged and respectable citizens insinuated that further resistance would… only produce more certain destruction to themselves and [their] families… But this was indignantly repelled by a great majority, and especially those who had been in action at Hanging Rock. Several of them stated that they then had seen the British soldiers run like sheep, and many of them bite the dust; that they were by no means invincible; that under suitable commanders and proper arrangements, they would at any time risk a conflict with them, man to man" [3].

Although Sumter bore ultimate responsibility for the debacle at Fishing Creek, he does not seem to have lost the esteem of those that had fought under him. It seems to have been generally understood that the defeat stemmed largely from some rather exceptional circumstances. According to Colonel Richard Winn (at the time recuperating from the wound he received at Hanging Rock), the most important factor was "the inattention of his patrols and rear guard Commanded by Major Crofford." Tarleton agreed: Although Sumter "had sent patrols to examine the road... fortunately for the British, they had not proceeded far enough to discover their approach." Indeed, the two Loyalist women that told Tarleton how to gain Sumter’s flank met the British commander just ½ mile in front of the American rear guard [4].

As Summer turned to Fall, Sumter's brigade reformed and returned to the field. Among the returnees was John Murphey, who had lived in the neighborhood of Fishing Creek, and was captured at the battle there. In early September he was released from the Camden jail upon making the following pledge:

"I John Murphy of Fishing Creek acknowledge myself a prisoner on parole to a detachment of his Majesty's troops under the command of the right Honorable Lieutenant General Earl of Cornwallis and I do promise that I will not act directly or indirectly against his Majesty's Government nor stir up others so to do, that I will not speak or say anything that shall be prejudicial to his Majesty's interest and will confine myself to my own plantation not exceeding one mile from thence until further enlarged."

However, Sumter "persuaded him that no good man and patriot would be bound by such a promise," upon which Murphey "tore up his parole and joined General Sumter" [5].

Notes:

1. The pension application of Samuel Watson, transcribed by Susan K. Zimmerman and R. Neil Vance. The pension application of George McLain, transcribed by Will Graves. The Revolutionary War Sketches of William R. Davie [extract].

2. The pension application of Zachary Kitchens, transcribed by C. Leon Harris. John Buchanan. (1997). The Road to Guilford Courthouse: The American Revolution in the Carolinas.

3. William A. Graham (1904). General Joseph Graham and His Papers on North Carolina Revolutionary History.

4. General Richard Winn's Notes -- 1780, transcribed by Will Graves. "Major Crofford" is very probably Major Robert Crawford of South Carolina. Banastre Tarleton. (1787). A History of the Campaigns of 1780 and 1781. James Hodge Saye. Memoirs of Major Joseph McJunkin, Revolutionary Patriot.

5. The pension application of John Murphey, transcribed by Will Graves.

Saturday, April 3, 2010

Battle of Fishing Creek 1

The Battle of Fishing Creek
Part 1: Sumter's Third Target
Next: Cary's Fort and Camden

[This account follows an earlier series of posts describing the battle of Hanging Rock. Some earlier posts provide useful background information, see especially Occupied South Carolina, Sumter's Brigade Forms, and Rawdon's Defense of South Carolina].

Rawdon's Dilemma

On the evening of August 6th, 1780 a trickle of Provincials and Loyalist militia arrived in Lieutenant-Colonel Francis Rawdon's camp at East Lynche's Creek. These men described how Thomas Sumter had routed their units and seized the British post at Hanging Rock. The news was a shock. Sumter had evidently cleared a route towards his base of operations at Camden. Worse, Sumter’s men were mounted; his were on foot.

Rawdon knew that even if Sumter could not seize Camden, he could at least get in rear of his command. This was a most unwelcome prospect because the main American army under Major-General Horatio Gates was simultaneously approaching from in front.

Deciding that no time was to be lost, Rawdon decided to abandon his strong post and make a night march towards Camden. He thought the situation might even turn in his favor if he could catch and defeat Sumter before Gates appeared. In the morning (August 7), however, he learned the truth of the battle of Hanging Rock: The British Legion infantry, aided by other detachments, had held their ground, forcing Sumter to withdraw. By now, the movements of Gates' army made it too hazardous to reestablish the post at East Lynche’s Creek. Rawdon therefore settled on a new (and weaker) defensive line closer to Camden. The troops at Hanging Rock were withdrawn to Rugeley’s Mill, and Rawdon's command encamped at West Lynche’s Creek. The post at Rocky Mount was not in imminent danger, but on August 12 Rawdon gave orders for it to withdraw as well to a more secure position [1].

Sumter Advances

Although Sumter was forced to withdraw from Hanging Rock, he took comfort in the fact that in the following days, "both British and Tories" were "pannick struck," by the Americans' gains [2]. As Gates' army closed with Rawdon's new position, Sumter wished to contribute to his operations by cutting the flow of men and supplies into Camden. To accomplish this, he proposed to march his brigade down the western side of the Catawba/Wateree River [3] and take control of key ferry crossings south of Camden [4]. On about August 13, Sumter's brigade set out on this mission. Sumter's brigade was much reduced in size by this time: in addition to the men killed and wounded at Hanging Rock, he lost the services of all of his North Carolina troops [5]. Some of his South Carolinians also left him in order to protect the western part of their native state from the Loyalist militia [6].

Rawdon's New Defensive Line: 1) British base at Camden, 2) British post at Rugeley's Mill, 3) British post at West Lynche's Creek. The arrow at upper left shows route of Sumter's advance (Sumter was in the marked area on or about August 14). The arrow at upper right shows Gates' advance (Gates' vanguard was in the marked area on August 8). (Compare with this map).

On August 14, Sumter informed Gates that a wagon train bringing men, ammunition, and clothing was approaching Camden from the south and that he was poised to capture it. By this time, Gates had maneuvered Rawdon out of his second defensive line and had become confident of his ability to take Camden. To support Sumter's small force (now only about 250 men), Gates lent him 100 Continentals, 300 North Carolina militia and 2 pieces of artillery. These men left Gates' army the night of August 14-15 and joined Sumter at daybreak [7].

Notes:

1. Letter from Francis Rawdon to Colonel McMahon, January 19, 1801. Letter from Josiah Martin to George Germain, August 18-20, 1780. Journal of Lieutenant Anthony Allaire, in Lyman Copeland Draper. (1881). King's Mountain and Its heroes: History of the Battle of King's Mountain.

2. Letter from Thomas Sumter to Thomas Pinckney, August 9, 1780.

3. The river is known as the Wateree in the vicinity of Camden, but as the Catawba at Rocky Mount and points further north.

4. Letter from Thomas Sumter to Thomas Pinckney, August 9, 1780. Letter from Thomas Sumter to Thomas Pinckney, August 12, 1780.

5. William A. Graham (1904). General Joseph Graham and His Papers on North Carolina Revolutionary History.

6. Will Graves. (2005). What Did Joseph McJunkin Really Saye? Southern Campaigns of the American Revolution, Volume 2, Issue 11.

7. Letter from General Gates to the President of Congress, August 20, 1780. Otho Holland Williams. A Narrative of the Campaign of 1780. Journal of Johann Christian Senf [extract].

The Continental infantry was drawn mainly from the Maryland line, although there were also a few of the 1st Delaware and a company-sized detachment of Armand's Legion. The whole was commanded by Lieutenant-Colonel Thomas Woolford of the 5th Maryland. Two 3-pounder cannon, accompanied by a small crew, were detached from the Continental artillery. The North Carolina militia were commanded by Colonel Elijah Isaacks.

See: Prisoners Taken at Catawba Fords. Pension application of Peter Scrum, transcribed and annotated by C. Leon Harris. Letter from General Gates to the President of Congress, August 20, 1780. Pension application of Thomas Bartley, transcribed and annotated by C. Leon Harris.

Friday, March 19, 2010

Battle of Hanging Rock 13

Part 13: Reinforcement and Retreat
Previous: Stalemate

The final British bayonet charge and the withdrawal to the center of the open area effectively brought the battle of Hanging Rock to an end. Nevertheless, the British remained apprehensive about another American attack. According to Charles Stedman, the outcome remained "doubtful," until:

"the appearance of a reinforcement changed entirely the fortune of the day. This reinforcement consisted of forty mounted infantry of the Legion who were returning from Rocky Mount: But the captains [Patrick] Stewart and [Charles] MacDonald, who commanded it, by ordering the men to extend their files, gave it the appearance of a formidable detachment. The bugle horns were directed to sound a charge: And the Americans, already kept at bay, were now fearful of being overpowered" [1].

Reinforcement. While the American militia plunder the center camp, the Provincials holding the open area receive an unexpected reinforcement.

Mounted Infantry Arrive (click to enlarge). Two companies of mounted Legion infantry advance up the Camden Road towards the Americans. The Provincials are in square formation.

William Davie and was dragoons "were returning towards the centre," after driving off a number of Provincials and Loyalist militia, when they saw that Stewart's and MacDonald's companies had "advanced up in the Camden road." Davie turned his men around and charged. The British "took the woods in flight, and one only was outdone" [2].

Davie's Final Charge (click to enlarge). The American dragoons send the mounted Legion infantry into the woods.

This repulse would seem to be the end of the affair, except that these green-jacketed mounted infantry were mistaken for the vanguard of Tarleton's dreaded British Legion dragoons [3]. According to Joseph McJunkin, Sumter remarked, "Boys, it is not good to pursue a victory too far," and began pulling his troops back [4]. A number of American participants and British commentators referred to this reinforcement as the cause of the American retreat [5].

Before the retreat was effected, "about an hour" was spent "plundering the [center] camp, taking the parole of the British officers, and preparing litters for the wounded" [6]. According to William Davie, "All this was done in full view of the British army, who consoled themselves with some military music [7] and an interlude of three cheers for King George" [8]. Hearing this, Sumter called out, "'Boys, can't you raise a whoop of victory?' Then the air was rent with the cry of victory" [9].

Plundering the British Camp (click to enlarge). The Americans raid the British Commissary's stores before abandoning the Hanging Rock battlefield.

Davie concluded, "The militia at length got into the line of march, Davie and his dragoons covering the retreat, but as the troops were loaded with plunder, and encumbered with their wounded friends, and many of them intoxicated, this retreat was not performed in the best military style. However, under all these disadvantages, they filed off unmolested, along the front of the enemy" [10]. Sumter claimed that he "brought off one hundred horses, two hundred and fifty stand of arms, with other articles of considerable value" [11].

The Americans had marched about a mile when a mounted British caught up to the rear of the column with a flag of truce, ostensibly to gain permission to bury their dead [12], but probably also to verify that the Americans were in fact retreating. Joseph McJunkin was near the rear of the column at this time, escorting the prisoners. Turning to Sumter he said, "You have through the Divine hand of Providence, achieved a great victory today." Sumter agreed, but ruefully noted that "it will scarcely ever be heard of, because we are nothing but a handful of raw militia, but if we had been commanded by a Continental officer it would have sounded loud to our honor" [13].

Sumter was correct: Hanging Rock was a remarkable battle, but destined to be mostly forgotten.

Notes:

1. Charles Stedman. (1794). The History of the Origin, Progress, and Termination of the American War, Vol. 2.

2. For William Davie's account, see The Revolutionary War Sketches of William R. Davie [extract]. Davie's account also appears in, John H. Wheeler. (1851). Historical Sketches of North Carolina from 1584 to 1851, Vol. 1.

3. Cf. Davie, ibid., and Joseph McJunkin's account, in Will Graves. (2005). What Did Joseph McJunkin Really Saye? Southern Campaigns of the American Revolution, Volume 2, Issue 11.

4. McJunkin, ibid.

5. For example, among the Americans, Mark Jackson stated that "it being rumored that Tarleton’s Corps were coming we retreated." James Kincaid noted, "we failed of success by a reinforcement of the British Army from Rocky Mount but we marched off in order." Zachary Kitchens observed that "after a hard and long fight we retreated, upon being informed that a reinforcement was coming to the aid of the British." As for British commentators, the connection between the arrival of this reinforcement and the American retreat is made by Charles Stedman, Banastre Tarleton, and Anthony Allaire.

Other causes for the American retreat were mentioned previously.

6. Davie, ibid.

7. The British Legion had a regimental band. See the letter from Otho Williams to Dr. James McHenry, dated January 23, 1781, and summarized here.

8. Davie, ibid.

9. McJunkin, ibid. This cheer was recalled somewhat differently by others. According to Davie, ibid., "three cheers [were given] for the hero of America." Richard Winn claimed that Sumter "gathered his men and for victory three cheers was given by the true friends of America." For Richard Winn's account, see General Richard Winn's Notes -- 1780, transcribed by Will Graves.

10. Davie, ibid.

11. Letter from Thomas Sumter to Thomas Pinckney, August 9, 1780.

12. McJunkin, ibid.

13. McJunkin, ibid.

Friday, March 12, 2010

Battle of Hanging Rock 12

Part 12: Stalemate

The battle of Hanging Rock began as a major assault on one part of the British camp, but degenerated over time into "skirmishing with detached parties" [1]. These scattered engagements had caused many of the British troops to be driven from the battlefield [2], but the Americans had difficulty completing the victory because "the rout and pursuit of these various [British] corps by a part" of Sumter’s force, "and plunder of the camp by others, had thrown the Americans into great confusion" [3].

South of the British center camp, a mixed force of Provincials, backed up by two cannon, held on in an open area. But although the Americans were disorganized, with "some intoxicated, others plundering in the British camp," still "a respectable number," [4], perhaps 200 in total [5], continued "facing the enemy and pressing them closely" [6]. In this manner, the Provincials "were compelled gradually to give ground 200 yards," [7] or beyond the effective range of the Americans’ rifles.

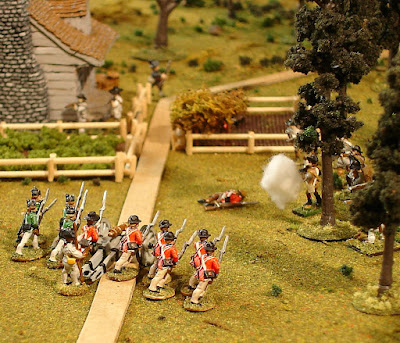
Sniping Near the Center Camp (two views; click to enlarge). The Americans send long-range rifle fire against the Provincials, who continue to hold the open space south of the center camp.

The British withdrawal was made grudgingly, and they made perhaps two quick bayonet charges against the Americans before falling back to a more secure position [8]. At the time of these charges, the British were under attack "in a peculiarly steep part" of the plateau [9]. The final counterattack was a "vigorous charge with the bayonet," which they claimed left the militia "not merely… repulsed but… broken and dismayed" [10]. In this charge, the British may have briefly succeeded in closing with Sumter’s men. James McConnel of Irvine’s battalion "was wounded in the right arm by a bayonet thrust" [11]. In any event, the Americans "abandoned the whole ridge" [12]. Francis Rawdon claimed this final charge was made by the Legion infantry; a first-hand account places a part of the Prince of Wales' American Regiment on the scene as well [13].

The Final Bayonet Charge (two views; click to enlarge). A fierce bayonet charge drives the Americans off the plateau.

American accounts do not describe such a defeat as the British claimed. Instead, they asserted that Sumter intentionally "had his men withdrawn a small distance." This was done so that the men could be properly "formed" and "stragglers collected." Sumter's intention was "to renew the action." However, as "he rode along the line, personally inquiring of each man his stock of ammunition," he "found that they had not on an average three rounds per man" [14].

There were other serious problems as well. Because "the weather was warm," [15] men were "fainting with heat and drought" [16]. Also, the final British position was "in the centre of the cleared ground" and following William Davie’s charge they "formed a hollow square" [17]. Davie noted that "The distance of the square from the woods, and the fire of the two pieces of field artillery, prevented the militia from making any considerable impression on the British troops" [18].

A final significant factor was the considerable losses that the Americans had sustained. Among the officers, for example, David Reid of North Carolina and John McClure were both mortally wounded in the assault on Bryan’s camp [19]. Richard Winn was shot during the fighting with the Prince of Wales' American Regiment; William Hill was also shot around the same time [20]. William Robison "was wounded by a musket shot through the shoulder," [21] Samuel Otterson was shot "in my left arm which severed" "about midway" "the bone between the elbow and shoulder," [22] and one Captain Petty "had his arm shot off" [23]. James Jamieson "was wounded by a musket shot through the body" [24], left on the field of battle, and subsequently "taken prisoner" [25].

The British Square (click to enlarge). The British form a defensive square in the center of the open area, daring the Americans to attack.

Stalemate. The Provincials launch a desperate bayonet charge against the Americans that have gathered south of the center camp. Neither side is strong enough to completely drive the other from the field.

Notes:

1. The pension application of James Clinton, transcribed by Will Graves.

2. cf. the letter from Francis Rawdon to Colonel McMahon, January 19, 1801.

3. William Davie's account; see The Revolutionary War Sketches of William R. Davie [extract]. Davie's account also appears in, John H. Wheeler. (1851). Historical Sketches of North Carolina from 1584 to 1851, Vol. 1.

4. Joseph Graham's account; see William A. Graham (1904). General Joseph Graham and His Papers on North Carolina Revolutionary History.

5. Davie, ibid.

6. Graham, ibid.

7. Graham, ibid.

8. American sources are almost silent on the subject of British charges during this period. Charles Stedman wrote that the Provincials made, "three desperate charges with the bayonet." One of these would have been the earlier charge that retook a cannon. George Hanger was less precise: "Sumpter renewed the attack; he was again and again beat off, charged, and pursued, but with regularity." Banastre Tarleton mentioned two charges and attributed these solely (and probably incorrectly) to the British Legion. His account is unclear as to whether one or more additional charges took place after other Provincials joined the Legion’s resistance.

9. Rawdon, ibid. Although there is not a consensus about where the fighting took place, each of the several possibilities I considered previously identified the final part of the battle with the plateau transected by the Camden Road (links to these posts can be found here). The plateau itself does not have "peculiarly steep" slopes. However, there is a place several hundred yards south of the point I’ve identified as the center camp where a kind of gully comes close to the Camden Road (the open area where the Provincials made their stand). Perhaps this terrain feature was used by the Americans to approach and fire on the Provincials in relative safety.

10. Rawdon, ibid.

11. The pension application of James McConnel, transcribed by Will Graves. It is usually difficult to tell when and where participants' injuries occurred. McConnel could plausibly have been stabbed by a bayonet at other points and places. This charge, however, seems to have been the most successful of the battle, and some of Irvine’s men are known to have been present (cf. Joseph Graham, ibid.).

12. Rawdon, ibid.

13. For the account of an anonymous officer of the Prince of Wales' American Regiment, see Todd Braisted (2001). A History of the Prince of Wales' American Regiment.

14. Graham, ibid. In light of the fact that the Americans were later compelled to abandon the ground, Graham claimed that this shortage "was the true cause of [Sumter's] retreating" Sumter agreed, writing not long after the battle that "the true cause of my not totally defeating [the British] was the want of lead, having been obliged to make use of arms and ammunition taken from the enemy." See the letter from Thomas Sumter to Thomas Pinckney, August 9, 1780.

Clearly by this point in the battle, Sumter was on the scene of the fighting south of the center camp. Earlier he oversaw the destruction of a detachment of the Prince of Wales' American Regiment. In consequence, Sumter's account of the battle (Sumter, ibid.) provides few details about the fighting near the center camp. He wrote that the British "sustained [the battle for the center camp] with great bravery for near an hour; at length [they] gave way, leaving me in full possession of their camp." They then, "rallied again in Col. Robinson’s encampment," which seems to mean in or near the camp of the Prince of Wales’ American Regiment. From this point on, however, "their opposition was but feeble."

Lieutenant-Colonel Joseph Robinson was an officer in a different Provincial regiment: the South Carolina Royalists. Neither he nor his men were at Hanging Rock.

15. Clinton, ibid.

16. Sumter, ibid.

17. Davie, ibid. Graham, ibid., also mentions this feature. Davie has the British adopting this formation as soon as they rallied south of the center camp, a view that is difficult to reconcile with British statements strongly pointing to a more active defense. More believable is that the several British accounts are essentially correct and that the British adopted the square formation only after Davie's dragoons chased a number of Loyalists and Provincials from the woods in their rear.

18. Davie, ibid.

19. Graham, ibid; Davie, ibid; Joseph Gaston. (1836/1873). Joseph Gaston's Narrative. The Historical Magazine and Notes and Queries Concerning the Antiquities, History and Biography of America, Vol. 1.

20. Davie, ibid; General Richard Winn's Notes -- 1780, transcribed by Will Graves. Alexander S. Salley. (1921). Col. William Hill's Memoirs of the Revolution.

21. The pension application of William Robison, transcribed by Will Graves.

22. The pension application of Samuel Otterson, transcribed by Will Graves.

23. The pension application of Daniel Carter, transcribed and annotated by C. Leon Harris.

24. The pension application of James Jamieson, transcribed by Will Graves.

25. The pension application of Henry Rea, transcribed by Will Graves.

Friday, March 5, 2010

Battle of Hanging Rock 11

Part 11: Rousselet's Gallant Stand
Next: Stalemate

After the American militia charged the center camp, the Loyalists and Provincials on hand retreated to the south and west, taking their cannon with them. What happened next is not entirely clear because few American participants described the subsequent fighting [1] and British sources are mutually contradictory [2]. This much can be said with some certainty: During the retreat of the British, they continued to fire a cannon at the Americans. This gun was somewhat separate from the Provincials, and it was seized by a party of North Carolinians. A group of Provincials that had rallied then charged and retook the cannon. Another group, consisting of both Loyalists and Provincials, also attempted to rally, but they were dispersed by William Davie's dragoons.

The British Rally (two views; click to enlarge). A group of Provincials and Loyalists rallies in the open space south of the center camp, while a second group rallies on the edge of the woods. The British cannon is defended by Henry Rugeley's South Carolina Loyalist militia [3].

Joseph Graham of North Carolina described the seizure of the British cannon as follows:

"On the British retreat from their position after being forced from their camp on the right of their line they kept firing a three pounder. Captain James Knox of Mecklenburg, gave order to his men to load their guns, and when that piece fired the next time they would take it; on the discharge of the gun they started in full run, and before the artillerists could load got within forty steps and began to fire, the British retreated and Knox and party took the gun and turned her on their adversaries" [4].

Knox Has the Cannon (two views; click to enlarge). Knox's North Carolinians turn a cannon on the Provincials.

Knox’s seizure of the gun threatened to drive the British Provincials off the field of battle. At this moment of crisis, however, Captain John Rousselet of the British Legion, was able to rally his regiment. Fortunately for Rousselet and his men, Knox’s men did not know “how to manage or load” the cannon, although it was “in their possession several minutes” [5].

By standing their ground, these “gallant few gave time for a few of the scattered troops to rally and join the legion” [6]. Among the arrivals was the unengaged portion of the Prince of Wales’ American Regiment. They had by this time “recover[ed] from the consternation into which they had been thrown by the flight of Colonel Bryan, and they now joined [the Legion infantry] to defend the British encampment” [7].

Elements of the Royal North Carolina Regiment and Prince of Wales' American Regiment were added to the right of the British line [8], and the British then “came on with fixed bayonets and retook the gun" [9]. George Hanger claimed that when the British charged, John Rousselet accompanied them, and that "this officer, possessing happily not only valour, but also good conduct," did not permit the British to pursue the Americans "in a broken and irregular manner," but instead, "convinced of the advantage of the ground he had been attacked upon, he marched back and took possession of it again" [10].

Soon after this episode [11], William Davie managed to get his dragoons "collected and formed on the margin of the woods." However, he did not send his men into the open field to battle Rousselet and the British three-pounders. Instead, he set his sights on “a large body of the enemy, consisting of the legion infantry, Hamilton's regiment, and Tories... rallying, and formed on the opposite side of the British camp, near the wood." William Davie decided to attack this force with his dragoons, “lest they might be induced to take the Americans in flank.” To avoid the deadly open space, he “passed round the [center] camp under cover of the trees, and charged them with his company of dragoons.” As a result, the British “were routed and dispersed by a handful of men” [12].

Davie Charges Around the Camp (click to enlarge). Davie's dragoons charge through the woods, driving before them Loyalist militia and Provincial infantry.

Rousselet's Gallant Stand and Davie's Charge. As one group of Provincials holds off American attacks south of the center camp, a second group is routed by a charge of William Davie's dragoons.

Notes:

1. Joseph Graham provided the clearest description. The accounts by William Davie and Thomas Sumter also provide invaluable insights, however, the latter two appeared to miss at least parts of this action. Of the other participants who wrote postwar narratives (these do not include pension applications), Richard Winn, William Hill, and Joseph Gaston were wounded elsewhere on the battlefield, and Joseph McJunkin was attending to the wounded and/or guarding prisoners.

2. Francis Rawdon, Banastre Tarleton, and George Hanger claimed that the British Legion was chiefly responsible for maintaining the resistance against the British during this period, while Charles Stedman, Roderick Mackenzie, and an anonymous officer of the Prince of Wales' American Regiment gave important roles to either the Royal North Carolina Regiment or the Prince of Wales' American Regiment.

A tentative resolution to these discrepant versions of events is as follows: The British Legion infantry was the first to rally after the center camp was lost and it was central to maintaining a British presence on the battlefield. After they rallied they were joined by other Provincials, and this combined force fought Sumter's men to a draw. Tarleton and Hanger were officers in the British Legion and their accounts probably reflect a certain degree of pro-British Legion partisanship (cf. Mackenzie). However, Rawdon observed that the British Legion infantry alone remained entirely on the battlefield after the action ended and that morale remained good among the Legion infantry, after it had fallen among the other British units fighting at Hanging Rock. Also, Stedman credited Captain John Rousselet of the Legion infantry with a special leadership role at around this point in the battle (cf. Hanger).

3. Braisted, ibid.

4. Graham, ibid.

5. Graham, ibid.

6. Hanger, ibid.

7. Tarleton, ibid.

8. Braisted, ibid.

9. Graham, ibid. It was perhaps at this time that, according to Mackenzie, ibid., that "Lieutenant [or Adjutant] Browne, of the North Carolinians... fell in a desperate charge, which the crisis of the action rendered inevitable."

10. Hanger, ibid.

11. Suggested by a comparison of Davie's and Graham's accounts. Davie seemingly missed the taking of the cannon and the subsequent British charge. His account states vaguely that “The remainder of a British line who had also made a movement, retreated hastily towards their former position.” This passage follows his description of the destruction of a detachment of the Prince of Wales' American Regiment, suggesting that his charge came subsequent to the charges by Knox and Rousselet.

12. Davie, ibid. As noted here and here, Davie's dragoons had scattered earlier in the battle.

Monday, March 1, 2010

Battle of Hanging Rock 10

Part 10: The British Flank Attack

Around the time the battle opened, a detachment of the Prince of Wales' American Regiment (PoWAR) was dispatched northward towards the sound of battle. This contingent seemingly reached the center camp while the fighting was still raging at Bryan's encampment. At the time, the British commander at Hanging Rock, Major John Carden, would not have known that Bryan's men had been completely routed or that McCulloch’s company was in the process of being destroyed. He therefore sent this detachment to Bryan's support, while keeping the remainder of the Provincials in a defensive posture [1].

At about the time the men of the PoWAR advanced towards Bryan's camp and "passed into a wood between the Tory and centre encampments" [2], the Americans began their assault on the center camp. Hearing the resulting gunfire, the PoWAR "drew up unperceived" into a line of battle, "and poured in a heavy fire on the militia." The Americans had quickly succeeded in taking the center camp, and at this moment "were forming from the disorder of the pursuit" [3]. Receiving this attack was a band of 30 militiamen [4]. By this "bold and skillful [British] manoeuvre," [5] these soldiers were "separated from the main [American] body" still near Bryan's camp [6]. One Samuel Saxon, a company commander, recalled that they turned about and "rushed upon the [British] line and broke our way [through,] losing in killed and missing 15 men" [7].


The Prince of Wales' American Regiment's Flank Attack (click to enlarge). Saxon's company and others attempt to retreat through the attacking PoWAR. Hanging Rock Creek is at far left. The green patch in the middle distance designates the ravine separating Bryan's camp from the British center camp.

The PoWAR detachment pursued these men towards Bryan's camp, and "nearly changed the fate of the day" [8]. At that moment, however, numbers of Americans led by Thomas Sumter and Robert Irwin were heading towards the center camp, and the attacking British. The Americans were in what appeared to be "an old field," [9] when Sumter saw that the British had "found means to turn my right flank" [10]. "The British advanced in good order" [11] through what appeared to be "a swamp," [12], or "a marsh" [13], while the Americans "halted and awaited their approach." Saxon stopped fleeing once he reached this group and "turned about, and took part in the battle which ensued" [14].

According to one participant:

"The contest was severe and of doubtful issue for some considerable time at length the American troops retreated and occupied a more favorable situation, where undergrowth and brush protected them much from the musketry of the enemy" [15].

Richard Winn, who was at the center camp, recalled that "On hearing a severe firing to my right I ordered my men to repair to the place." They joined the action "as quick as possible," and came upon "the back of the British" who were "in action" with "a party of our men." Winn gave the order to "commence firing as usual," which caught "the British between two fires." Their line soon "gave way," [16] and the Redcoats "took instinctively to the trees and bush heaps," to defend themselves [17].

The Prince of Wales' American Regiment Under Attack (click to enlarge).

Soon "there was not a British officer standing, and many of the regiment had fallen," but still they "returned the fire with deadly effect." [18] Robert Irwin "had his clothes perforated with four separate balls," but "escaped unhurt" [19]. Richard Winn was not so lucky; he received "a most dangerous wound" [20].

At last, 22 men, all the rank and file that were left unhurt, "threw down their arms" "on being offered quarters" [21]. Robert Irwin, who had particularly distinguished himself during the fighting [22] approached an obstinate sergeant major and "wrenched the bayonet" from his hands. Then he too surrendered. [23]

Capitulation (click to enlarge).

The British Flank Attack. A detachment of the Prince of Wales' American Regiment is beset by American militia near Bryan's camp. Meanwhile, the British Legion infantry rally near the center camp.

Notes:

1. That it was a detachment of the regiment that was sent north, and not the whole regiment, was discussed previously, see Note 1 in this post. The timing of these events is not discussed in participant accounts, but this is the most parsimonious explanation. Several American participants, including Thomas Sumter, asserted that this detachment was sent to Bryan's relief. For Sumter's account, see the letter from Thomas Sumter to Thomas Pinckney, August 9, 1780.

2. William Davie's account; see The Revolutionary War Sketches of William R. Davie [extract]. Davie's account also appears in, John H. Wheeler. (1851). Historical Sketches of North Carolina from 1584 to 1851, Vol. 1.

3. Davie, ibid.

4. The pension application of Samuel Saxon, transcribed by Will Graves.

5. Davie, ibid.

6. Saxon, ibid.

7. Saxon, ibid.

8. Davie, ibid.

9. The pension application of John L. Davies, transcribed by Will Graves. Sumter, ibid., places this event near Bryan's camp.

10. Sumter, ibid.

11. Davies, ibid.

12. Sumter, ibid.

13. Saxon, ibid.

14. Saxon, ibid.

15. Davies, ibid.

16. Richard Winn; see General Richard Winn's Notes -- 1780, transcribed by Will Graves. (See here for images of the original document).

17. Davie, ibid.

18. Davie, ibid.

19. Joseph Graham; see William A. Graham (1904). General Joseph Graham and His Papers on North Carolina Revolutionary History.

20. Winn, ibid.

21. Davie, ibid. for the quote; Sumter, ibid., and George Cunningham are the source of the number of surrendered men. For Cunnigham's account, see the pension application of George Cunningham, transcribed by Will Graves.

22. According to Joseph McJunkin, before this battle, he was "called Granny Irwin," but "afterwards [he] was spoken very highly of on account of his good conduct that day." See Will Graves. (2005). What Did Joseph McJunkin Really Saye? Southern Campaigns of the American Revolution, Volume 2, Issue 11.

23. Davies, ibid.

Thursday, February 25, 2010

Battle of Hanging Rock 9

Part 9: Battle for the Center Camp

At the same time that elements of the Americans center and left divisions were battling McCulloch for possession of the Loyalist camp, other American militia were pursuing Samuel Bryan’s Loyalists to the west and south. These panicked men threw the camps of the Provincials into disorder [1]. Amid the chaos, the Provincials mistook some of Bryan's men for Sumter's militia and shot them [2]. The Americans added to the confusion by closing pursuing Bryan's men. According to one remarkable tale told after the war:

"As the tories fled towards the British camp, many of the whigs [i.e., Sumter’s men] rushed pell-mell with them. One named Walker, hurrying along in their midst, was about to fire on those before him, when a tory close to him caught his arm, crying, ‘Those are on our side!’ and then, as if struck with a sudden suspicion, asked ‘What is that green leaf in your hat for?’ The whigs had taken the precaution to put each a leaf in their hats that morning before going into battle. The soldier pulled out the token, but the discovery was already made; one of the tories seized his gun, the other ran a bayonet through his hunting shirt. Letting the weapon go, he turned and fled back. ‘It appeared to me,’ he said, ‘that they fired fifty guns after me; every leap I gave, I heard something fall on the leaves which I took for blood, and thought I must be badly wounded, and would soon fall exhausted. I thought of the intolerable thirst I had witnessed in those bleeding to death, and my mouth began to feel parched. I had now reached the branch [Hanging Rock Creek or a tributary], and stooped to drink. On examination I found I was not hurt, but my powder horn was severely wounded, being pierced through with a rifle ball, and having lost the greater part of its contents’" [3].

Bryan's Volunteers in Flight (click to enlarge). A portion of Bryan's men flee through the camp of the Prince of Wales' American Regiment.

The American right division followed those of Bryan's men fleeing westward. For Richard Winn, the purpose of this movement was to attack the British center camp, his original target [4]. Here, the British "were well posted" [5]. When the Americans came into view, "the British immediately commenced firing from behind some bush tents," [6] and "behind a fence" [7]. Many of the men with Winn were simply moving "in pursuit of the Tories," and were surprised "by this unexpected discharge" from the Provincials [8]. But the Americans were quick to recover. Seeing that the Provincials were without loaded muskets, Winn "set up the Indian hollo," and his men "rushed and fire[d] on their enemy as they went with bullets in their mouths and powder in their pockets." They loaded their rifles on the run, not stopping "to take a tree even where trees was" [9]. "The British… finding such a charge made on them," [10] "broke and joined in the flight of the Loyalists" [11].

Elements of the center and left divisions soon began arriving after having pursued the survivors of McCulloch’s company to the center camp [12]. Among these, two companies of North Carolinians began taking fire from "A party of fifteen or twenty of the enemy," who had taken "shelter in a cabin with a clapboard door," and were "firing through the cracks." In response, "Captain [James] Knox, with half the men, charged the front door, Lieutenant [George] Graham with the rest charged the rear door. Captain Knox ran against and broke down the door, the enemy fled out of the rear door, and Graham's party shot down several of them" [13].

The British Flee the Center Camp (click to enlarge). Loyalist militia, the Royal North Carolina Regiment (red coats), and British Legion infantry (green jackets) abandon the center camp to American riflemen and dragoons. The British manage to retain their cannon.

All-in-all, the Provincials had delivered only "a few discharges," before giving up the center camp. They retreated "for about 300 yards." Here, Joseph Graham thought, was the opportunity to launch the knockout blow against the British garrison. The British infantry "turned their backs for 300 yards," and "a charge of 70 cavalry would have made them surrender, but at that period but few of the cavalry had returned from pursuit of the tories and they were yet unformed." That Davie’s dragoons had charged and scattered so early in the action was a "great blunder" for the Americans [14].

Battle for the Center Camp. The Americans pursue a portion of Bryan's Volunteers to the center camp and attack the British Provincials stationed there. Meanwhile, a portion of the Prince of Wales' American Regiment (PoWAR) advances towards Bryan's former encampment.

Notes:

1. Charles Stedman. (1794). The History of the Origin, Progress, and Termination of the American War, Vol. 2.

2. The pension application of Samuel Saxon, transcribed by Will Graves.

3. Elizabeth Fries Ellet. (1850). Domestic history of the American Revolution.

4. Suggested by the accounts of William Davie and Richard Winn; both describe early attack on center camp, and neither mentioned the battle with McCulloch described in my previous post. Winn's account notes, "as soon as Brian gave way [Winn] marched with his party for the British camp which he found in an open old field about [one] half mile from where Brian was posted." For Davie's account, see The Revolutionary War Sketches of William R. Davie [extract]. Davie's account also appears in, John H. Wheeler. (1851). Historical Sketches of North Carolina from 1584 to 1851, Vol. 1. For Winn's account, see General Richard Winn's Notes -- 1780, transcribed by Will Graves. (See here for images of the original document).

5. Letter from Thomas Sumter to Thomas Pinckney, August 9, 1780.

6. Winn, ibid.

7. Davie, ibid.

8. Davie, ibid.

9. Winn, ibid.

10. Winn, ibid.

11. Davie, ibid.

12. Implicit in the account of Joseph Graham, and explicit in the account of Joseph McJunkin. For Graham's account, see William A. Graham (1904). General Joseph Graham and His Papers on North Carolina Revolutionary History. For McJunkin's account, see Will Graves. (2005). What Did Joseph McJunkin Really Saye? Southern Campaigns of the American Revolution, Volume 2, Issue 11.

13. Graham, ibid. According to this source, Knox commanded one company, Graham the other. Graham took over Captain David Reid’s company after Reid was killed in the assault on Bryan’s camp.

14. Graham, ibid.

Monday, February 22, 2010

Battle of Hanging Rock 8

Part 8: An Ill-Timed Reinforcement
Previous: Bryan's Defeat

The Provincial regiments were not idle while Samuel Bryan’s North Carolina Volunteers were being assailed. In the camp of the Prince of Wales' American Regiment, a detachment of men was sent north towards the Loyalist militia and other Provincials [1]. In the center camp, the British Legion infantry and Royal North Carolina regiment were formed into a line of battle [2]. Also, Captain Kenneth McCulloch's company of British Legion infantry left the center camp to go to Bryan’s aid.

The Prince of Wales' American Regiment Responds (click to enlarge). A detachment is sent north towards the sound of battle.

McCulloch’s company was dispatched “on the first alarm,” and “they arrived on the eminence [where Bryan was encamped] just after the tories had left it” [3]. Here, the Provincials found the Americans in a state of complete disarray. Half of the men, including all of Davie’s dragoons, had scattered in pursuit of the Loyalists [4], while the remainder were taking guns and ammunition from the abandoned Loyalist camp [5].

McCulloch’s men struck the American center and left divisions [6], and “advanced firing in platoons” [7]. However, the attack was ineffective. The Americans “took to trees and rocks,” [8] and the British “overshot their opponents” [9]. The Americans formed “a half circle around the eminence,” and “by taking steady aim” “in a short time caused one third of them to fall” [10]. The Provincials “fell so fast by their unseen enemy that their officers were obliged to push them forward by their sabers” [11].

McCulloch Under Fire. Having gained Bryan's encampment, McCulloch's company confronts an arc of gunfire.

At last, McCulloch’s company broke. More of his men fell when the American left division “began to cut off their flank” [12]. The survivors “retreated to the main body,” all the while “briskly pursued by Sumpter’s men” [13]. Among the fallen, Joseph McJunkin recalled finding Captain McCulloch “near the Tory camp… begging for water” [14]. He would soon be dead [15]. Casualties in McCulloch’s company were so extensive that the company was subsequently removed from the rolls of the British Legion [16].

McCulloch's Defeat. While Bryan's Volunteers flee, McCulloch's lone company is destroyed by Sumter's militia. Some of the unit actions shown on this map will be described in subsequent posts. Bryan's men fled south and west; their flight, and the American pursuit, was less organized and more scattered than the arrows indicate. PoWAR = Prince of Wales' American Regiment.

Notes:

1. William Davie's account of the battle refers to "a part of Colonel Brown's Regiment." Likewise, Banastre Tarleton referred to the actions of "a detachment of Colonel Brown's regiment" [This is the Prince of Wales' American Regiment; emphasis mine]. The activities ascribed to the "part" or "detachment" are so distinct in the two accounts as to suggest that the regiment was divided into two parts early in the battle and that the two parts fought in different parts of the battlefield. One part, as will be seen, became engaged near Bryan's camp and was destroyed. The other part ended up fighting alongside the Legion infantry near the center camp and suffered only light casualties. Why would a division in the regiment have occurred? The most likely reason is that one part of the regiment was sent in the direction of the fighting when the battle began, while the remainder defended the regiment's encampment. More about the activities of this regiment will appear in upcoming posts.

For Davie's account of the battle, see The Revolutionary War Sketches of William R. Davie [extract]. Davie's account also appears in, John H. Wheeler. (1851). Historical Sketches of North Carolina from 1584 to 1851, Vol. 1. For Tarleton's account of the battle, see Banastre Tarleton. (1787). A History of the Campaigns of 1780 and 1781.

2. Inference based on comments made by Davie. Davie found these regiments in a defensive posture shortly after the events described in this post.

3. William A. Graham (1904). General Joseph Graham and His Papers on North Carolina Revolutionary History.

4. William Hill claimed half of the men had pursued Bryan’s men “a considerable distance,” and could not “be brought off from the pursuit of the Tories,” before McCulloch arrived. See Alexander S. Salley. (1921). Col. William Hill's Memoirs of the Revolution. Graham, ibid., claimed that the dragoons were so scattered that they could not be collected again until late in the battle.

5. Joseph Johnson (1851). Traditions and Reminiscences Chiefly of the American Revolution in the South.

6. The main commentators identified with these commands (Joseph Graham, Joseph McJunkin, and William Hill), described this attack in some detail. The main commentators with the right division (William Davie, Richard Winn) did not mention it.

7. Hill, ibid. Graham, ibid. also mentioned the firing by platoons.

8. Hill, ibid.

9. Graham, ibid.

10. Graham, ibid.

11. Hill, ibid.

12. Joseph McJunkin's account, in Will Graves. (2005). What Did Joseph McJunkin Really Saye? Southern Campaigns of the American Revolution, Volume 2, Issue 11.

13. Graham, ibid.

14. McJunkin, ibid. McJunkin also claimed that he “got a canteen out of the Tory camp… and gave him a drink.”

15. Banastre Tarleton. (1787). A History of the Campaigns of 1780 and 1781.

16. Don Gara. Service summary of officers of the British Legion Infantry, sorted by troop. The only other officer of the Legion infantry to be killed during the battle was Lieutenant Ralph Cunningham of McCulloch’s company. See Don Gara. Biographical sketches of the infantry officers of the British Legion. (Retrieved February 19, 2010).

Friday, February 19, 2010

Battle of Hanging Rock 7

Part 7: Bryan's Defeat

Battle plan in place, the Americans remounted their horses and filed off towards the British camps. For a brief moment, everything went as planned. According to Richard Winn, "the main body [i.e., the center and left divisions] wheeled to the left," while Winn and Davie’s men moved "to the right." The American commanders knew their targets, but they did not know the terrain. Therefore, they were forced to rely on the services of local guides to lead them to their destinations. Unfortunately, the guides leading the right division knew only that they were to lead this column towards the center camp on the Camden Road; they had not been briefed on the placement of Samuel Bryan’s Volunteers [1]. As a consequence, they led the right division into the Hanging Rock Creek bottom and past the front of Samuel Bryan’s men.

At this moment, Bryan’s men were having breakfast [2], but they could hardly fail to notice the Americans. Indeed, Richard Winn claimed that "his party was within 30 steps" of some of Bryan’s men when they began to receive fire. Sumter’s intended plan of attack was quickly abandoned. There was no choice now but for all three American divisions to assail Bryan’s camp.

Davie’s dragoons were in the lead when the right division came under attack. Winn claimed that Davie’s men were "ordered to move on to make room for the [infantry]" [3]. Winn’s men hurriedly began to dismount. At this moment, he recalled, "we received a most tremendous fire from Brian," but "The enemy being on the top of a big hill over shot us." Davie, however, complained that his men "suffered much while tying their horses, and forming under a heavy fire from the Tories" [4].

The Americans Advance Up the Hill (click to enlarge). Leaving their horses near the creek bottom, the Americans advance under fire towards Bryan's Volunteers at upper left.

Bryan’s men, for their part, formed up so as to face all three American divisions, their lines following the contours of the hill. Opposite the American left division, the hill looked "something like a half moon or a workman’s square," [5] and here, their "lines were extended from a point at right angles" [6]. The left division had not yet reached its assigned ground when the firing began. As a consequence, the center and left divisions were forced into an almost head-on assault of the Loyalist camp. William Hill recalled that "This action commenced under many very unfavorable circumstances to the Americans, as they had to march across a water course and climb a steep cliff, being all this time under the enemy's fire" [7].

Bryan's Line of Defense (click to enlarge). In the foreground, a camp follower awaits the outcome of the fighting. Brush huts and barrels mark the site of Bryan's camp.

The first Americans to be attacked were the first to ascend the hill. On the right, "Winn's party was ordered to put up the Indian hollow and rush up the hill before they discharged their pieces. This took place in an instance at this same time [Davie’s troop] was ordered to charge" [8].

Davie's Dragoons Charge Bryan's Left

Bryan’s line was soon rolled up from left to right. On the left, his Volunteers were only able to get off a single volley, and American losses were relatively light: just one killed and two wounded [9]. In the center, the Loyalists got off two volleys before their line collapsed [10]. The most severe losses were inflicted by Bryan’s right. Here, John McClure led his men against the angle in the Loyalist lines. They ran forward in two ranks with a terrific fire began pouring down on them. In a few moments, McClure, Joseph Gaston, and two of his brothers "fell in the front of the action." Gaston "received a ball on the bridge of his nose" that "went under the left eye and out by the ear." One of Gaston’s brothers lay "dead on the ground," while McClure and another brother lay mortally wounded [11]. Much lore developed around the mortal wounding of John McClure. According to one tradition,

"Colonel McClure was shot through the thigh, early in the action, but stuffing the wound with wadding, he rushed ahead of his command, and his clear voice was still heard, urging on his men to the continued charge. Just as the tories fled, he fell, pierced by several wounds. Those near him ran up to his relief, but he ordered them back to the fight, and his voice continued to be heard, urging and encouraging them in the pursuit" [12].

Battle Amid the Trees. The southern end of the Loyalist (left) and American (right) lines during the assault on Bryan's camp.

As Bryan's line was rolled up, many of his men began fleeing toward the south. Just then, a part of the American left "got around the side of their camp" [13], "and as Brian's men went by," the Americans gave them "a severe fire" [14].

Bryan’s men were in full rout, "attacked in front and flank, and routed with great slaughter," [15] they "fled with the utmost precipitation, and spread confusion through every quarter of the post" [16]. Even flight was precarious, for Davie’s dragoons "could not be restrained, but pursued them" across the woodland [17]. Further, some of those Loyalists that fled towards the center camp were mistaken for Sumter's men and shot by Provincials [18]. Winn boasted that "many of these men was so frightened they never stopped [running] until they got into Georgia" [19].

Bryan's Volunteers in Flight

Assault on Bryan's Camp. Some of the unit actions occurring at this time will be described in subsequent posts. PoWAR = Prince of Wales' American Regiment.

Notes:

1. The error of the guides is described by William Davie, Joseph Graham, and Richard Winn. For William Davie's account, see John H. Wheeler. (1851). Historical Sketches of North Carolina from 1584 to 1851, Vol. 1. For Graham's account, see William A. Graham (1904). General Joseph Graham and His Papers on North Carolina Revolutionary History. For Winn's account, see General Richard Winn's Notes -- 1780, transcribed by Will Graves.

2. The pension application of Samuel Saxon, transcribed by Will Graves.

3. Winn, ibid.

4. Davie, ibid.

5. Joseph McJunkin's account, in Will Graves. (2005). What Did Joseph McJunkin Really Saye? Southern Campaigns of the American Revolution, Volume 2, Issue 11.

6. Joseph Gaston. (1836/1873). Joseph Gaston's Narrative. The Historical Magazine and Notes and Queries Concerning the Antiquities, History and Biography of America, Vol. 1.

7. Alexander S. Salley. (1921). Col. William Hill's Memoirs of the Revolution.

8. Winn, ibid.

9. Winn, ibid. However, as already noted, his description of American losses is at odds with Davie’s.

10. Graham, ibid., who was with Robert Irwin and the center division.

11. The pension application of Joseph Gaston, transcribed by Will Graves.

12. Joseph Johnson (1851). Traditions and Reminiscences Chiefly of the American Revolution in the South. See Elizabeth Fries Ellet. (1850). Domestic history of the American Revolution for another version of this story. McClure’s death was mentioned by many participants.

13. Hill, ibid.

14. Winn, ibid.

15. Davie, ibid.

16. Charles Stedman. (1794). The History of the Origin, Progress, and Termination of the American War, Vol. 2.

17. Graham, ibid.

18. Saxon, ibid.

19. Winn, ibid. This is an exaggeration of course, but some of the Loyalists continued their retreat at least as far as Rawdon’s force on Lynche’s Creek, 12 miles away. They reached this point in the evening and were joined there by soldiers from the Royal North Carolina Regiment and the Prince of Wales’ American Regiment who fled during a later stage in the fighting. See Letter from Francis Rawdon to Colonel McMahon, January 19, 1801.