Showing posts with label iabsm. Show all posts

Thursday, 18 August 2022

IABSM - Cassel 1940

Following a discussion at the club, various people expressed an interest in playing I Ain't Been Shot Mum by the TooFatLardies.  I had originally planned it for a relatively small game but ended up expanding it to cover 5 players.

The scenario was based on a what-if engagement between B Company of 2/Glosters (with some supports) defending the North West part of Cassel, from an assault by Kamfgruppe von Esebeck - a combined armoured and infantry force.

Here are a few pictures from the game:


Saturday, 10 May 2014

The Gloucesters at Zuytpeene

I put on a 15mm WW2 game at the club last meeting using I Ain't Been Shot Mum.  I used one of the Lardies' own scenarios featuring the Gloucestershire Regiment defending the village of Zuytpeene against the Blitzkrieg.

The Brits had two platoons, a Boys anti-tank rifle, two Vickers MMGs and three "Big Men".  Facing them the Germans had three platoons, four MMGs, five "Big Men", three Panzer IIs and some Stuka support.

The German objective was to secure the river crossing just beyond the village - which meant clearing the village in order to secure their lines of communication.  The Gloucesters simply had to stop them.

The Germans decided to deploy on one of the two roads but it was the one the Brits had not expected.  However, the German advantage was lost when they were slow to deploy and advance.  This allowed the British to redeploy some troops and hold them up along the road.


The initial German assault from the road across a field ran into some dug in opposition and after a fierce firefight the German platoon suffered heavy casualties.  After having run into the Boys one of the Panzers decided that supporting the second wave of the infantry assault in the field would be a good idea and that tipped the balance and soon it was the British retiring hurt.


The third panzer engaged a British section deployed forward of the village.


The third German platoon continued the advance up the road.


A sniper in the church tower (it's a tradition!)


After a hard fight the third German platoon eventually entered the village.


Whilst the Stuka bombed some of the retiring British.


In the end the slow pace of the Germans was their downfall as, whilst they did get troops into the village they failed to secure it before their time was up.

Monday, 20 May 2013

Rearguard at Pevensey

The final game of our wargaming weekend was another outing for the I Ain't Been Shot Mum from the TooFatLardies.  I picked a scenario from the old Operation Sealion book and Lenin and I reprised our usual roles.

The Home Guard (Lenin) are defending the edge of Pevensey when the Blitzkrieg hoves into view.  Their task is to hold up the Germans until the regulars can come to the rescue.

My German infantry came onto the board and straight into a crossfire from the town and the train halt.  After having taken a few casualties I managed to get my machine guns deployed and concentrated some fire into the town which quickly put paid to the first Home Guard unit.

It was then an interesting exercise in FIBUA with the Home Guard slowing up my advance whilst their reinforcements advanced across the table.  Here are some pictures of the game:


I have to say that if I were playing this one again I would move the town into the centre of the table as we really didn't use the top half of the table which was a bit of a waste.

Sunday, 14 April 2013

Coulogne Redux

You may have been wondering why my blog posting had dried up recently (or , more probably, have more important things to wonder about).  Anyway I have been spending all my spare time painting.  Unfortunately it has been 1:1 scale - our hall, stairs and landing.  This has rather cut into my hobby time but I did get the chance to pull together an I Ain't Been Shot Mum game for the club yesterday - largely as a couple of the other chaps had expressed an interest.

To make things easier I decided to use a scenario I have run before - the Coulogne one from the Defence of Calais scenario book (with appropriate changes to reflect the kit I actually have available).  However, whilst I remembered all the necessary figures and terrain, I managed to forget my proper camera - so please forgive the rather poor pictures from my BlackBerry.


The scenario played out somewhat differently from last time - possibly not least as it was 2 players on an 8 x 6' table last time and 7 players on a 6 x 4' table this time (there was rather more interest than I had originally anticipated).  The Germans arrived on blinds, as usual, but this time the blind on other far side of the canal actually contained a platoon.


The initial German assault on Le Colombier took a bit of a pasting from the British troops in the village but the German Panzer IIs outflanked them and the British was caught in a rather painful crossfire.  With the Germans running around their left flank the remaining Brits, with the 2 pounder anti-tank gun decided to pull back, but were spotted and were almost wiped out.


The British unit on the hill south of Orphanage Farm initially did well.  It revealed the German platoon across the canal and caused some casualties; however, the Germans repeated had lucky return fire and soon the British numbers were dwindling.  The Germans tried to bring down their artillery on the hill but the initial ranging shots were uncomfortably close to their own infantry and the Forward Observer chose not to fire for effect!  With their casualties increasing the British decided to withdraw from the hill and try to take a position with their Boys anti-tank rifle flanking the German armour.  Unfortunately their initial shot only temporarily immobilised one of the Panzer IIIs and revealed their position whereupon they came under some devastating machine gun fire.


Meanwhile the German light armour's advance had stalled in Le Colombier and their infantry was forging ahead without them.  The units who had flanked the village were moving through the fields north of Orphanage Farm when the remainder of the British Searchlight HQ unit opened fire on them.  The fire caused a couple of casualties but brought down a hail of return fire, including some HE from the Panzer IIIs.  With their flank secured the Germans continued to advance and ran straight into an unspotted British section who decimated the lead German squad.  Unfortunately the Germans regrouped and poured fire into the Brits, who were forced to withdraw.


The German platoon over the canal had stalled but finally began to advance and their lead unit located the final British platoon, who were positioned to guard the bridge the Germans were trying to cross.  The Germans rushed in to assault the first British unit but were thrown back and rest of their platoon began a firefight from across the canal.

With time growing short we had to end the scenario early; however it was quite clear that the British weren't in a position to hold the main German advance for much longer and so I declared the game a German victory despite a valiant attempt by the British.

Wednesday, 27 February 2013

First Look: Vpered Na Berlin

Vpered Na Berlin is the latest handbook for I Ain't Been Shot Mum 3 from the Too Fat Lardies.  Following on from their previous supplement, Battle for Liberation, this one focuses on the Eastern front of World War 2 from 1943 to 1945.

Weighing in at a whopping 108 pages this full colour pdf covers German, Romanian, Hungarian, Finnish, Yugoslavian and Soviet forces for the period.

Presentationally this handbook follows the style of Battle for Liberation with each nationality begining with a brief introduction followed by a single page detailing each type of company, then a couple of pages covering possible battalion, divisional and other support which might be available.

As before each page is neatly split into various colour coded boxes to distinguish between the various units making it clear whether these are on table or off table elements. Tables are then provided to give stats for the various troops, vehicles and heavy weapons along with any special rules and an outline of which additional cards may be applicable.

Each section covers the various unit type - for the Germans this includes a staggering 14 different unit types ranging from a Grenadier Kompanie through a Panzerspah Kompanie to a Cossack Sotnia. To this are added guidance on fielding German AFVs, how to rate German forces, stats for all the vehicles and weapons, weapon rules and articles on Partizan fighting and forming a Kampfgruppe. The other nationalities receive similar treatment.

Once again the presentation style is very similar to the previous handbook and the main IABSM rule book, the text is clearly laid out and interspersed by various photographs and relevant diagrams and everything is easy to find and understand.

Having set the price point with Battle for Liberation it should come as no surprise that this handbook is also £10 but it is clear that an enormous amount of time and effort has gone into researching the various units and organisations. I think this is another very useful addition and I am looking forward to future material (particularly some early war stuff - hint, hint!).

Monday, 4 February 2013

First Look: Blenneville or Bust!

I often pick stuff up more out of interest rather than with a genuine plan to doing something with them.  This has been true more than once with Too Fat Lardies' products which are usually interesting even if slightly off schedule.

Given that I am thinking of expanding my 15mm WW2 project a little I wondered if the Blenneville or Bust! campaign book for I Ain't Been Shot Mum (3rd edition) would be helpful - so I picked up a copy.  Whilst it's not exactly cheap at £9.50 for the pdf, it is a whopper at 300 pages!

The campaign is a fictional one, set shortly after D-Day with British and American forces trying to break through German defensive positions.  The campaign follows a pyramid structure with the outcome of each scenario determining which scenario should be played next meaning there is plenty of re-playability and fifteen separate maps are included for the various scenarios.

The forces are based on those appearing in the Battle for Liberation supplement for IABSM3 and, whilst for the full Monty there's quite an investment it does mean they will be re-usable.  A figure requirements table is helpfully included.

Each scenario comes with an introduction and separate briefings for each side with force requirements.  The booklet isn't intended to be printed and read cover to cover but rather for the individual briefing sheets to be printed out ready for any specific game.

The scenarios look nicely varied and the information is presented in a clear and accessible way - all round very interesting.

Saturday, 29 September 2012

First Look: Battle for Liberation

Having been very pleased with the latest version of I Ain't Been Shot Mum from the Too Fat Lardies, I thought I would pick up a copy of their first rerelease of information for it.  Battle for Liberation is sub-titled A Handbook for the War in the West 1943-45 and contains an overview and orders of battle for the main forces in the theatre along with details of the available support.

The supplement is available as a 99 page pdf and, after a couple of pages of introduction covers the British & Commonwealth, US, French, German and Italian forces of the period including the main types of units and troops.

Each nationality begins with a brief introduction followed by a single page detailing each type of company, then a couple of pages covering possible battalion, divisional and other support which might be available.  Each pages is neatly split into various colour coded boxes to distinguish between the various units making it clear whether these are on table or off table elements.  Tables are then provided to give stats for the various troops, vehicles and heavy weapons  along with any special rules and an outline of which additional cards may be applicable.

Each section covers the various unit type - for the British & Commonwealth this includes the Rifle Company, the Reconnaissance Squadron, the Tank Brigade Squadron, the Armoured Division Squadron, the Motor Company, the Parachute Company, the Air Landing Company and the Commando Assault Troop.

After covering the ground forces there is a short section providing tables and rules to determine the availability and effectiveness of air support.  This is followed by short sections on using smoke with 2 inch mortars, how to manage supply for airborne operations and a final page of credits.

The presentation style is very similar to the main IABSM rule book, the text is clearly laid out and interspersed by various photographs and relevant diagrams and everything is easy to find and understand.

Some may think the £10 price tag high (especially when compared to some previous Lardies' offerings) but I think this needs to be considered against the quality of the production and the amount of research which has clearly gone into producing the supplement.  This is a very useful addition and I am looking forward to future material.

Saturday, 4 August 2012

Lardies Summer Special Arrives

The Too Fat Lardies' summer special has just been released. If you like the Lardies' rules these are always worth a look and this time it's 118 pages long and is available from their website as a pdf for £6.

This time around there are a couple of extras for Dux Britannarium and a sneak peak of the teased Sci Fi rules - Quadrant 13 - along with the usual brace of articles for the various other Lardy rules.

The special contains:
  • Introduction – Fat Nick says hello
  • Migrating Dux - Using Dux Britanniarum in other settings
  • St Barthelemy – A classic I Ain't Been Shot Mum (IABSM) historical double-scenario set in Normandy 1944
  • Random Events in IABSM - Geoff Bond adds random events to IABSM
  • Just the Right Sort of Chap - Sidney Roundwood looks at characters in Through the Mud and the Blood (TTM&TB)
  • A Conversation with DZ - Richard Clarke in conversation with Major General John Drewienkiewicz about his Wargames in History books
  • Bull Run – An 1861 scenario for They Couldn't Hit and Elephant
  • Bagging the Hex - Graham Riddle presents his ideas for Bag the Hun without a hex mat
  • Wrong Side of the Fleche - Mark Luther deploys his jaeger on the outskirts of Charleston in this scenario for Sharp Practice from the AWI
  • Glorious First of June - Admiral A large fleet actions scenario for Kiss Me Hardy
  • Quadrant 13 Designer's Notes - Robert Avery beams down to tell us all about his forthcoming Sci-Fi rules
  • Battle in the Orchard - The PLO, the Southern Lebanese Army and the Israeli Defence force battle it out in this modern scenario for IABSM
  • BTH: The Italian Job – A scenario for Bag The Hun
  • Them that Ain't Cowards, Follow Me! - A scenario for Sharpe Practice and La Longue Carabine for the American War of Independence from the pen of James Schmidt
  • An Encounter for Alpha Company - A Charlie Don't Surf (CDS) scenario from Ross Bowrage 
  • A Lesson in Lard – Ross tells us about his experiences on the show circuit with CDS
  • On a Saxon Shore - A bonus raid scenario for Dux Britanniarum 
  • The Last Stand of the Baron – A back end of nowhere scenario for TTM&TB from the pen of Allan Coleman
  • August Storm - Charles Ekhart takes a look at the Soviet conquest of Manchuria in 1945
  • Decisions, Decisions: Applying the OODA loop - Fat Nick explains the decision making process and how it impacts on wargames rules.
  • BTH: Zero 2 Hero - A scenario for Bag the Hun
  • Meaty Dux – Adding some extra meat to the bones of Dux Britanniarum campaign system. 
  • The Roundwood Report - Sir Sidney Roundwood takes his regular look at the world of Lard
Plenty for everyone it seems!

Thursday, 9 February 2012

Wargames Weekend: Coulogne

Our final game of the weekend was a chance to try out the latest edition of I Ain't Been Shot Mum by the Too Fat Lardies.  I decided to select a scenario from the Defence of Calais supplement (suitably adjusted for 3rd edition and for my available forces).  Lenin took command of the defending British and I took the Germans.

The British troops, from the 1st and 2nd Searchlight Regiment under the command of Col. R.M. Goldney, were positioned in and around the small town of Coulogne and the nearby village of le Colombier.
They were facing elements of Assault Group Kruger of the 1st Panzer Division and only had a single actual anti-tank gun and a few Boys rifles.

Having decided not to advance along the south bank of the canal, largely to avoid the bottleneck at the single bridge, the Germans began on a narrow front between the canal and the Les Attaques/Calais road.  This several limited the advantage of their numbers.

The attack began slowly (largely due to checking that things hadn't changed from previous editions of the rules and because I hadn't thought through a proper plan).  The anti-tank gun targeted the first Panzer III but failed to penetrate, which was unfortunate as it then came under heavy fire and was silenced.  However, the two Boys anti-tank rifles faired somewhat better.  They weren't able to brew up the tanks but managed to keep chipping away at them which hampered the German advance.

The Germans chose to try to outflank the British position in the village but some stalwart defensive fire from the village caused several casualties and one flanking force then came under fire from another British group on the hill ahead.  A long slugging match ensued with the Germans being held up for far too long until they eventually whittled the defenders down and broke through.
It was then a race up the main road towards Calais to see if the Germans could exit the table before the time limit.

The German column advanced quickly up the road with one of the remaining undamaged Panzer IIIs in the lead but then the other parts of the Searchlight Regiment revealed themselves, both in front (blocking the route to the objective) and to the flank.
The combined fire not only took its toll but it forced the German advance to grind to a halt and gave victory to the British as their delaying tactics had been successful.

Saturday, 5 November 2011

First Look: I Ain't Been Shot Mum III

I never thought it would happen but the Too Fat Lardies have actually produced a full colour professionally bound rule book!  It's the new (3rd) edition of their I Ain't Been Shot Mum company size WW2 rules in fact.  So I felt compelled to buy it.

The rules are now beautifully presented in over 100 pages interspersed with diagrams, examples and some nice photos.  But what else has changed?

If you weren't familiar with the previous edition of the rules, you can find my overview here.

The core rules are pretty much unchanged but with lots of improvement in layout, explanation and the introduction of some concepts from some of the other Lardies rules (e.g. Command Initiative).  Some of the terminology has been improved - particularly "wounds" (which was confusing) which have become shock.  The main change for infantry has been with the Big Men who are no longer rated by dice but rather with a Command Initiative rating.  This is supplemented by Command Initiative cards within the deck which may only be used by Big Men of that rating or above.  The rating and the cards provide a number of actions that the Big Man may perform, activating a unit for example.  The rating also determines the Big Man's command radius.

The armour rules have been overhauled too which was a rather weak area for the previous edition and the concept of "Aces" has been introduced to allow for those really exceptional individuals who crop up in various accounts.

There are six generic and four historical scenarios included along with a "handbook" section covering the organisation of forces for Normandy.  This shows the model the Lardies will be using as they update their theatre specific supplements for the new edition.  Fortunately the changes aren't substantial so the old supplements can still be used with some easy tweaks (as outlined in the Lard Island News blog).

In addition to the new rules the Lardies have also produced an official printed set of cards to use with them.  There are 104 cards, which are larger than normal playing cards, which allow you to field two companies of infantry, five platoons of armour and eight Big Men per side along with three off-table support units and all the bonus characteristic cards you will need.
There is also an official set of tokens to accompany the rules which include low ammo, artillery aiming point,  pinned/suppressed, reduced actions, AFV reduced movement, AFV immobilised, AFV main gun damaged and AFV main gun disabled markers as you can see below:
The rules are available in softback, pdf or tablet enabled pdf and also in bundles with the cards and tokens.

I am glad I bought them as I have now got my 15mm WW2 figures out of the boxes and am starting to plan a game with them!

Tuesday, 17 May 2011

Wargames Reunion: Retimo Airfield

Our second reunion game was one Lenin and I had been thinking about for a while - the German assault on Crete - in 28mm using our combined figure collections. We chose to use the Two Fat Lardies' I Ain't Been Shot, Mum! rules as the game was rather too large for Nuts!

The Germans had an ad hoc formation from the 2nd Fallschimjäger Regiment based around the remnants of the 2nd Company, I Battalion and supported by elements of the Headquarters Company, I Battalion, 9th Company, III Battalion and 13th Company. Their objective was to take Hill 'A' which dominated the airfield. Whilst they were facing remnants of C Company, 2nd Battalion, 1st Australian Infantry Regiment supported by elements of 1st Platoon, 1st Australian Machine Gun Company.

Both Lenin and I were playing in the game (largely to take advantage of playing on a larger table than normal - 8 x 6') but decided to let the other players take the lead as we had set the game up. As usualy I played on the German side with Lenin taking the Aussies.

The German plan was to advance up the road on the left flank and secure the farm buildings then move into the woods and secure the other farm at the other end of the table before assaulting the hill itself. Things started to go wrong for them pretty much straight away. They hadn't read the brief fully and so didn't take advantage of the initial bombardment available and then they were spotted whilst still advancing in the open on the road. The Austrailians were dug in on the hill so the ensuing fire fight was somewhat uneven with the Germans pinned in the open gradually taking more and more casualties.


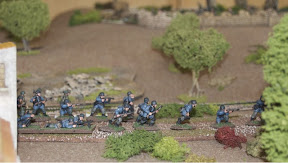
Eventually we managed to take advantage of the limited cover at the base of the hill but our fire was relatively ineffective agaist their position. With no smoke for thr light mortars and assault under heavy fire was going to the very costly and so the attack was stalled pretty much straight away.

Due to some rather poor communication on the German side the blinds advancing down the side of the hill to outflank the Australian position were simply dummies whilst the one behind us in the farm yard turned out to be the third platoon!

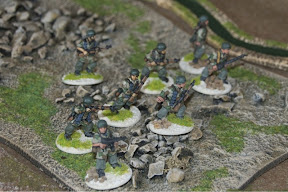
Fortunately we were reinforced by a medium mortar and an infantry gun and with their support we started to advance up the hill but it was terribly slow going.


Our plan had been for the morning (real time) to be the evening (game time) and for the afternoon to be the following day. So when lunch (real time) came around the Germans still had not taken the hill. Fortunately for the Germans, the Australians received an order to withdraw (higher command thought they had better intelligence and wanted to consolidate their forces) which allowed the Germans to occupy the hill unopposed. When the Australians realised their mistake the organised a counter attack for the next morning.

During the night the Germans had been reinforced with two medium MGs and an anti-tank rifle team but had run out of ammo for the mortar and had been unable to manhandle the infantry gun up the hill. They reorganised their force into two full strength platoons and started to dig in. The Australians had four understrength platoons with medium MG support and two light tanks for the attack. (At this point I had swapped sides to help with the numbers too)

Unfortnately for the Aussies their troops and armour were almost immediately spotted and came under fire. Even with smoke from the light mortars the attack became heavy going and things began to slow down. One of the light tanks threw a track when crossing the ditch at the edge of the road and the MGs were held up for some reason.

The attack devolved into a rather unequal fire fight and when the second light tanks attempted to move into support it was assaulted by the Germans and caught fire. The only close assault was thrown back by the Germans for little loss on their side and the attack stalled.

The attack then turned into making an orderly withdrawal for the Australians, which proved difficult under the heavy German fire but over half the force managed it.

Sunday, 7 October 2007

Wargames Weekend Update

Managed to get quite a few games in when Lenin visited last weekend including Troops, Weapons and Tactics, Metal Storm, Renaissance Raiders, Savage Worlds and Commands and Colors: Ancients Expansion #1.

Troops, Weapons and Tactics is heavily based on the Too Fat Lardies previous rules I Ain't Been Shot, Mum! (IABSM) and that is very apparent. As the rules are lower level, with the tactical unit being a fire team rather than the IABSM section, a few additional mechanics have been added. This was only the first try out but our initial impression was that, whilst they did provide an interesting game, the additional chrome didn't produce a result which was a pleasing as Nuts! in terms of the "feel". Obviously this is highly subjective but I think the additional mechanics confuse and complicate the basic IABSM approach but don't deliver proportional added value - which is a shame as I am a big fan of IABSM and use them as my preferred rules for the next level up.

Metal Storm was another first outing. The rules appear to be heavily based on Peter Pig's AK47 Republic rules with the addition of different dice sizes and rules for more modern weaponry. As with all rules which use up and downgrading using different dice sizes (d4, d6, d8, d10 etc.) the statistics are a little iffy but the overall result was a fun game (though we're reserving judgement on the realism element) and I expect these will see another outing (though possibly with some tweaks).

For oue first go at Renaissance Raiders from the Antwerp Fusiliers, we pulled out my 28mm Vendel Border Reivers, Grand Manner Bastle House and Gripping Beast livestock for a little sheep and cattle rustling on the borders. The rules are heavily influenced by the Commands and Colors system and are intended to be hex based. Since I don't have any hex terrain I chose to restructure them slightly to allow them to be used on a normal tabletop. Again they gave a fun game but in my view the card and average dice initiative mechanic was a little too involved for the type of game we were trying and the cards needed to pop up more often (and be a little more varied) to add flavour. The core approach is sound but a few changes are what's needed for it to become ideal for a Reivers game rather than a more traditional Renaissance battle.

Savage Worlds once again proved it is a versatile ruleset allowing you to meld various genres successfully. Lenin presented an excellent Pulp meets Call of Cthulhu game which was tremendous fun.

And having spent ages putting the stickers on my Greek and Eastern Kingdom expansion for Commands and Colors: Ancients (CC:A), I was determined to actually use it - so we set up and played the Gaugamela scenario. CC:A is still a favourite and the card system provides some real challenges for each commander.

Saturday, 18 November 2006

Overview: World War 2 Rules

Like the Napoleonic period the Second World War seems to polarise wargamers by their preferred rule sets. Until relatively recently I had a problem finding any sets of rules that I felt provided the flavour that I was looking for at the various scales you can game the period. I thought I'd outline the rules I've now found and why I like them (you will probably also see full reviews of these rules at various times in the future - indeed I have reviewed one of them already). This isn't to say that other WW2 rules are bad but simply that I prefer these (and as you will see there is still a gap I am trying to fill). You may notice my list doesn't include Rapid Fire, I'm not a big fan of these rules generally as I think they play like a skirmish but as that's not the level they are trying to represent that's not a plus point! However, I would agree that they are relatively simple to pick up and might be a good introduction to the period. Anyway here are my favourites:

Nuts! from Two Hour Wargames is the WW2 variant of their Chain Reaction 2 skirmish rules.

The chain reaction concept takes a little while to get your head around but once mastered I find it provides the best modern skirmish games I have ever played. It neatly represents the feeling of a fire fight and the effect of troop quality and leadership very well. The rules provide both the basic game mechanics for infantry, armour and artillery along with army lists (though focussed on mid to late war) and a campaign system. It's a great package based on an excellent series of mechanics that give a great skirmish game.

I Ain't Been Shot, Mum from the Too Fat Lardies has been reviewed by me before and whilst also at a 1:1 ratio uses the section as the basic manouevre unit.

The use of an interrupted card based initiative system and reducing action dice generates a series of challenges for the player acting at a Company commander level or higher. It works as both a two player and multi-player level and the rules are easy to pick up and play.

The fact that not every unit can act every turn can be a little frustrating at first but it does present a very interesting series of challenges to the player. Obviously for multi-player games it is essential that the distribution of units is properly thought through to avoid prolonged downtime.

My final selection is Great Battles of World War II by Bruce McFarlane (originally published by The Canadian Wargamers Group). These rules use a company as their smallest manouevre unit and allow the player to operate at a Brigade or Division commander level.

The rules are designed around fighting large multi-day actions as units gradually grind to a halt during combat and have to be reorganised overnight. A Divisional Centre of Operations and Forming Up Place are represented and provide reference points for deployment and lines of communication and supply.

The CWG rules sets include background, rules and scenarios as a complete package and the original two volumes were The Canadians in Europe and Dropzone which dealt with major airbourne campaigns (Crete and Market Garden). A third early war volume (Invasion '40) has also been released and is available, along with a .pdf version of the rules as part of the CWP offering at Saber's Edge Hobbies & Games (whose website appears to be down at the moment).

The obvious omission from this list is a set of rules at Regimental level. I have used Spearhead for this but, whilst a decent set of rules, I'm afraid they don't float my boat.

Wednesday, 15 November 2006

Review: I Ain't Been Shot, Mum

I Ain't Been Shot, Mum (IABSM) is a set of World War 2 rules by Richard Clarke and Nick Skinner of the Too Fat Lardies.
The rules are based on a 1:1 figure:man ratio, with the smallest manoeuvre unit being the section and placing the player at Company commander level or above.
Turn sequence
The turn sequence is dictated through a card system with each platoon, each "Big Man" having a card combined with various special cards. In addition there is the "Tea Break" card which, when drawn, indicated the end of the turn; however, units which have not yet fired and have a target in short range may then fire. The Tea Break card means that not every unit will be able to act each turn.
You will have noticed the reference to Big Man this is Lardies shorthand for the natural leaders within a company who are able to galvanise their fellow soldiers into action. Their inate command ability is represented by having their own card so a unit with a Big Man attached doubles their opportunity to activate during any turn.
The special cards include bonus moves, bonus firing, ammunition shortages, national characteristics (e.g. human wave attacks) etc. These cards are theatre and scenario specific.
Once active a unit may utilise their "Initiative Dice" in order to perform actions (spotting, movement, firing etc.). The number of Initiative Dice (d6) is determined by the quality of the troops and is gradually reduced as a unit takes casualties.
Spotting
The rules system provides for the use of "Blinds" where units have not yet been spotted. These are card templates which can conceal one or more or, indeed, no units and must be the subject of a successful spotting roll or activate in order to be revealed. Any cover may also be treated as a blind and hence be hiding troops deplayed in concealment.
A separate Blinds Move card is used in the deck and the cards for the units concealed are kept to one side and only inserted into the pack when the unit is revealed. This system enables some greater co-ordination of units before they fully deploy and maintains an element of the fog of war. Additionally Blinds may perform any action that a unit can do other than firing (in which case they must be revealed).
Spotting is achieved by sacrificing one Initiative Dice in order to make each spotting roll. The target number for the spotting roll is an example of the Lardies approach to these issues. Rather than provide a prescriptive list of modifiers they provide examples of factors which may make spotting easier or more difficult alogn with typical target numbers (e.g. a particularly easy spot will require a 3 or 4 on a 2d6, with ahard spot around 11). The players or umpire then need to determine the number and thus whether the units revealed or the blind removed. This may no appeal to all gamers but I have found it provides a much more flexible approach than a precriptive list.
Movement
Movement is determined by allocating a number of Initiative Dice, rolling them and then moving that number of inches. Units who have take sufficient casualties to lose their Initiative Dice may make a Guts Test to see if they may move or must rely on a Big Man (who has an Initiative Dice of his own) to help them. Modifiers are provided to allow for different terrain types.
Firing
Firing is determined by the number of Initiative Dice allocated to it. It does not need to take place when a unit's card turns up as the dice may be reserved for use later in the turn when the attached Big Man's card turns up or on the Tea Break card.
As with spotting th system is not prescriptive it requires the players to agree as to whether the situation provides a Good, OK or Poor shot and different columns on the firing table are applied. Range bands are also included. The result is specified as a number of potential casualties and may also make the unit pinned (no move but may fire) or suppressed (no move or firing) for the remainder of the turn. Potential casualties are the diced for to determine whether they were a near miss, wound or indeed dead. "Wounds" is more Lardies shorthand and actually means loss of unit cohesion and is a negative modifier to the unit's Initiative Dice. These "Wounds" may be removed by a Big Man.
Close Combat
This is achieved by each side rolling 1d6 per figure with the total number of dice for each unit being modified for troop quality, Big Men, heavy weapons, wounds, suppression etc. A "six and you're dead" approach is then used with the overall result being determined by the difference in casualties.
Morale
For the most part morale is built into the system through the Initiative Dice being reduced as casualties are suffered; however, where the players agree a specific morale test is required due to the particular circumstances a specific roll of 2d6 versus the number of casualties suffered may be made. Again a flexible approach is provided with the players agreeing any positive or negative factors which should be taken into account (examples are provided) and ultimately agreeing the effect of the result.
Optional rules
Various optional rules are provided to address Tank Quirks, MG Sustained Fire, National Characteristics etc.
Vehicles, Artillery etc.
Rules are provided for all these but I have concentrated on the infantry to better communicate the basic mechanisms as armour, artillery etc. all follow similar principles.
Presentation

The rules are clearly layed out in sections with a table of contents and some examples. There are no graphics and, other than the covers, the rules are in black and white. This obviously has benefits if your are buying the .pdf option and printing it yourself. A few more examples might be beneficial but overall the presentation is good.
Summary
The Lardies strapline is "playing the period, not the rules" and these rules are an excellent example of this approach in that they provide a framework for play rather than having a prescriptive approach thus meaning that player should win through the use of appropriate tactics rather than relying on obscure references to or inappropriate application of rules. I believe these rules achieve the aim.
IABSM are not rules for everyone. If you like to have total control with every unit moving on every turn then the initiative system will not be for you. If you like a prescriptive set of modifiers for spotting, firing or morale rather than the common sense/by agreement approach adopted by IABSM then you will probably not like these rules. But if you want a good set of World War 2 rules for this level of combat then I highly recommend IABSM. With the unpredictability of unit movement the best use of Big Men becomes a real challenge along with the need for a more complex level of planning which is appropriate for the level of command being represented. They have become firm favourites of mine and work equally well in two or multi-player games. The rules are available in both hard copy and .pdf format from the Too Fat Lardies for £11.25 and £6.00 respectively. A wide range of theatre specific supplements are available along with scenario booklets.