Showing posts with label USMC Armour. Show all posts

03 March 2012

Old Stuff Day+1: More Vietnam

There was some interest in my Vietnam figures yesterday so I though I'd expand a little on that.  Comrade James and I got into the genre 5 years ago to play an emerging and fun looking game: "Flashpoint Vietnam".  Unfortunately, as cool as it was the mechanics didn't flow so well and our games were less than satisfying.

In the rewrite to a second edition the author moved countries, sold his company etc and it all fell apart.  I would love to try FoW: Vietnam with these guys, but unfortunately an entire state separates the antagonists for now.  Anyhow, here are some other goodies I made for my USMC force:

Ontos: http://tasmancave.blogspot.com.au/2008/03/two-ontos-join-platoon_7313.html

M48s: http://tasmancave.blogspot.com.au/2008/02/another-m48-joins-orbat_6443.html
http://tasmancave.blogspot.com.au/2008/02/m48-project-part-2_03.html

And yes, the LVTPs are still sitting half done in the box, along with a bunch of other great goodies...

17 May 2008

LVTP-5 Project commences

Long delayed, I finally got his project started ahead of my imminent two weeks off. I've been looking forward to doing these for ages and after getting a technique I'm happy with with the M48s and Ontos, I'm ready to have a crack at these large beasts. Detailed pics of AMTRACS in country are somewhat hard to find, but I'll generally be going for a look like this one.


The models are by Peter Pig, are resin and come on a precast base (which I'll replace to match my other vehicles). I've cleaned them up and added the usual gear hanging off - 44 gallon drums, jerry cans, crates and stowages are metal by Skytrex, plus some plastic sand bags around the forward turrets too. One beef is the blocky front of the main turret. A metal barrel insert would have been much nicer. I've left one as-is for comparison and carved one off as an expriment.


Here is the review from the Eleven-Barco site (reproduced here in full now that the site has been taken down)


Introduction

Peter Pig (AKA Martin Goddard and team!) have recently expanded their already comprehensive 15mm Vietnam range to include the LVTP-5 (Landing Vehicle Tracked, Personnel) AMTRAC amphibious tractor/APC used extensively by the US Marine Corps in Vietnam. The model is available in two versions – a full sized vehicle and a "waterline" version representing the vehicle in the water. The full model costs £4.80 while the waterline version sells for £2.50

I have recently updated my 15mm collection to include US Marines and I took the opportunity to buy a couple of the full size LVTP-5 models. I started collecting Peter Pig Vietnam models in 1990, when the company first started up and, over the years, Peter Pig have gone from strength to strength, in both quality of models (which are, in my opinion, some of the best detailed and sculpted available today) and in the extensive range available. The LVTP model is a worthy addition to their Vietnam range. However before looking at the model I must point out that I am primarily a wargamer and not a fine scale modeler. I am not overly bothered if a model is not 100% accurate as long as it looks right when it is painted and placed on my wargames table. In the case of the Peter Pig LVTP-5 cannot vouch for the scale accuracy of the model, firstly because I do not have any scale plans to check it with, and also because the resin casting medium may suffer from some distortion. So, allowing for this, on to the model itself....


The LVTP-5 Model

In their catalogue Peter Pig claim it is a big model and when compared to a 15mm figure it certainly is. The model is a one piece resin casting 85mm long, 35mm wide and 30mm high. The model is cast with an integral base. Although I cannot vouch for the accuracy of the dimensions the model itself certainly looks right when placed next to some model soldiers and it really does give the impression of size, which is obvious in photographs of the real thing. Details are cast or engraved onto the model. In addition the detailing looks absolutely right, particularly the positioning of the hatches, cupolas and other external detail. My only real quibble is that the engraved line indicated the front hatch door and one of the side access panels (LHS) are not straight and look as though Martin was having a bit of an "off" day.

The model represents the standard APC version of the LVTP-5 and is modeled in a "clean" configuration with no external stowage or clutter and all of the hatches and doors closed. The level of detail is good, particularly around the area of the running gear/tracks and the MG turret and driver's/commander's cupolas. I particularly like the way Martin has modeled the vision blocks/episcopes on the machine gun turret. The models were very cleanly cast and required no cleaning up other than a bit of sanding to level the base and reduce it's thickness slightly.


Customising the LVTP-5

Although I was a bit disappointed to find the model had no stowage clutter included I realised that this was not necessarily a bad thing, as it allowed me to customise the model easily to what I wanted. Most photos of LVTPs in Vietnam show the top deck cluttered with sandbags, C ration boxes, fuel or oil drums, plus lots of marines. To produce this effect I decided to modify my two models with the addition of some sandbags, a few C ration boxes and some troops as passengers. I also added several radio antenna from thin steel wire as I think these really add to the overall look of a model armoured vehicle (actually the wire was from an old top E string off my guitar – it is very thin, flexible and strong enough to withstand the handling which most wargame models have to put up with).

The sandbags were simply made from Milliput, rolled into thin sandbag sized strips and then pressed into place with a couple of dental tools. The C ration boxes were made from balsa wood and superglued in place, while the soldiers were selected from my spares box (and are a mixture of figures from Peter Pig and QRF Models). I also wanted to show the passengers standing up in an open top hatch so I first needed to modify the model as follows:
  • Using a scalpel and file I removed the raised hinges/ribs on one of the two long upper hatches.
  • After referring to several photographs, I then cut a new hatch from plastic card, and glued it in the open position, adding the hinge details from plastic strip.
  • The figures selected as passengers were then (with the exception of the kneeling M-79 gunner) cut in half at the waist and drilled to accept a thin wire pin. The kneeling M-79 grenadier was cut from his base and drilled under the groin (ouch!) to accept a wire pin.
  • I then decided how the passengers were to be positioned and drilled corresponding holes in the open hatch and deck to accommodate the pins inserted in the models.

Painting the LVTP-5

Once I had added all the detail I wanted I glued the models to card bases and, once the glue was dry, I undercoated the models with a matt black acrylic spray paint.
Painting the models was simplicity itself. The detail is good enough that they almost paint themselves. The sequence was as follows:
  • Black undercoat.
  • Dry brush coat of olive drab, leaving the black showing in the engraved detail.
  • Cover the entire model with a wash of sepia/dark brown acrylic ink and leave to dry.
  • Dry brush with olive drab, progressively lightening each coat to highlight the detail.
  • Paint the tracks dark brown. When dry cover with a wash of sepia/dark brown acrylic ink. When dry drybrush with a steel/ gunmetal colour to represent worn/exposed steel.
  • Paint the vision blocks/episcopes with a light blue-green (to represent the armoured glass) and highlight with spots of white.
  • Paint on any unit markings, graffiti, or "artwork" (many LVTPs were adorned with paintings of scantily clad ladies – but these were beyond my ability to paint in this scale!).
  • "Weather" the vehicle by drybrushing the model with the same yellow ochre colour with which I would paint the base. Lighten subsequent coats with white to again highlight the detail.

Final Touches

Once the vehicles themselves were painted I drilled holes in the appropriate spots and glued the antennas in position. I also glued the passenger figures in place using the holes I had drilled earlier (the figures themselves had been painted earlier and were thus ready to be installed with no further effort).

The card bases were then given an undercoat of green paint and a sand/fine gravel mixture glued onto the base to blend the base and model together. The sand mixture was then painted with yellow ochre and lightened with white to highlight the detail. As a finishing touch the base was decorated with "static grass".
All in all there was quite a lot of work involved for what is essentially a simple model but I think the end result was worth it.


Conclusion

Conclusions? A good, solid no-nonsense model from Peter Pig which looks the part and is very easy to prepare and paint but which also offers great scope for conversions and modifications (I wouldn't mind building one of the engineer versions with a big plough/bulldozer blade on the front!). They are not cheap at £4.80 for a resin model but I think that they offer good value and Martin and his team are to be congratulated on producing an excellent model of such a useful vehicle.

Now Martin, what about a stowage and deck clutter pack for the Peter Pig M-48 and LVTP-5, plus a vehicle crew/passenger set (with crew members in t-shirts/flak jackets and AFV crew helmets, and passengers in various sitting/lying/sprawling positions)?
The full range of Peter Pig 15mm models can be found on-line at http://www.peterpig.demon.co.uk
Barrie Lovell
July 2000

02 March 2008

Two Ontos join the Platoon

Presenting the two M50 Ontos I have just finished. They are 15mm scale and manufactured by QRF. The models themselves are crisply cast and have nice detail, including different versions of baggage already sculpted on. The model itself comes in 6 pieces - 2 treads, a hull, a turret with 4 barrels and 2 separate (lower) barrels - all of which quickly and easily fit together.

I was quite happy with these vehicle models, though note that these are wargaming vehicles, not diorama modelling vehicles - so the hatches etc don't open and are not posable. My only complaint is the very flexible barrels, but the use of vehicle bases should reduce their handling and bending.


The models were prepared using the same techniques and colours as my recent M48s, though being less rugged than the Main Battle Tanks, I did less weathering to reflect less heavy off-road time. Upon reflection, it would have been easier to fit the turrets after everything had been detailed though. Once again the vehicle bases are by Battlefield Accessories.


As you can see, the Ontos is a very small vehicle (it was designed for airmobile ops and was air-transportable by Chinook) as these comparisons shots with an M-48 show.


Finally here are some shots of a Light Section of M-50 Ontos patrolling through some paddy fields, somewhere in I Corps Area of Operations (Paddy fields and Jungle sections by Miniature World Maker)


24 February 2008

M50 "Ontos" Information


Mike's rebuild project: http://ontos.homestead.com/mikes.html
Pics of M50 Ontos on Display:http://www.battletanks.com/m50_ontos.htm
Ontos Pics http://news.webshots.com/album/278167680qDZFqd

Combat Footage of the Ontos in Action:


Organisational Note:
The Ontos platoons were organized into heavy and light sections. There were three Ontos in a heavy section and two Ontos in a light section. There were three platoons to a company; and three Companies to an Ontos Battalion.
.
I have 2 of these puppies , unpainted (for the time being) of course...

17 February 2008

Another M48 joins the ORBAT


I got another Peter Pig 15mm M48 completed over the weekend, using exactly the same process and colours as before, so I wont go into that again. Instead, here are some pics of the finished product:


The effect is not as striking this time, but probably because its not the first M48 off the production line and I knew what to expect. I'm still very happy with it though.


And just to give Charlie a scare....Rolling Hot!

02 February 2008

M48 Project, Part 2

Having washed and highlighted the tank (see Part 1 here: http://firebasecoral.blogspot.com/2008/02/m48-project-part-1.html), it was time for some detailing and weathering.

Detailing was done using my minimalist technique where 'less is more' and the hint of a detail is to enought to suggest it (meaning I do little because I'm not very good at it!). The baggage and crates I added were now painted, as were the cupola gun barrel and the main gun surround. The tracks were also blackened, followed by a light GW bolt gun metal drybrush, and finally the exhaust outlets were blackened with some soot splashed back up onto the back plating. The minimal ID lettering Ive seen on Vietnam tanks was omitted as it would be covered with mud later anyway.
It was at this point that I thought I should have added more baggage earlier in the process but it can also be added later. I also reduced it when I realised the turret didn't train fully with too much around it, so that is realistic I suppose. One very common mod in Vietnam seems to have been to add extra track sections around the turret to created a spaced armour effect as an anti-RPG measure, but I havent yet found spare tracks in 1/100 scale.

Weathering I have always found to be a tricky balance of too much vs cant see it from greater than 6 inches away and probably something I'd love to have an airbrush for. Anyway, Drybrushing with Tamiya dark earth (for dried mud) and Ral Partha Adobe Brown (for wet mud) on the lower half, then I did a few loads on an old toothbrush for splatters. Actually, I was enjoying this bit too much and went a little overboard, but I like the overall effect.


So thats it - 1 vehicle down, heaps to go!

01 February 2008

M48 Project, Part 1

You may recall that I recently took delivery of two M48s from Peter Pig's range, which has previously been reviewed at Eleven-Bravo site (http://www.eleven-bravo.co.uk/reviews/figures/peter-pig/m48a3.php) and I can only concur his comment that this model is good value for money. I like nice weighty vehicles!

The seven componets fit together nicely with minimal fuss. Only a small bit of putty around the gun barrel was needed and a few extra bits of baggage was added from the Skytrex Accessories pack (15mm WW2 range). I left the turret and cupola seperate so they can be trained as required on the table, and undercoated the lot with a black spraycan. No pics of this as it looks like...just a black tank really!


A base coat was applied using product I've just found - Testor's Olive Drab in a spray can. I did 2 light coats. which gave a nice look overall but was a little light for my taste.


A light wash followed, using Tamiya IJN Green watered down to about 20%


And a then a few highlights were added by mixing some white to Valleho Olive Drab


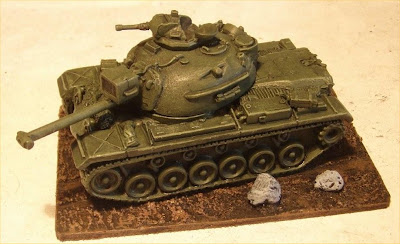
The textured base is from Battlefield Accessories range (same as the bases I used on my USMC figs) - pack Vehicle Bases 2. So far its sprayed black, drushbrushed with Tamiya Dark and Flat earth in succession and the rocks painted Slate Grey.
Now to get on with the detailing, weathering and finishing off the base!
More to follow....out.


14 December 2007

M48 review

Eleven Bravo has posted a review of Peter Pig's 15mm scale M48, which is handy since I just ordered two!

Overall I would say that this model represents excellent value for money. It is well cast, easy to assemble, straightforward to paint and, most importantly, it looks the part. I have three of these vehicles as the tank section of an Armored Cavalry platoon (for use with Barrie Lovell's Incoming! rules) but they could also be used as part of a USMC tank platoon.
.When pitted against enemy infantry on the wargames table they are lethal and you will certainly want some of these in your collection if you envisage scenarios involving NVA armour. When matched up with the M113 ACAV you can field an extremely powerful fighting unit - the Armored Cavalry Platoon.
.All in all, well worth investing in and, given that the prices of models are only likely to go up, get them now!