Showing posts with label Britain 1940. Show all posts

Friday, 15 September 2023

Battle of Britain 1940: Remembering the Battle through a Board Game

When considering the Battle of Britain I am always thrown back to the epic 1969 film which captures the mood perfectly, the authentic (well near enough) actual flying machines (pre-dating CGI with scale models when they had to blown up) and the sheer scale of the battle for me - including the bombing of Duxford aerodrome (see below, "Repeat Please" as the Polish pilots unofficially join the fight and thank God they did): 


The Plastic Soldier Company (PSC) did a revamp of the (Airfix?) boardgame and I even managed to paint most of the planes for the board game (see below, the start of the campaign, Kanalkampf - I still have a few German planes still to paint!):  


We managed to stumble through a turn, with heavy attractional losses for the Luftwaffe and big recovery problems for the RAF (see below, damaged RAF planes radar stations and an airfield, but a mass of Luftwaffe planes did not make it back to France):  


Definitely needs a longer revisit [probably three hours+ to do it justice]/ I think the key to a successful game is playing following the German historical sequence of attack by arranging the Mission Cards - historically, rather than drawn semi-randomly as suggested by the rules. In its purest form it needs to be played double blind with a White Control Room and added atmosphere!

Tuesday, 30 November 2021

Stockton Battleground (2021): Battle of Britain "Double Blind Game"

Stockton Battleground Wargames Show 2021

Cinderella you shall go to the "ball" (well it is actually a "wargames show"). Myself and fellow wargamer Ian took the relatively recently released PSC "Battle of Britain" Game (which older Grognards would recognise as a revised [and I would say much improved] version of the game from the earlier Airfix 1980/90's (?)edition of the "Battle of Britain" board game) off to the show to play it "double blind". This meant a partition board between the players and a slight revision to the rules. Rather than relying on the random shuffle of the deck of mission cards to provide intrigue and chance - the German would be allowed to choose or rather "determine" his targets and use an appropriate force composition - but he [as in "me" on the day] was playing fair and hitting targets in historical order (radar, airfields and then cities). The forces were selected to player preferences (although the Germans followed the rule of thumb that 50% Fighter and 50% Bomber in his formations - with at least one Ju87 Stuka and Me 110 squadron (until they ran out)). The RAF likewise controlled their force composition, naturally holding the Blenheims, Defiants and Gladiators to the "last line of defence". The German was playing with Fog of War - the RAF player being a semi-plumpire by virtue of handling all combat - the Luftwaffe player passing his cards over the wall to do "combat" and generally receiving "fewer" back. It worked really well (IMHO), as the Luftwaffe was deprived of th eobvious board game "tells" of how well (or bad) he was actually doing, so he had to do a bit of guesswork and bad guesswork often leads to bad mistakes.

The video of the Stockton Battleground 2021 event is here, with at 9:20 is a quick fly-by of the Battle of Britain Game: 

Right at the start of the action and the "view" from the German side of the Battle of Britain board (see below, a lot of Red bombing missions to perform, with the Luftwaffe intent on eating them up, by nibbling from the south coast upwards in order of: Radar - Airfield - Cities): 


Kanalkamf and the bomber formations are 'mysteriously' intercepted and bounced by formations of RAF fighters (see below, in the game the RAF player tries to "intercept" rather than "dogfight" his German opponent wherever possible, by this tactic he stands a good chance of getting to those juicy bombers without having to tangle with those nasty Me 109s): 


The first wave returns after a partially successful mission strike. According to Luftwaffe intelligence estimates of 50% of the RAF radar stations have been destroyed [explousion markers denoting dead radar stations, or so the Luftwaffe player thinks]. The second mission wave with be sent to take out the remaining stations of the Home Radar Chain Defence Network (see below, a cunning trick of the game is that the German player cannot return to a "completed mission", so to his utter amazement he keeps getting intercepted by the RAF - annoying "detected" markers appearing on his fighter/bomber formations as if the destroyed radar stations and airfields had somehow been repaired [something that didn't happen in Poland and France]): 


With the radar chain taken out it is now time to move onto the RAF airfields (see below, the RAF radar stations on the coast are burning now so the historic name of Tangmere comes to the top of the German bombing list, this is going to be the "crux of the battle" RAF fighters defending their home turf, a bit of a "sticky wicket" as they say in cricket): 


The Luftwaffe target list is slowly creeping up the board. Despite the (very) heavy losses optimistic reports are being sent to Goering about significant RAF losses and numerous infrastructure targets totally destroyed. The RAF airfields are now to be put out of commission and as a final insult Luftflotte 5 will attack from Norway (we [the German player] expect only to meet the decrepit Gloster Gladiators and outclassed Blenheims). This is now the "tussle of eagles" (see below, the south coast is burning, one more push and the English surely will be on their knees):  


Alas, the Englanders have other plans. Luftflotte 5 reports disastrous losses. They found Spitfires and Hurricanes waiting for them - the converted long distanced Me 110s stripped of the rear gunners for extra fuel tanks could not protect the bombers. There losses were irreplaceable, tLuftflotte 5 are now a spent force. Meanwhile the fighting over the southern English coast is simply ferocious. "How are the Tommies still intercepting us?" A final wave of fury is unleashed on 10 and 11 Groups airfields, the Port of London and naval towns of Portsmouth and Southampton are also targeted. Another attempt to take out Tangmire is launched. The destruction is wanton, but the Luftwaffe is down to its bare bones of bomber formations, the crews are tired and dispirited. The London Docks blaze savagely and are totally destroyed in game terms, Portsmouth and Southampton are damaged, RAF airfields smoulder but somehow 11 Group, Keith Parkes boys, rise like a phoenix rises from the ashes, a punch-drunk boxer raising himself defiantly from the canvas one more time and slugs out at the arrogant Aryan. He lands a  body blow, a body blow, another body blow and then solid punch to the jaw. The airwaves are full of Polish chatter, Heinkels fall from the skies and dogfights mesmerise Londoners. Luftwaffe suffer terribly (see below, their bombs land and buildings fall, Luftwaffe pilots confidently tell their superiors of the destruction reeked.If this is true then is it time for Sealion? Tomorrow will tell):  


The RAF is ready and waiting in the morrow, in far better shape than the Germans think. Yes, the Germans will come but they will see the RAF still in the skies, not down the their last fifty Spitfires as Goering boasted. No, it is not the time for operation Sealion, disperse the invasion barges, send the infantry to the East ready for Russia. More bombing missions will follow, different towns will burn but the RAF has not been cracked or broken (see below, German intelligence cannot simply understand how the radars, how supplementary airfields have been used so effectively and how pilots are trained so quickly to replenish British losses. It is "the few" who stopped them by their persistence and doggedness "To keep buggering on" as Churchill said (see below, although seriously damaged the RAF are not down and out. 10 Group are reeling more than 11 Group, 12 Group supporting them on the South East coast. The constant  problem for the Luftwaffe player is that they do not known what to try and hit next - it really played well as a double blind game, particularly as the German had to "estimate" rather than know the RAF losses): 


Honourably mentioned in dispatches, the "other few", spare a thought for the "other" British fighters of the Battle of Britain. Along with the Spitfire and the Hurricane there were a fews RAF fighter squadrons who flew twin engine Bristol Blenheim Fighters, the twin seater Boulton Paul Defiant (a rear facing turret but no forward firing guns) and even the famous Gloster Gladiator biplane (see below, painted up in 1/300 from the PSC expansion pack): 


Other spoils from the Battleground show. Next year we plan to do the Battle of Gazala, so these 10mm Pendrakon Italian CV33s, British 8th Army Infantry and A13 Cruiser tanks (maybe not, too early in teh Desert War but I have a soft spot for them) are but the start of a long term painting project (see below, a small lead mountain to attack in the winter months):  


These will reinforce my previously purchased and now painted Pendrakon Italians. I wa hoping to pick up the tiny Italian L6s, but alas that will have to come in a later postal order.  

Footnote: Apologies as it was rude of me not to thank the many members of the wargaming public who popped by and helped with the game (drawing random cards from the Luftwaffe Player's hand (as in me)) plus engaged in fascinating conversation, passing on fascinating Battle of Britain comments. I learnt a lot .. thankyou! 

Wednesday, 22 January 2020

Blood Red Skies: Battle of Britain (3 of 3) Battle End

Adding insult to injury the Me110s find themselves now tangling with Spitfires (see below, a Spitfire racing to get into the rear are of a lumbering Me110, this is not what or how it happened in Spain. Poland, Norway, Holland, Belgium and France):


Thankfully Von Ken claims a final "boom chit" on a tight turning Spitfire and they have had enough, boom chits being greater than the number of engines on the table (see below, this comes as a great relief to this particular shot-up Me110 crew, Herman's "not so finest"):


As the Spitfires disappear and the Me110s morale (barely) hangs on (one more "boom chit" and they too will be off) the Destroyers try one more head-long charge at these pesky Hurricanes, bringing 20mm hard hitting cannon to a deflection shot on a "Cat" (see below, another 'boom chit' on the Hurricanes):


It is up to Von Ken to deliver the coup de grace, as a disadvantaged Hurricane finds itself "finally" on the receiving end of a burst of deadly fire from a Me109 (see below, and much to the relief of the crew of another shot up Me110):


The final act is for both the Me110 Squadron and Hurricane Squadron to call it a day with "boom chit bust" and go home (see below, the parting view is the Hurricane going down in flames and the RAF pilot parachuting down to home soil and a welcome from the local Home Guard):


The Me109s of Von Ken rule the skies over Kent before a low fuel gauge tells them it is time to go home (see below, where have the RAF gone?):


A good introductory game, although my Me110 nose (and in particular rear gunners) got a "bloodying"! A few less people round the dinner table at the chateau for the Destroyer Squadron but meanwhile high spirited toasts to Von Ken's for his latest kill in there more rough ad ready farmyard accommodation. Across "The Channel" there is earnest discussion in the 'Cat' Mess Bar over the real merits of the "Vic three formation" and down the Dog and Duck laughs as Maisie serves up another round for her favourite "Boys in Blue" as the ivories of the piano get a hammering!

End Note: Despite my collection of 1/144 fighters I may have to male a token dabble into 1/200. Although I am loathed to replicate across different scales (again)! The starter box set of Blood Red Skies might be a more sensible purchase!

Tuesday, 21 January 2020

Blood Red Skies: Battle of Britain (2 of 3) The Grist to Battle

Cunningly Von Ken's boys have sneaked (a complementary term) into a rear position behind teh Spitfires for tactical advantage - although out of gun range for the moment (see below, it is going to be a testing time for the "rookie" RAF Spitfire Pilot Commander, the dashing young Ian fresh from his exploits with Maisie the  barmaid):


Meanwhile the Me110s have made a desperate dash at the Hurricanes, trying to get their deadly 20mm frontal cannons into play. However the crafty "Dapper Dave" has learnt a thing or two from his experience fighting the Luftwaffe in France and is not going to fall for a frontal exchange (see below, the pilots trade curses and "skill tests" trying to out manoeuvre their opponents into disadvantaged positions - with mixed success):


Note: The upright position of the plane on the stand denotes it is in an "advantaged" position - while you have an advantage you cannot be shot at (which is really good believe me), therefore there is a lot of positioning and skill tests (a pilot action is used to make the other pilot 'make a skill test' or lose one grade of position [advantage/neutral/disadvantage - state change left to right] when you get within mine inches of their plane). The easiest way to be put in disadvantage is by letting an enemy in within gun range in your rear arc. You are very vulnerable to being shot down while at disadvantage - so the number one rule is to maintain an advantaged position at all costs (see below, multiple skill tests start to wear down the Me110s from advantaged positions, starting with my "wingman"):


I find out to my cost Me110's are poor chasers unless you can "zoom and boom" with a "great dive" ability - which gets you a boost of extra movement (see below, my incompetence lets this Hurricane escape):


It is satisfying when you manage to to get a bucket full of sixes (German Crosses on the Luftwaffe dice) but you can only ever get "one hit" - a second cross ups that to a critical (which makes it harder to save) but you do not automatically inflict damage. Things are handled rather abstractly, with the attacked plane allowed to make a saving throw. If this is failed when the plane is at a disadvantage, the plane is shot down, otherwise you "get a boom chit" which accumulates as fatigue and loss of morale. Eventually the accumulation of "boom chits" breaks the squadrons "will to fight" and they disengage. It's a very nice concept and game mechanic - other rules systems encourage a last man standing fight to the death (see below, it cannot get much better for the Germans, but even such skewed stats rolls do not produce overly devastating effects, but rather secure a good outcome):


One advantage of having a two-engined plane is that you effectively get two lives. The first life loses one engine (which loses some speed) and kills the rear gunner - which means you cannot get the Parthian shot at the Hurricane in your rear arc anymore, the second sees you tumble out of the skies like a flaming meteor (see below, disadvantaged and failed my skill test means my rear gunner and an engine is lost):


The Me109s are really taking it to the Spitfires, no losses but lots of "boom chits" acquired. The Spitfires tight turns give them plenty of dice to make their saving throws, which turns a rear arc shot into deflection shot. From auto kill to a morale "boom chit". At least four Spitfire pilots owed their lives to this ability! The Hurricanes meanwhile are certainly taking to Baron Mark's flight of "elite" Destroyers!

Monday, 20 January 2020

Blood Red Skies: Battle of Britain (1 of 3) Closing to Battle

Kent, August 1940 - Squadron Scramble, six Hurricanes from 43 Squadron vector in via the Dowding System to intercept German blips on the radar screen (see below, freshly painted ready for their first BRS battle - the Hurricanes recover from an initial bad set-up by playing their RADAR card which allows them to recover from an initial set of poor "advantage/neutral/disadvantage" positioning, to the German players curses):


The enemy, which turns out to be a group of four German Me110s "Destroyers" (see below, seeing as I had suffered at the hand of these beasts in a previous game I fancied my chances flying them):


Close by are a "swarm" of six Me109s (see below, paired up for combat, luckily for my sake in the hands of a veteran player):


Last but not least "the boys from the blue" a freshly commissioned brace of six shiny Spitfires from 19 Squadron (see below, can you sense the menace?):


The Hurricanes close with Destroyers. The German player (me) has played his "obselete tactics" card forcing the RAF player "Lucky Dave"  to chose the "RAF Vic Three" formation favoured in France (see below, the RAF have twelve engines [two separate forces of six which equate to a "boom chit" - think morale value - of six each], the Luftwaffe have fourteen [two separate forces of eight (Me110s) and six (Me109s) resectfully]):


The Spitfires and Me109s instinctively hurtle together (see below, cunningly Von Ken intends to use the left hand cloud to sweep behind and get into the Spitfires from behind):


Battle is about to commence in deadly earnest as the planes are almost within range of each others guns.

Saturday, 18 May 2019

Squadron Scramble: (TSR) Battle of Britain Game

Context: Britain's Darkest Hour (see below, "Green" Spitfires of 10, 11 and 12 Group await the Luftwaffe Fleets taking off from Northern France (Nos 2 and 3) based in France):


Eagle Day: The Luftwaffe Missions and Squadrons are assigned and RAF WAAFs waiting by plotting tables waiting ready to see Goering is disappointed (see below, the RAF Flights are assigned and scrambled as the enemy formations are picked up on the Radar Home Chain, attacked - honours even as only 50% of the Bomber Missions completed):


Another wave of German bombers is prepared. The RAF gets points for just surviving while the German Luftwaffe has to complete missions (see below, German Squadrons are being traded 1:1 with RAF Flights):


A morale boost for the RAF as the celebrity RAF Duck Display Team does a morale boosting tour of 12 Group Squadrons. The Luftwaffe are ahead on the points and the RAF have a tough turn ahead of them (see below, 12 Group have been giving 11 Group sterling support):


The air battle for London and Canterbury define the strategic campaign. Both German Missions are stopped dead in their tracks, including a sacrificial exchange by a Beaufighter Squadron bounced by Me 109s (see below, the bombing of London fails and the RAF jumps ahead with the populace appreciating the sacrifice "The Few" are making): 


The Luftwaffe embark on another desperate mission to "Bomb London" but meets with the RAF "Steel Wall of Spitfires" and a "Taxi Rank of Hurricanes". The bombers were annihilated before the bombing phase (see below, this turn was damage limitation on behalf of the Luftwaffe as they were beaten across the board):


After four turns the basic game completed with an obvious RAF win. One important lesson was for the RAF not to needlessly dogfight with German Fighters (even the lame duck Me 110 "Destroyers") unless they are stacked with bombers.

Next Steps: Review the changes in dog-fighting in the advanced rules.

The original TSR Game of Board Game Geek:

https://boardgamegeek.com/boardgame/1844/battle-britain
Note: This has has two interesting reviews

The Plastic Soldier Company revamp of the TSR Battle of Britain game has an interesting review: 

https://www.amazon.com/Board-Games-Plastic-Soldier-Company/dp/B07DM77WSP?SubscriptionId=AKIAJQZPVL52RDH5YIQQ&tag=itemtext-boardgamegeek-20&linkCode=xm2&camp=2025&creative=165953&creativeASIN=B07DM77WSP#customerReviews 

Just in case it disappears here it is in full: 
Battle of Britain, from PSC Games, is a thrilling game that depicts the 1940-1941 Battle of Britain. One player plays the German Luftwaffe as it tries to bomb British cities, airfields, and radar installations, while the other player takes on the role of the British RAF as it desperately tries to defend the island from the enemy onslaught. The board is a map of England and the channel, as well as the north coast of France and a small section of Norway. The German player has Luftflotte player boards for his cards, while the British player has RAF player boards for his cards. There are different scenarios and a campaign game that players can do. A typical scenario will last four game rounds.
During the game rounds the German player will draw a number of "mission" cards and assign them to his various squadrons. On his turn he will move the various squadrons from their bases in France and Norway to over Britain. When they cross into Britain's radar cover, the British player may choose to intercept and moves one of his squadrons from up to three spaces away into the same space, however he can only engage in a total of five combats per found to reflect Britain's limited resources. The German player then moves all of his non-intercepted aircraft toward their targets, spending fuel supply as he does so. The British player can then decide to attack certain German squadrons with his own, moving up to five spaces away, and within the five battle limit.
Combat occurs differently in interception than it does in dogfighting over the German targets. In both, players roll their fighter combat number (the top right number on the card) and try to score hits by rolling the enemy's symbol on their dice, (however, they can also roll their own symbol, which acts as a friendly fire hit). In interception, however, the British player plays all three of his squadron cards at the beginning of combat, and the German player can choose any three of his six squadron cards. Each player then rolls and casualties are assigned. A single hit is enough to take down one aircraft, up to its strength level. (For instance if two aircraft are in the fight and one has a strength level of three and the other of three, and four hits are rolled, both planes become casualties. If only three hits were rolled then only would be taken.) In dogfighting, each player lays down one card simultaneously, and they battle each other. If one card is able to score two hits that squadron becomes an ace squadron. British casualties go to a damaged aircraft section of the appropriate player board, while German casualties are eliminated from the game.
The German player then attempts to bomb their target, rolling the bombing number on the card. Depending on what the target is a certain number of success must be rolled. Damage tokens are placed on successfully bombed targets, and on the British player's infrastructure track. The German player then must fly his squadrons home. If he has exhausted all or most of his fuel tokens, he must roll to see if those planes make it home safely. At the beginning of the next round the British player may attempt to repair planes and bomb damage by rolling a number of dice from uncovered cities on the infrastructure track. Successes allow him to repair planes, airfields, and radar installations, but not cities. After four rounds scoring occurs. The German players scores for things like cities destroyed, aces created, and missions completed. The British player scores for things like enemy aircraft destroyed, aces created, and incomplete German missions. Whoever has the most points wins Battle of Britain.
There is a lot more to this game but these are the basic rules. The game was created by Richard Borg, better known for his Commands and Colors games, which are fantastic light wargames. Here, each player is given several tough choices. For instance, the German player must decide which missions to risk while the British player must decide which units to intercept and which to dogfight- and which to just let through to their targets. Each player must make choices during dogfighting combat- which planes to use is very important. And the British player must carefully consider what planes or facilities to repair with his limited resources. The tough decisions make for exciting narrative gameplay. The game looks great. The board is just beautiful and the minis are a nice touch. Players fell like their in the Cabinet War Rooms with Churchill sliding units across maps. The downside is that many of the plane minis do not fit easily on their stands, and it is easy to knock them over during gameplay. Some more dice would have been nice as well. These are minor complaints, however. Generally this is a fun and exciting light wargame that fans of World War II games should really take to. Check it out.


Monday, 21 May 2018

Blood Red Skies: Battle of Britain - Bomber Escort Mission (Part 3)

The Hurricanes tussle with the Me110's having a tough battle with the frontal passes (see below)


Mixing it up they find contrary to popular belief the Me 110s can be nimble and actually having the drop on speed against the Hurricane move and hence can shoot first (see below):


Numbers should help though as four more Hurricane friends swoop in to assist (see below):


Meanwhile in the entangled melee of Spitfires and Me109s the two Germans are fighting for their lives. Although not shot down the Germans have acquired five "boom" chits through narrow misses from the Spitfires shooting. Two more "boom chits" and the formation will break its morale and run for home. This was the gamble the British player sought as he passed the Me109's head on (perhaps a bit too risky on calmer reflection). The Spitfires also got in some telling side shots but failed to get on Jerries' tail and produce a clear kill (see below):


Realising that the key was to down the bombers a Spitfire pair broke through to get the Dorniers. Two hits required to down a bomber so you have to be persistent. The good news was that if you hit them the bombers have a very poor chance to dodge unlike those crafty Me109 fighters. One bomber was sent spiralling down in flames but a Spitfire paid the ultimate price (always watch your six) as a Me109 got on its tail and downed it. However only one more German bomber downed to 'stop the raid' (see below):


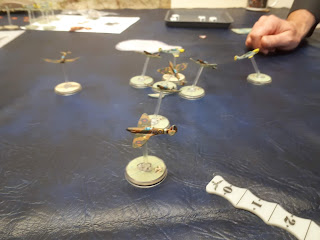
A wider panoramic view sees the Spitfires giving the lone Me109 hell, but with a Skill of 4 the German pilot is just managing just to hold it together, praying for the other escorting Me109s to come to his aid. Luckily for him the frantic cries of the bomber crews have released them from their static positions and eight fighter escorts sweep down [4 x Me110s and 4 x Me109s] at an 'advantaged' state (see below):


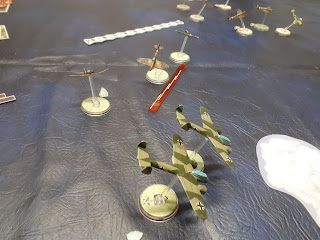
Across the other side of the table and to overuse a common wartime phrase, "all hell breaks loose" (again) as the Hurricanes have to deal with four Me110s arriving just at the wrong time (if you are wearing RAF Blue). Cannon fire sweeps the sky. One Hurricane pilot pays the ultimate sacrifice and the mission suddenly looks to be "hanging in the balance" or rather "gone to rat-poo". Off camera the Spitfires fair better and manage to survive the initial onslaught of the 'bouncing' four additional Me109s, and eventually break the Me109's squadron morale. The Me109s will "bug out" having still their complete number plus one enemy (precious Spitfire) kill to their credit, although they failed to protect the bombers! That certainly will not go down well at Headquarters back in France. (see below):


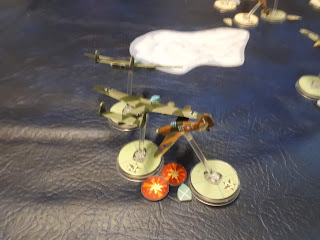
The bravery and skill of the Hurricane pilots pays dividends as "F" for "Freddie" gets in amongst the bombers and in a skilful display of "this is how you do it" with two shots in one turn downs the second Dornier, thus breaking the German Bomber Squadron's morale. With nothing left to protect the Me110s are more concerned for their own safety and 'also 'break off'. The Me110's claim two kills. Three RAF fighters were lost in total to two Germans bombers (three engines to four engines in Albert Speer terms). The RAF claim a strategic win as the bombers did not get through (see below, the Hurricanes bring home the bacon):


Back in France a different sort of hell breaks loose. The Bomber Squadrons again complain of "no protection" from the fighters. They claim the beloved fighter tactic of "High Escorts" is a flawed concept. What is the point of having any fighters at all, if they don't turn up until the bombers are being attacked and shot down. The German fighter pilots are appalled as this means meeting Spitfires on very unequal terms - which one particular Level Skill 4 Me109 pilot knows will probably be the end of his Me109 squadron. He returns home to his squadron after the unruly staff conference to hear the hearty sing song from the officers canteen. This is bitter sweet as they are in good spirits. He knows for sure there will be far less Luftwaffe pilots returning from the next mission thanks to Goering's decision to deploy "close escorts" so that the "bombers will get through".

Meanwhile a recently "downed" and abashed Spitfire pilot is being lectured by a more experienced comrade. "Listen Fango [his Mess nickname], you would have still been in the air if you had thought a little quicker and performed the 'defensive tactics' [a card in the British player's hand] manoeuvre interrupting the Hun with a simple 'tight turn', then that nasty blighter of on Me109 would not have been on your tail and you wouldn't have been at a disadvantage. It's like a game of cards Fango, don't miss a trick. Now take a look at the new Spitfire we've got for you and get a good night's sleep. You'll be up again tomorrow."

PS: Once again thanks to Renko for the hosting the game with very nice models and a much more complete understanding of the rules. In the words of Amazon and Whiskers if you like the above, nine out of ten cats who expressed a preference, also liked: https://twtrb.blogspot.co.uk/2018/05/blood-red-skies-over-channel-tale-of-j.html?showComment=1526677918061#c7630556548291730388

PPS: Many thanks to Asgard Games for hosting this event. Always nice to have access to a hot cup of tea during a wargame ;)

Sunday, 20 May 2018

Blood Red Skies: Battle of Britain - Bomber Escort Mission (Part 2)

The Hurricanes rose in unison to get to an "advantaged" position to meet the threat posed by the twin-engines, double-seated with 'evil' rear gunner. They do shift and have a special "agile"ability card which takes them out of the "bomber clumsy" category (see below):


The battle had broken down into two separate dog-fights: the Hurricanes versus the Me110's and the Spitfires versus the Me109s (see below):


When you go through a cloud (see middle of the picture below) you reset your status to "neutral" (see below):


The bombers make their clumsy was forwards. The German commander was reconsidering teh wisdom of setting their initial position to "disadvantaged" as I could not see how they could gain a better status in the tactical context of this dogfight. It simply takes the bombers too long to do anything in comparison to the nimble fighters. Once you are in a "disadvantaged" position it is very "easy" to get shot down (see below):


Meanwhile the Spitfires were keen to press ahead with their advantage in numbers over the pair of Me 109s and harass the German fighters out of the game before the extra German "top cover" could descend (see below): 


Snowdrop  Leader: "Tally Ho!" Game on. The Spitfires try a head-on attack against the Me 109s which allows the Germans to fire back. A dangerous tactic as the Me 109 has two nasty 20mm cannons and a heavier weight of fire (see below, the red tracer of 'the first round of combat'):


All depended on the "luck of the nice" but the Spits had their "blood up"!

Next: "Achtung Spitfire!"

PS: Thanks to Renko for the hosting the game with very nice models and a much more complete understanding of the rules. In the words of Amazon and Whiskers if you like the above, nine out of ten cats who expressed a preference, also liked: https://twtrb.blogspot.co.uk/2018/05/blood-red-skies-over-channel-tale-of-j.html?showComment=1526677918061#c7630556548291730388