I have chosen to go for the Dutch version, but will either have to freehand or source some decals (bizarrely the kit came with Czechoslovakian instead of Dutch ones). Base coat needed first.
Showing posts with label Dutch. Show all posts
Showing posts with label Dutch. Show all posts
Thursday, 11 September 2025
Fokker D XXI Progress - Assembled
Hitting the ground running as the PM 2 model was a neat and quick assembly (see below, few parts and a plastic that takes well to ploy cement, it posed no problems going together):

I have chosen to go for the Dutch version, but will either have to freehand or source some decals (bizarrely the kit came with Czechoslovakian instead of Dutch ones). Base coat needed first.
I have chosen to go for the Dutch version, but will either have to freehand or source some decals (bizarrely the kit came with Czechoslovakian instead of Dutch ones). Base coat needed first.
Wednesday, 10 September 2025
Late Birthday Present to Myself - 1/72 Fokker D-XXI (PM Model)
It is rude to go into a model shop and not buy something. I had to look hard but I chose this for jut under £9 (see below, an interesting early flying machine that did not survive its contact with the Luftwaffe [in Dutch and Danish service] but lasted longer in service with the Finnish Air Force fighting the Soviet Union):

I am tempted to do it in Finnish colours but my 1/72 Dutch army will miss it! NoteL In which case I will need the Dutch Orange Triangle war markings!
I am tempted to do it in Finnish colours but my 1/72 Dutch army will miss it! NoteL In which case I will need the Dutch Orange Triangle war markings!
Friday, 11 December 2020
Connections NL2020 Conference Books and Game Downloads
This was good (see below, good news - the Dutch are getting in on the Connections act):
Click on links below:
- Book “On wargaming” by Matthew B. Cafrey Jr
- Solitaire board wargame “Terror War” on the events in the wake of 9/11. This is a print & play game. All maps, counters and rules are included. Download Terror War from HERE
- PC wargame “Order of Battle” by Slitherine. OOB is the free base game for the OOB series which covers most of WWII both in the Pacific and in the ETO. Additional modules can be bought from Slitherine and at the moment in the Holiday sale, at a discount.
Download OOB HERE. - Book on wargaming WWII “Winning a future war” by Norman Friedman.
- Book on wargaming: "The complete handbook of wargame". Updated {easy entry, somewhat dated, still relevant!} by the master of wargames Jim Dunnigan.
- Free wargame: “Cold War Naval Battles” by Dan Verssen. 2 to 6 player game.
|Something to pass those cold winter nights watching ;)
Tuesday, 9 April 2019
Waterloo in York .. 5,000+ 15mm Soldiers on Table
A slightly dodgy introduction to this story would be "imagine my surprise" when walking down the back streets of York (on an unplanned family day-trip) to be lured into a church hall on the pretence of "The Battle of Waterloo"! What is going on here, I had actually walked past the venue, but was stopped in my tracks by an A4 notice strapped to a lamppost. "I think it's back there," said the wife - so while she and the kids went to see Dinosaurs in the York Museum I loitered back and said "I'll just see what it's like" which was updated to you "see you in twenty, after the Dinosaurs". Minus one in the "good Book" column! I have to say though the whole set up was spectacular. They had set-up on Friday night and they were still playing ti the finish on Sunday mid-day to early afternoon. Epic stamina as well as epic proportions [they did sleep I believe].
Please see this link for what the organisers had to say:
http://theminiaturespage.com/boards/msg.mv?id=502951
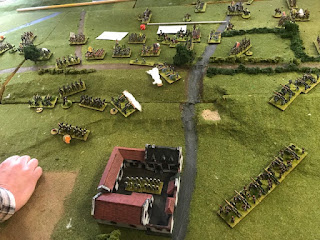
The high point of the Allied cause, the Prussians crushing the French (including the Young Guard) at Placenoit (see below, alas despite their obvious success it seems that they have taken too long):

The Allied left (on the ridge) tells a sorry tale, the British-Dutch-Belgian forces have been broken in two. Here the remnant of the force is being shepherded in sheep-dog fashion of the table Papelotte just visible on the left hand side of the photograph (see below, heavy artillery and French columns hitting the two remaining battalions):

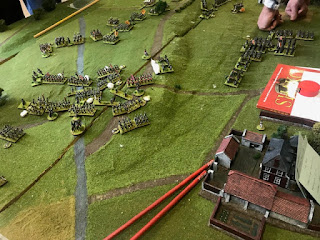
Towards the centre, behind La Haye Sainte, the victorious French on the Allied left have swung into a deadly hinge threatening the Allied squares bunched in the centre. Wellington was looking decidedly nervous. He had survived a reconstruction of Ney's ma cavalry charge in the centre but had been severely pinned down and mauled in the process (see below, his [Wellington's] cavalry reserves had all gone and the Middle and Old Guard were massing at the bottom of the slope):

The Allied centre, battered but [at this moment] still holding, the fight to its left [top right of the photograph] behind the ridge-line betrays its "dire straits". The French have set-up the final "attack of the Guard" with the British defending two ways (see below, I believe that is the fateful hand of the Emperor himself has been caught on camera, see bottom left):
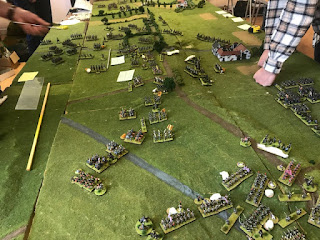
The Allied right had been mauled early on as the French had ignored Hougoumont completely (which is always the problem with a Waterloo re-fight, for without fixing "Victory Conditions" or rule/scenario constraints the temptation is for the French to "ignore it" - but Napoleon did consider it too important on the day to ignore - perhaps that was because of too poor intelligence and bad staff work - as plagued the campaign of "The 100 Days"). Most of the fighting had been around the far right of the Allied line and very attrition, but the Allied did hold their own to the credit of their player! (see below, Hougoumont would not need to be rebuilt from the foundations up after this battle!)
One last panoramic shot which won't be pleasing to the Allied eye. The Middle and Old Guard can be seen massing next to Napoleon's fists [indeed one thinks they are Napoleon's Fists]. The Allied left is holding its own [just] but Hougoumont is off camera [deserted, the French just walking past it at this point] but along with the centre is about to be sorely pressed (see below, alas at this point I had to say "Adieu" and return to my family to learn tales about dinosaurs [and pay for lunch as penance]):
A fabulous looking game [spectacle is probably more deserving], played in what I could see as great spirit (using the latest [Edition 2] of Shako I believe]. As stated in the title 5,000+ figures [although by this stage a fair few from both sides were in the dead and routed box], every battalion that fought was represented and beautifully sculpted terrain. Brilliant and money also raised for a good cause. Hats off to the lads who put this together! (PS: Apparently they are keen on ancients too!)
Waterloo related: Waterloo Uncovered - As seen on the BBC News Website -
https://www.bbc.co.uk/news/uk-scotland-glasgow-west-44845892
The article was posted 16th July 2018 but the game is scheduled for June 2019. The insane figure quoted was 20,000 figures! Does anybody know anything more about this?
Please see this link for what the organisers had to say:
http://theminiaturespage.com/boards/msg.mv?id=502951
The high point of the Allied cause, the Prussians crushing the French (including the Young Guard) at Placenoit (see below, alas despite their obvious success it seems that they have taken too long):
The Allied left (on the ridge) tells a sorry tale, the British-Dutch-Belgian forces have been broken in two. Here the remnant of the force is being shepherded in sheep-dog fashion of the table Papelotte just visible on the left hand side of the photograph (see below, heavy artillery and French columns hitting the two remaining battalions):
Towards the centre, behind La Haye Sainte, the victorious French on the Allied left have swung into a deadly hinge threatening the Allied squares bunched in the centre. Wellington was looking decidedly nervous. He had survived a reconstruction of Ney's ma cavalry charge in the centre but had been severely pinned down and mauled in the process (see below, his [Wellington's] cavalry reserves had all gone and the Middle and Old Guard were massing at the bottom of the slope):
The Allied centre, battered but [at this moment] still holding, the fight to its left [top right of the photograph] behind the ridge-line betrays its "dire straits". The French have set-up the final "attack of the Guard" with the British defending two ways (see below, I believe that is the fateful hand of the Emperor himself has been caught on camera, see bottom left):
The Allied right had been mauled early on as the French had ignored Hougoumont completely (which is always the problem with a Waterloo re-fight, for without fixing "Victory Conditions" or rule/scenario constraints the temptation is for the French to "ignore it" - but Napoleon did consider it too important on the day to ignore - perhaps that was because of too poor intelligence and bad staff work - as plagued the campaign of "The 100 Days"). Most of the fighting had been around the far right of the Allied line and very attrition, but the Allied did hold their own to the credit of their player! (see below, Hougoumont would not need to be rebuilt from the foundations up after this battle!)
One last panoramic shot which won't be pleasing to the Allied eye. The Middle and Old Guard can be seen massing next to Napoleon's fists [indeed one thinks they are Napoleon's Fists]. The Allied left is holding its own [just] but Hougoumont is off camera [deserted, the French just walking past it at this point] but along with the centre is about to be sorely pressed (see below, alas at this point I had to say "Adieu" and return to my family to learn tales about dinosaurs [and pay for lunch as penance]):
A fabulous looking game [spectacle is probably more deserving], played in what I could see as great spirit (using the latest [Edition 2] of Shako I believe]. As stated in the title 5,000+ figures [although by this stage a fair few from both sides were in the dead and routed box], every battalion that fought was represented and beautifully sculpted terrain. Brilliant and money also raised for a good cause. Hats off to the lads who put this together! (PS: Apparently they are keen on ancients too!)
Waterloo related: Waterloo Uncovered - As seen on the BBC News Website -
https://www.bbc.co.uk/news/uk-scotland-glasgow-west-44845892
The article was posted 16th July 2018 but the game is scheduled for June 2019. The insane figure quoted was 20,000 figures! Does anybody know anything more about this?
Wednesday, 27 March 2019
Ramilles: Consolidated History
High Level Summary:
End Scene: The storming of Ramillies (see below, after the fire of cannon comes the storming of the infantry, a bloody and dangerous affair for sure):

A game of three parts, two won by the Allies, one a winning draw by the French which translates into a 2-1 football score and Allied win; compared that is to Marlborough's 3-0 masterpiece on the day. This was cause partly with the 'historical hindsight' (hard to factor out without being too deterninistic) allowing the French to defend far further forward than they did on the day. Another Allied disadvantage being the total 100% information presence - aka no "Fog of War" which denied the 'stroke of genius' Marlborough had on the day in achieving a critical mass of cavalry on his left flank. However it produced a hard fought and entertaining game which gave a greater appreciation of how good a general Marlborough was.
The Battle Plan:
As viewed from the Allied side the left wing was going to be the scene of a massed and ferocious cavalry battle, the slim centre was a concentrated bombardment of the town of Ramillies (hopefully down to rubble) and a holding action along the length of the riverbank (despite the Allied infantry being provided with 'historical' brush fascines to assist filling the ditch - to attempt a full frontal attack would be suicidal). The bulk of the artillery from the holding sector was transferred to the Ramillies bombardment along with the Allied Cavalry Reserve (this movement was in the clear as opposed to hidden). The French were happy be aggressive with their cavalry wing and be defensive elsewhere, however they countered the Allied Cavalry Reserved by committing their own Bavarian Cavalry Reserve to the cavalry wing (again movement seen to all).
The Battle:
The Allied obtained a swift storming of a fortified town hamlet on their extreme left which was invaluable in securing that flank. In addition it drew in no less than six French dismounted Dragoon formations into a futile attempt to retake it. These French Dragoon formations were sorely missed in their mounted role as despite their fighting ability being "less than" that of regular fresh Line Cavalry, they could certainly hold more than their own against the same Line Cavalry weakened or disordered. This in the end tipped the balance in the Allies favour. The reciprocating mutual destruction of massed ranks of cavalry oscillating back and forth across the battlefield was the 'standard mode of operation' for the day. To give you a feel of the level fluctuation, portions of both side's baseline at some point were occupied by 'enemy' cavalry (albeit rather transient in the case of the French Cavalry success). The wear and tear of successful charges being subsequently caught afterwards in a disordered state and then in turn routing seemed a shameful waste of good cavalry. The Elite French Guard Cavalry was the first formation to disappear (as was its fate historically), followed by an Allied Line Cavalry Division and so on. The reciprocal exchange continued but the Allies manage to rally more of the routing units maintaining a slight superiority, having some when the French had lost all of theirs. Towards the end of the battle what was previously the French Cavalry Wing was collapsing into the ruins of Ramillies and rout!
Ramillies itself had been methodically reduced by the might of the Allied artillery (something that from an OrBat perspective was in their favour). When the Allied infantry went in success was assured and the town feel in four quick turns of fighting (compared to the twenty rounds that decided the cavalry affair). This was timed to perfection with the collapse of the French Cavalry Wing so that the defenders of Ramillies were not supported in their time of need.
Meanwhile the posturing along the "Siegfried Bank" by the river eventually escalated from earnest skirmishing with dismounted Dragoons to full musketry exchanges between Line Infantry. From the Allied perspective this sector was always planned as a forceful demonstration to 'pin' the bulk of the French Infantry down in what they [the French] knew as an advantageous position without committing to the 'futile' (historical) fascine crossing. However the course of the battle drew in the Allied First Infantry Line and then even some of the Second Infantry Line. It was the concern of the Allied Cavalry Commanders (including myself) on the outer Cavalry Wing that the Allied Infantry Commanders would lose their restraint and commit to an assault (in fact because the battle continued over ten separate "game nights" the faces of the infantry commanders were never the same). There in question being "one particular moment" where this seemed to about to happen - thankfully instead of going forwards the Allied Commanders took the pain of tracing back [and taking artillery hits as a consequence of being condensed targets]. If the French had counterattacked at the end of the line (the Allied Right Wing) something may have come of it. As it was, when Ramillies and the French Cavalry Wing fell so did the player morale of the French and the came was conceded. Night was calculated as falling and the it seemed natural to stop at this point. We (the players) were all mentally exhausted and glad to see it "done".
In Retrospect and Conclusion:
The rule-set was Under The Lilly Banner Version 3 (admittedly this was not a universally known set of rules - although several play tests had been made, several unique circumstances occurred during the battle which we had to figure out on the fly). One conclusion was that although we "bath-tubbed" down the scenario with regiments representing brigades, the rules at times played (such as partial interpenetration being prohibited) too tactical for the forces we were trying to represent. Higher level morale was absent and the consequences of a wings's collapse "were local". Having said that the game was played and thoroughly enjoyed which stands as a great testament to all involved.
Note: One 'house rule' that really seemed to work was an ammunition restriction on cannon, only having a certain number of cannon balls [black balls as markers] which turned it into an asset that needs to be husbanded.
All Ramillies Posts can seen through this link but you will have to cycle back to the oldest post and read forward: https://exiledfog.blogspot.com/search/label/Ramillies%201706
Individual Ramillies Posts can be seen directly using the following links:
End Scene: The storming of Ramillies (see below, after the fire of cannon comes the storming of the infantry, a bloody and dangerous affair for sure):
A game of three parts, two won by the Allies, one a winning draw by the French which translates into a 2-1 football score and Allied win; compared that is to Marlborough's 3-0 masterpiece on the day. This was cause partly with the 'historical hindsight' (hard to factor out without being too deterninistic) allowing the French to defend far further forward than they did on the day. Another Allied disadvantage being the total 100% information presence - aka no "Fog of War" which denied the 'stroke of genius' Marlborough had on the day in achieving a critical mass of cavalry on his left flank. However it produced a hard fought and entertaining game which gave a greater appreciation of how good a general Marlborough was.
The Battle Plan:
As viewed from the Allied side the left wing was going to be the scene of a massed and ferocious cavalry battle, the slim centre was a concentrated bombardment of the town of Ramillies (hopefully down to rubble) and a holding action along the length of the riverbank (despite the Allied infantry being provided with 'historical' brush fascines to assist filling the ditch - to attempt a full frontal attack would be suicidal). The bulk of the artillery from the holding sector was transferred to the Ramillies bombardment along with the Allied Cavalry Reserve (this movement was in the clear as opposed to hidden). The French were happy be aggressive with their cavalry wing and be defensive elsewhere, however they countered the Allied Cavalry Reserved by committing their own Bavarian Cavalry Reserve to the cavalry wing (again movement seen to all).
The Battle:
The Allied obtained a swift storming of a fortified town hamlet on their extreme left which was invaluable in securing that flank. In addition it drew in no less than six French dismounted Dragoon formations into a futile attempt to retake it. These French Dragoon formations were sorely missed in their mounted role as despite their fighting ability being "less than" that of regular fresh Line Cavalry, they could certainly hold more than their own against the same Line Cavalry weakened or disordered. This in the end tipped the balance in the Allies favour. The reciprocating mutual destruction of massed ranks of cavalry oscillating back and forth across the battlefield was the 'standard mode of operation' for the day. To give you a feel of the level fluctuation, portions of both side's baseline at some point were occupied by 'enemy' cavalry (albeit rather transient in the case of the French Cavalry success). The wear and tear of successful charges being subsequently caught afterwards in a disordered state and then in turn routing seemed a shameful waste of good cavalry. The Elite French Guard Cavalry was the first formation to disappear (as was its fate historically), followed by an Allied Line Cavalry Division and so on. The reciprocal exchange continued but the Allies manage to rally more of the routing units maintaining a slight superiority, having some when the French had lost all of theirs. Towards the end of the battle what was previously the French Cavalry Wing was collapsing into the ruins of Ramillies and rout!
Ramillies itself had been methodically reduced by the might of the Allied artillery (something that from an OrBat perspective was in their favour). When the Allied infantry went in success was assured and the town feel in four quick turns of fighting (compared to the twenty rounds that decided the cavalry affair). This was timed to perfection with the collapse of the French Cavalry Wing so that the defenders of Ramillies were not supported in their time of need.
Meanwhile the posturing along the "Siegfried Bank" by the river eventually escalated from earnest skirmishing with dismounted Dragoons to full musketry exchanges between Line Infantry. From the Allied perspective this sector was always planned as a forceful demonstration to 'pin' the bulk of the French Infantry down in what they [the French] knew as an advantageous position without committing to the 'futile' (historical) fascine crossing. However the course of the battle drew in the Allied First Infantry Line and then even some of the Second Infantry Line. It was the concern of the Allied Cavalry Commanders (including myself) on the outer Cavalry Wing that the Allied Infantry Commanders would lose their restraint and commit to an assault (in fact because the battle continued over ten separate "game nights" the faces of the infantry commanders were never the same). There in question being "one particular moment" where this seemed to about to happen - thankfully instead of going forwards the Allied Commanders took the pain of tracing back [and taking artillery hits as a consequence of being condensed targets]. If the French had counterattacked at the end of the line (the Allied Right Wing) something may have come of it. As it was, when Ramillies and the French Cavalry Wing fell so did the player morale of the French and the came was conceded. Night was calculated as falling and the it seemed natural to stop at this point. We (the players) were all mentally exhausted and glad to see it "done".
In Retrospect and Conclusion:
The rule-set was Under The Lilly Banner Version 3 (admittedly this was not a universally known set of rules - although several play tests had been made, several unique circumstances occurred during the battle which we had to figure out on the fly). One conclusion was that although we "bath-tubbed" down the scenario with regiments representing brigades, the rules at times played (such as partial interpenetration being prohibited) too tactical for the forces we were trying to represent. Higher level morale was absent and the consequences of a wings's collapse "were local". Having said that the game was played and thoroughly enjoyed which stands as a great testament to all involved.
Note: One 'house rule' that really seemed to work was an ammunition restriction on cannon, only having a certain number of cannon balls [black balls as markers] which turned it into an asset that needs to be husbanded.
All Ramillies Posts can seen through this link but you will have to cycle back to the oldest post and read forward: https://exiledfog.blogspot.com/search/label/Ramillies%201706
Individual Ramillies Posts can be seen directly using the following links:
- https://exiledfog.blogspot.com/2019/01/ramillies-set-up.html
- https://exiledfog.blogspot.com/2019/01/big-game-ramillies-final-set-up.html
- https://exiledfog.blogspot.com/2019/01/ramillies-opening-rounds.html
- https://exiledfog.blogspot.com/2019/02/big-game-ramillies-cavalry-sash-and.html
- https://exiledfog.blogspot.com/2019/02/big-game-ramillies-heart-of-matter-game.html
- https://exiledfog.blogspot.com/2019/02/big-game-ramillies-second-wave-of.html
- https://exiledfog.blogspot.com/2019/02/big-game-ramillies-second-wave-of_10.html
- https://exiledfog.blogspot.com/2019/02/big-game-ramillies-not-even-pause-for.html
- https://exiledfog.blogspot.com/2019/02/big-game-ramillies-all-that-remained-of.html
- https://exiledfog.blogspot.com/2019/02/big-game-ramillies-sickening-sight-of.html
- https://exiledfog.blogspot.com/2019/02/big-game-ramillies-spilling-more.html
- https://exiledfog.blogspot.com/2019/02/big-game-ramillies-first-blooding-of.html
- https://exiledfog.blogspot.com/2019/02/big-game-ramillies-oh-fortuna-game-11.html
- https://exiledfog.blogspot.com/2019/03/big-game-ramillies-hot-pursuit-game-12.html
- https://exiledfog.blogspot.com/2019/03/big-game-ramillies-allied-cavalry-close.html
- https://exiledfog.blogspot.com/2019/03/big-game-ramillies-sternest-french.html
- https://exiledfog.blogspot.com/2019/03/big-game-ramillies-hanoverian-cavalry.html
- https://exiledfog.blogspot.com/2019/03/big-game-ramillies-crumbling-french.html
- https://exiledfog.blogspot.com/2019/03/big-game-ramillies-attack-on-name-sake.html
- https://exiledfog.blogspot.com/2019/03/big-game-ramillies-victory-ramilies.html
Thursday, 21 March 2019
(Big Game) Ramillies "Victory .. Ramilies Falls" [Game 18] Post #20
A plucky unit of French Dragoons charge the disordered Hanoverians (or rather mass of Hanoverians) attempting to repeat the astounding success of the Allied line cavalry on an equally massive target of Bavarian Cuirassiers, but for all its valour it is routed - but it will draw the four bases of Hanoverians with it in pursuit but importantly they are not "lost" to the Allies cause and will eventually return. Meanwhile the charging Allied Dragoons continue to hack into the static Bavarians trading cruel blow for cruel blow (see below, this effectively will end the French cavalry on this wing as a fighting force):

The Allied Dragoons are gone [but not forgotten] but only one strength point remains on the Bavarian unit - which means that it will "die" in the next combat (see below, there is also a good chance that if pressed or charge it will simply dissolve away):

The precarious position of the French is shown here. The angle of their "L" is being encircled slowly. What good troops they have here cannot escape. The last unit of cavalry is one casualty away from 50% so will not fair well in a combat (see below, what is more the Allies are about to deploy a light cannon - there will be no peace for the French - the Allies are now confident of victory ):

The Wild Geese are destroyed and half of Ramillies occupied by victorious British troops. The last remaining stand of French will retire. Ramillies falls to the Allies after a bitter contest (see below, once garrisoned it effectively traps any French troops to the south [three infantry brigades and the last Bavarian Cuirassier regiment] in a hopeless position):

The French C-in-C concedes that "All is lost" and the rearguard action has to start, falling back down the river-line, losing all their baggage and train (see below: it has been a long, long day but it will be a longer night for the French with the bitter taste of defeat):

Bitter sweet is the victory given the piles of Allied (and French) dead that litter the battlefield. It just showed you the true genius of Marlborough and how he conducted the real attack!
The Allied Dragoons are gone [but not forgotten] but only one strength point remains on the Bavarian unit - which means that it will "die" in the next combat (see below, there is also a good chance that if pressed or charge it will simply dissolve away):
The precarious position of the French is shown here. The angle of their "L" is being encircled slowly. What good troops they have here cannot escape. The last unit of cavalry is one casualty away from 50% so will not fair well in a combat (see below, what is more the Allies are about to deploy a light cannon - there will be no peace for the French - the Allies are now confident of victory ):
The Wild Geese are destroyed and half of Ramillies occupied by victorious British troops. The last remaining stand of French will retire. Ramillies falls to the Allies after a bitter contest (see below, once garrisoned it effectively traps any French troops to the south [three infantry brigades and the last Bavarian Cuirassier regiment] in a hopeless position):
The French C-in-C concedes that "All is lost" and the rearguard action has to start, falling back down the river-line, losing all their baggage and train (see below: it has been a long, long day but it will be a longer night for the French with the bitter taste of defeat):
Bitter sweet is the victory given the piles of Allied (and French) dead that litter the battlefield. It just showed you the true genius of Marlborough and how he conducted the real attack!
Wednesday, 20 March 2019
(Big Game) Ramillies "The Attack on the Name-Sake" [Game 17] Post #19
The action at Ramillies becomes intense. The full weight of Allied infantry comes to bear on the defenders (see below, one senses no quarter is taken in this battle - particularly with the Wild Geese involved):

Successive rounds of combat build up infantry losses on all units. The Allies weight of numbers allows them to distribute them more evenly across many units instead of one (see below, the Wild Geese are down to their last 'base' of troops in the top section of Ramillies):

On the Allies left flank two more cavalry charges take place. At the top two French Dragoon dice versus four Allied Line Cavalry (both sides charging in). At the bottom the Allied Dragoons catch the Bavarian Cuirassiers at the halt (this seemed to be the straw that broke the French camel's back). The Allied Dragoons had turned the table of their Bavarian Cuirassier foe and the chances are now that there will be several bloody rounds of combat (see below, with this the sands of time had run out for the French Cavalry Wing):

Along the river the infantry firefight had exhausted itself. The British had sacrificed a full third of their forces but the French were unwilling (or perhaps unable) to launch any form of counterattack (see below, two forlorn bundles of fascines had been placed [next to the bridge, right-middle] at such a great price - too high a price in Corporal John's eyes):

One thinks the Allied far right wing commander is almost tempting the French to charge across the bridge [to do so they have to form in condensed columns]. It looks ripe for attacking the Allies in teh flank but they would swing round to face and charge [probably] (see below, the Frenchman does not seem to be a gambler):

Another infantry fight, but after a protracted fire-fight the Dutch infantry charge in. At three stand to one they hold a distinct advantage (see below, there is much confusion when common colours used on both sides [one thinks of BLUE as a French colour but the Dutch used it too], you can only tell the Allied infantry by the direction of their advance):

The combat ends with the French in a state of rout. Additional Allied infantry are also following up to exploit the success (see below, yet another whole appears in the French line - brick by brick the French wall is crumbling):

The coup 'de grace' on the Cavalry Wing. The French Dragoons put up a round of resistance before routing whereas the French Line Cavalry finds itself in a protracted hacking match (see below, the Allied cavalry have done all asked of it on this day):

Both sides reduce themselves to below 50% casualties, this means heir combat effectiveness is now all but minimal , yet still the hacking continues (see below, the Allied Dragoons have in the course of the battle travelled the full depth of the Cavalry Wing - from the Allied baseline to the French baseline):

With one weary round of combat to go the Bavarian Cuirassier will be the last man standing in this combat as a hoard of Allied cavalry comes his way. Guaranteed to lose one casualty if he fights again this places this unit is a completely "no win" situation (see below, the Allied cavalry has truly earned its laurels at Ramillies):

The way is now clear for an advance down the undefended French baseline, straight to the French baggage camp behind the rubble that is now Ramillies.
Successive rounds of combat build up infantry losses on all units. The Allies weight of numbers allows them to distribute them more evenly across many units instead of one (see below, the Wild Geese are down to their last 'base' of troops in the top section of Ramillies):
On the Allies left flank two more cavalry charges take place. At the top two French Dragoon dice versus four Allied Line Cavalry (both sides charging in). At the bottom the Allied Dragoons catch the Bavarian Cuirassiers at the halt (this seemed to be the straw that broke the French camel's back). The Allied Dragoons had turned the table of their Bavarian Cuirassier foe and the chances are now that there will be several bloody rounds of combat (see below, with this the sands of time had run out for the French Cavalry Wing):
Along the river the infantry firefight had exhausted itself. The British had sacrificed a full third of their forces but the French were unwilling (or perhaps unable) to launch any form of counterattack (see below, two forlorn bundles of fascines had been placed [next to the bridge, right-middle] at such a great price - too high a price in Corporal John's eyes):
One thinks the Allied far right wing commander is almost tempting the French to charge across the bridge [to do so they have to form in condensed columns]. It looks ripe for attacking the Allies in teh flank but they would swing round to face and charge [probably] (see below, the Frenchman does not seem to be a gambler):
Another infantry fight, but after a protracted fire-fight the Dutch infantry charge in. At three stand to one they hold a distinct advantage (see below, there is much confusion when common colours used on both sides [one thinks of BLUE as a French colour but the Dutch used it too], you can only tell the Allied infantry by the direction of their advance):
The combat ends with the French in a state of rout. Additional Allied infantry are also following up to exploit the success (see below, yet another whole appears in the French line - brick by brick the French wall is crumbling):
The coup 'de grace' on the Cavalry Wing. The French Dragoons put up a round of resistance before routing whereas the French Line Cavalry finds itself in a protracted hacking match (see below, the Allied cavalry have done all asked of it on this day):
Both sides reduce themselves to below 50% casualties, this means heir combat effectiveness is now all but minimal , yet still the hacking continues (see below, the Allied Dragoons have in the course of the battle travelled the full depth of the Cavalry Wing - from the Allied baseline to the French baseline):
With one weary round of combat to go the Bavarian Cuirassier will be the last man standing in this combat as a hoard of Allied cavalry comes his way. Guaranteed to lose one casualty if he fights again this places this unit is a completely "no win" situation (see below, the Allied cavalry has truly earned its laurels at Ramillies):
The way is now clear for an advance down the undefended French baseline, straight to the French baggage camp behind the rubble that is now Ramillies.
Tuesday, 19 March 2019
(Big Game) Ramillies "The Crumbling French Right" [Game 16] Post #18
The fighting on the left wing of the Allies is condensed around the French baseline. Never a good sign for the defender when one errant move can see formations disappear off-table in the blink of an eye. Even more concerning is that the French and their Bavarian allies have "no room" to manoeuvre. They are literally tripping over themselves, with their flanks and rear being constantly threatened (see below, a draw would be the French could hope for here!):

Ramillies is assaulted ... the "first wave" goes in and both sides extract casualties on the other. The Allied artillery has done good work on the original brigades (including the Wild Geese) and reinforcements sent it to take the place of casualties (see below, more disconcerting for the French is the second wave of Allied infantry advancing to reinforce the contest next turn):

The bravest of the brave ... foolhardy souls simply obeying orders (see below, the Allied Cavalry Commander[me] only hopes their sacrifice will not be in vain):

All eyes focus back on the Allied cavalry wing. They [the outnumbered Allied line cavalry] fought and died hard ... killing more of the enemy that they lost themselves which meant they actually won the melee. Therefore no morale test for the Allied Cavalry (see below, a tense time suddenly comes for the French C-in-C because, if the Bavarians fail they will rout "off-table" and that is the best part of his "last" cavalry on this wing):

The die is cast and the Bavarians morale crumbles. The Allied line cavalry had fought them so hard that despite being inferior in numbers they astounded all and won! The Bavarians could not take it and will flee (see below, with this one result in particular you could see the French C-in-C's personal morale crumble too - one stand will be pursing four stands off table):

Rather than take a devastating infantry fusillade it is clear that the Hanoverians will charge and try and fight their was out of a tight corner (see below, with the French on their own baseline a win means an unrecoverable rout off-table - the Allied cavalry will pursue off table but in battle terms they are deemed 'recoverable'):

The first wave of infantry assault Ramillies. These are the poor unfortunates who will take the brunt of the defenders fire. Three units go in against the defenders two. It will now become a slogging match and the bodies of the dead will pile high (see below, flags a flying the boys go in):

A final glimpse of the chaos that is now the French right wing. Soon there will be more Allied units on the French baseline than the French themselves have. This is not a good sign (see below, the "L" in the French line is being turned in on itself):

Posing briefly for the camera the 'luckiest' Allied cavalry unit of the day departs off table chasing the Bavarian Cuirassiers (see below, this exposes the flank of the remaining French cavalry unit on the French baseline):

Once again the Allies have a distinct cavalry advantage which means an "end run" into the French rear is now possible (see below, the slow moving Allied infantry brigade is now free to move down the enemy baseline to their camp and behind Ramillies):

The French cavalry may have one final fling of the dice, but all know they are doomed. Along with their demise then the French hopes of holding Ramillies flounder.
Ramillies is assaulted ... the "first wave" goes in and both sides extract casualties on the other. The Allied artillery has done good work on the original brigades (including the Wild Geese) and reinforcements sent it to take the place of casualties (see below, more disconcerting for the French is the second wave of Allied infantry advancing to reinforce the contest next turn):
The bravest of the brave ... foolhardy souls simply obeying orders (see below, the Allied Cavalry Commander[me] only hopes their sacrifice will not be in vain):
All eyes focus back on the Allied cavalry wing. They [the outnumbered Allied line cavalry] fought and died hard ... killing more of the enemy that they lost themselves which meant they actually won the melee. Therefore no morale test for the Allied Cavalry (see below, a tense time suddenly comes for the French C-in-C because, if the Bavarians fail they will rout "off-table" and that is the best part of his "last" cavalry on this wing):
The die is cast and the Bavarians morale crumbles. The Allied line cavalry had fought them so hard that despite being inferior in numbers they astounded all and won! The Bavarians could not take it and will flee (see below, with this one result in particular you could see the French C-in-C's personal morale crumble too - one stand will be pursing four stands off table):
Rather than take a devastating infantry fusillade it is clear that the Hanoverians will charge and try and fight their was out of a tight corner (see below, with the French on their own baseline a win means an unrecoverable rout off-table - the Allied cavalry will pursue off table but in battle terms they are deemed 'recoverable'):
The first wave of infantry assault Ramillies. These are the poor unfortunates who will take the brunt of the defenders fire. Three units go in against the defenders two. It will now become a slogging match and the bodies of the dead will pile high (see below, flags a flying the boys go in):
A final glimpse of the chaos that is now the French right wing. Soon there will be more Allied units on the French baseline than the French themselves have. This is not a good sign (see below, the "L" in the French line is being turned in on itself):
Posing briefly for the camera the 'luckiest' Allied cavalry unit of the day departs off table chasing the Bavarian Cuirassiers (see below, this exposes the flank of the remaining French cavalry unit on the French baseline):
Once again the Allies have a distinct cavalry advantage which means an "end run" into the French rear is now possible (see below, the slow moving Allied infantry brigade is now free to move down the enemy baseline to their camp and behind Ramillies):
The French cavalry may have one final fling of the dice, but all know they are doomed. Along with their demise then the French hopes of holding Ramillies flounder.
Monday, 18 March 2019
(Big Game) Ramillies "The Hanoverian Cavalry Make Their Mark" [Game 15] Post #17
The "prodigal sons" return. On the Allied baseline a "lost" unit (well base) of French line cavalry with attached General appears "far from the maddening crowd" (see below, they spy in the distance "routers that" could be easy pickings - fate seems to be turning in ever so small ways to the French, the Allies nerves are beginning to tingle a little):

Even the French infantry are getting the "best of it" in the attritional battle of the flank of Ramillies (see below, the addition of a cannon seems to be helping the French cause):

I must confess that the long hours in the saddle pitching my wits against French horse had not prepared me well for this match-up against the infantry. Seeing the hard-won cavalry advantage being thrown away was heart-breaking. At this point I was set to become defensive, bring up my light cannon and let the infantry take over. That seemed slow but sure. Thankfully the Cavalry Commander of the Reserve was made of sterner stuff. Not only was he going to charge again but in condensed double line. That way his mass should break the the disordered French infantry (see below, the might of two whole lines of Hanoverians thundered at the French - all eyes turned to the outcome of the melee):

Down the line another small but vital action took place. A bastion of French heavy artillery pieces had to be removed and the brave Dutch infantry charged into contact (see below, they took the force of the "effective" cannonade but removed the canons [one base]):

As the mighty Hanoverians stampede in, a unit of Dragoons move half and dismount - just in case the Hanoverians come to mischief (see below, the theory being that if we cannot ride over then we start shooting them up - I had the distinct feeling that this could be the Allied Stalingrad):

But my worries were unfounded. The Cavalry rolled eight dice to the oppositions four (it really helped with the double line and the infantry remaining disordered) and rolled well. The infantry (my beautifully painted infantry - Grenadiers and all) were routed (see below, a most welcome sight for sore Allied eyes, yet all the work is not yet done as the Bavarians lurk alongside the last French infantry brigade):

Seen from another side the catastrophic destruction of the French infantry brigade. This is deemed a huge swarming mass of mixed cavalry and infantry which prevents "volley fire" from the last remaining "wing" infantry unit (see below, the infantry are hapless and will be removed next turn as the cavalry will always catch them in a pursuit situation):

What remains of the original Allied cavalry forms up ready to attack the Bavarians. There target is a condensed formation of two lines of Bavarian Cuirassiers. The top right unit of line cavalry will lead the attack and the dragoons follow up one after the other - expecting to find the Bavarians disorganised and hence themselves at an advantage (see below, even so it is by no means a sure thing):

What seems like a crazy charge follows, the Allied line cavalry seek to sell their lives dearly so others may follow up (see below, with this turn of events this "wing" may well become cavalry neutral! With both sides obliterating each other):

Meanwhile the Allied infantry were methodically cleaning up the second French artillery bastion outside of Ramillies, steadying themselves for the main assault with "friends" out of camera shot to the right (see below, gaps were now appearing in the French Line, here there was not the defence in depth as seen on the river-line):

One more push is called for as the very walls of Ramillies are assaulted!
Even the French infantry are getting the "best of it" in the attritional battle of the flank of Ramillies (see below, the addition of a cannon seems to be helping the French cause):
I must confess that the long hours in the saddle pitching my wits against French horse had not prepared me well for this match-up against the infantry. Seeing the hard-won cavalry advantage being thrown away was heart-breaking. At this point I was set to become defensive, bring up my light cannon and let the infantry take over. That seemed slow but sure. Thankfully the Cavalry Commander of the Reserve was made of sterner stuff. Not only was he going to charge again but in condensed double line. That way his mass should break the the disordered French infantry (see below, the might of two whole lines of Hanoverians thundered at the French - all eyes turned to the outcome of the melee):
Down the line another small but vital action took place. A bastion of French heavy artillery pieces had to be removed and the brave Dutch infantry charged into contact (see below, they took the force of the "effective" cannonade but removed the canons [one base]):
As the mighty Hanoverians stampede in, a unit of Dragoons move half and dismount - just in case the Hanoverians come to mischief (see below, the theory being that if we cannot ride over then we start shooting them up - I had the distinct feeling that this could be the Allied Stalingrad):
But my worries were unfounded. The Cavalry rolled eight dice to the oppositions four (it really helped with the double line and the infantry remaining disordered) and rolled well. The infantry (my beautifully painted infantry - Grenadiers and all) were routed (see below, a most welcome sight for sore Allied eyes, yet all the work is not yet done as the Bavarians lurk alongside the last French infantry brigade):
Seen from another side the catastrophic destruction of the French infantry brigade. This is deemed a huge swarming mass of mixed cavalry and infantry which prevents "volley fire" from the last remaining "wing" infantry unit (see below, the infantry are hapless and will be removed next turn as the cavalry will always catch them in a pursuit situation):
What remains of the original Allied cavalry forms up ready to attack the Bavarians. There target is a condensed formation of two lines of Bavarian Cuirassiers. The top right unit of line cavalry will lead the attack and the dragoons follow up one after the other - expecting to find the Bavarians disorganised and hence themselves at an advantage (see below, even so it is by no means a sure thing):
What seems like a crazy charge follows, the Allied line cavalry seek to sell their lives dearly so others may follow up (see below, with this turn of events this "wing" may well become cavalry neutral! With both sides obliterating each other):
Meanwhile the Allied infantry were methodically cleaning up the second French artillery bastion outside of Ramillies, steadying themselves for the main assault with "friends" out of camera shot to the right (see below, gaps were now appearing in the French Line, here there was not the defence in depth as seen on the river-line):
One more push is called for as the very walls of Ramillies are assaulted!
Sunday, 17 March 2019
(Big Game) Ramillies "The Sternest French Infantry of the Day" [Game 14] Post #16
Yet again this fierce brigade of French Line Infantry fought off the savage charge of Allied cavalry, despite being in a state of disorder. These men were the firm stanchion that fixed the point of concern in the French lines (see below, a clash of arms of savage fury, yet more horse than soldiers fell - the cavalry learning respect for the socket bayonet):

Yet Ramillies itself was coming under severe pressure with a considerable force of Allied infantry steadfastly advancing. The French brigades inside had already suffered fearfully (see below, the ruins give it some protective cover but not the fortress walls afforded at the start of the battle):

The Allied cavalry on their Right Wing had scattered back, forming a concave depression. The French however were in no mood to risk a counter-attack, preferring a slow death instead (see below, the moment of danger had seemingly passed here):

The flickering firefight was continuing along the whole length of the line of the river. The French seemed to be getting a "defensive upper hand" but did not have the necessary mass to exploit anything (see below, the British Line Infantry brigades seemed perfectly happy to trade blows at a disadvantage to the French defenders, dying in some cases to a man instead of retreating/routing):

The blood and thunder back on the cavalry wing was going the French way. Having not broken the infantry in the first charge the Allied cavalry suffered 50% casualties but bravely fought on, passing a morale test (see below, this dreaded infantry formation had broken two Allied cavalry - a good return on investment):

In desperation an addition stand of mounted Allied Dragoons reinforced the melee - another rule we had not experimented with (see below, the plan was to bleed the infantry with yet another round of melee):

The regular cavalry was routed away. The French line although disordered was still intact (see below, the next round of combat was going to go very badly for the Dragoons):

The Dragoons too rout, but at least a base is taken of the French infantry brigade (see below, this has been a costly business particularly as the Bavarian Cavalry Reserve is reforming behind them):

For the first time there is notable concern within the Allied Cavalry Wing. The infantry's flank must be protected in their assault on Ramillies (see below, any more piecemeal commitment of Allied cavalry could have disastrous consequences):

I had painted this French Infantry well, perhaps too well. How I secretly regretted painting that extra base of French Grenadiers (see below, at this rate it was ploughing through the Allied Cavalry Reserve at a game winning rate of knots):

Something decisive was sorely needed from the Allied side or the game could be seen to be slipping away from them.
Yet Ramillies itself was coming under severe pressure with a considerable force of Allied infantry steadfastly advancing. The French brigades inside had already suffered fearfully (see below, the ruins give it some protective cover but not the fortress walls afforded at the start of the battle):
The Allied cavalry on their Right Wing had scattered back, forming a concave depression. The French however were in no mood to risk a counter-attack, preferring a slow death instead (see below, the moment of danger had seemingly passed here):
The flickering firefight was continuing along the whole length of the line of the river. The French seemed to be getting a "defensive upper hand" but did not have the necessary mass to exploit anything (see below, the British Line Infantry brigades seemed perfectly happy to trade blows at a disadvantage to the French defenders, dying in some cases to a man instead of retreating/routing):
The blood and thunder back on the cavalry wing was going the French way. Having not broken the infantry in the first charge the Allied cavalry suffered 50% casualties but bravely fought on, passing a morale test (see below, this dreaded infantry formation had broken two Allied cavalry - a good return on investment):
In desperation an addition stand of mounted Allied Dragoons reinforced the melee - another rule we had not experimented with (see below, the plan was to bleed the infantry with yet another round of melee):
The regular cavalry was routed away. The French line although disordered was still intact (see below, the next round of combat was going to go very badly for the Dragoons):
The Dragoons too rout, but at least a base is taken of the French infantry brigade (see below, this has been a costly business particularly as the Bavarian Cavalry Reserve is reforming behind them):
For the first time there is notable concern within the Allied Cavalry Wing. The infantry's flank must be protected in their assault on Ramillies (see below, any more piecemeal commitment of Allied cavalry could have disastrous consequences):
I had painted this French Infantry well, perhaps too well. How I secretly regretted painting that extra base of French Grenadiers (see below, at this rate it was ploughing through the Allied Cavalry Reserve at a game winning rate of knots):
Something decisive was sorely needed from the Allied side or the game could be seen to be slipping away from them.
Subscribe to:
Posts (Atom)