Showing posts with label Totenkoft. Show all posts

Wednesday, 15 January 2020

Arras 1940 Re-fight (Part 4 of 4) Closing Time

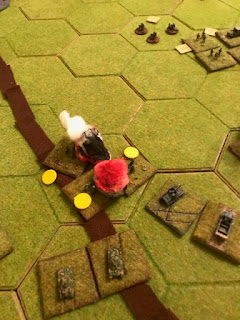
Despite the destruction of the 7th RTR as a fighting formation, some of the surviving individual elements took on 'local initiatives' and pressed forwards. This had mixed results as a Recon Bren Carrier "finds" a hidden Pak 37mm troop an incongruously succumbs to a less than heroic fate (see below, the corpse British 7th RTR is now being nibbled away):


The Allies now opt to sacrifice a VP by committing a "reserve" (historically not used on the day), the flanking composite French Char Battalion (Germans 3 VPs,  Allies 5 VPs). This allows a French Char Company to overrun the last company of routing German Motorised Infantry from the SS Totenkoft Battalion - no additional VPs claimed but a case of 'clearing' the board of troublemakers):


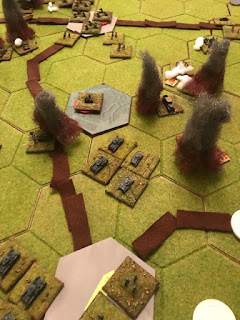
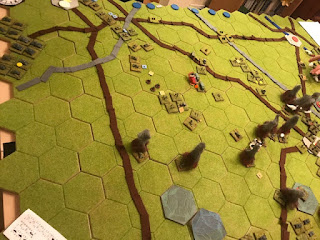
The grim path of destruction is plain to see for all, although it is a brave Frenchman that ignores a Panzer Jaeger troop on his flank (see below, in the far off distance you can see a de-bussed company of British 2pdr Anti-Tank guns, supported by a Infantry Company of the 8th DLI):


This unexpected threat sends uncontrollable fits and convulsions through the 7th Panzer Division's chain of command, Rommel would later write that he was being attacked by no less than five enemy divisions. The result being at Rommel commits the 25th Panzer regiment into the fray. It had already been well off table and "halted" then "reversed" back to Arras (the tanks not literally in reverse though), now by committing it the Germans lose an additional 2 VPs. Though as the Germans see it, if the French tanks are not stopped they could easily roll through the flank of the whole German artillery set up, which would be another 7 VPs, so 2 VPs is a worthwhile investment. The first German Light Panzer Company mops up the remaining troublesome British Bren Carrier troop and stops the threat to the German backfield (see below (Germans 3 VPs while the Allies have surged ahead to 7 VPs):


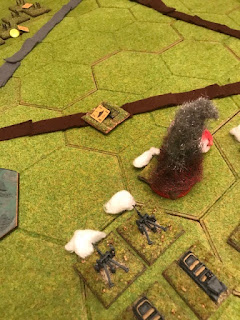
The last remaining stands of British armour (two troops, a Matilda I and Matilda II, approximately ten tanks all told) attempt a valiant do or die, slow charge of the heavy brigade in the face of the massed deployed artillery of the SS Totenkoft and 7th Panzer Division. The results were predictable but it was a close run thing (see below, a billowing column of smoke marks the final resting place of the 7th RTR Regimental HQ troop):


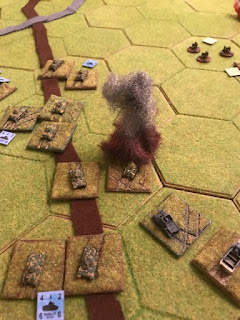
"Crump!" goes one H-35 as the "forgotten about" Panzer Jaeger I reminds the French tankers about its existence. It then shoots and scoots away as the last surviving non-routed SS Totenkoft stand. The French armour although it could go 'toe-to-toe' or better with the panzers  in a stand up fair fight, is in the unenviable position or being surrounded and attacked in the flank so rather than "lose it" and hand the Germans some VPs, teh French commander decides to 'fall back' and defend the baseline (see below, inadvertently this French attack marks the deepest Allied penetration of the day):


The final state of affairs .. yes, we ran out of time, another half to an hour and it would have all been cleared up nicely .. but we had to call it here. Another (the second from the 25th Panzer Regiment) has appeared threatening the French baseline. This caused the French Char Battalion to face right and join up with the DLI's 2pdr Anti-Tank line forming a solid "PAK wall". It would be a foolish German Panzer Battalion that tried to charge through that! Meanwhile the tragic crescent of smoke shows the baleful advance of the 7th RTR and its subsequent demise, but i has extracted a huge price in VPs. To the far right of the "British Bulge" dismounted infantry of the DLI are peeling back. Thankfully out of line of sight to the mass of German artillery. As a final insult to injury a German motorcycle company has infiltrated behind the DLI's lines and is threatening Allied baseline VP and 'safe-exit' hexes (see below, although the Allied position seems dire, they have won a VP victory as they have shocked the Germans by the ferocity of their attack, panicked Rommel and caused flutters in the German High Command):


So end'eth the game! A good concept test of mapping Panzer Blitz/Panzer Leader rules to hex based miniature games, trying to simulate the theme of actual battles. I think it 'worked' but I would like to review some of the game mechanics. The addition of a withdraw and rout states were a very good improvement. No automatic rallies was a good change although I think that target prioritisation from Spearhead could also be easily included, as could Command Decision "Company Command" orders. The key thing is speed of play and reducing unnecessary dice roles to a bare minimum. Thought should also be given to 1940 "clanky tank" or "tank fright" rules and features of combined arms attacks getting bonuses in the likes of close assaults.

Tuesday, 14 January 2020

Arras 1940 Re-fight (Part 3 of 4) - A Bloody Exchange of Blows

The Matilda I's slow tortuous escape from the direct fire of the 105mm Howitzers firing over open sights continues, but inevitably it means more casualties of precious tanks that the British Army (or rather BEF) can ill afford to lose at this juncture. The two companies of Matilda I's swing to right of the contested village - as the Brit would see it], the one company of heavier Matilda II's swinging to the left [as the Brit would see it]. The Matilda I's have already suffered 50% casualties but the Matilda II's are as of yet fresh and untouched (see below, the DLI infantry are content to be out of sight from the German artillery,but a watchful eye to the sky reveals another [potentially more deadly] danger, circling like a flock of vultures, a visitor from the Luftwaffe a flight of Stukas, eyeing up the tantalising sight of a nice line of enemy troops sill in trucks):
 

The mournful wail of the sirens from the Stuka's precedes a devastating bombardment that "incredibly" (only) pins a company of the 8th DLI and does not destroy them - however they are "frozen in their situation" aka "perilous". Meanwhile the armoured tip of the British Right Hand Column, although dispersed and diluted, has swung into the "soft" head of the Totenkoft Motorised Infantry Battalion it has already savaged. Two troops of Bren Carriers and two troops of Matilda Is conduct an armoured assault - though lacking friendly infantry back-up (see below, the British force is being pulled out of mutually supporting formation and is being dispersed across a widening battlefield):


One positive development for the British is the positioning of the British Royal Artillery detachments FOO, clearly seeing the enemy firing over open sights. He promptly call ups a bit of counter battery fire with devastating effect. One battery of German 105mm is annihilated and another routed, effectively a Battalion of firepower so that is another 2VPs for the Allies (see below, although well ahead of the VP (4-0 [2 x 1VP Hex + 1 x 2VP support battalion]) front the Allied player is extremely concerned about recent developments):


The Matilda Is attack routs a motorised German Infantry Company but loses another Matilda I to a Panzer Jaeger I troop which is sufficient to crack (or rather check) the British morale (see below, another colourful spot of flame lights up the battlefield):


The Bren Carriers attack is again spectacular as this time a whole company of German motorcyclists are 'put to the sword' effectively ending this German battalion as an effective fighting force (see below, and earning the Allies another VP in the process making it 5-0 to them):


The British Commander although taken aback at the Matilda I's rough treatment of is extremely aggressive in nature (he must have read Rommel's book)  and decides to launch a combined armour/infantry assault to break through the line of German infantry to the left of the village [as the Brits would see it]. He certainly is taking the fight to the Germans and causing them much concern  (see below, the Matilda II is also a much stronger faster and better armed tank than the Matilda I):


The "Hell on Earth" consumed the column of tanks, as to their left a Battalion of SS Totenkoft heavy artillery opened up from concealed flanking positions. They had moved up and de-bussed during the course of the initial exchange with the companies of Matilda I and under cover of the Stuka attack. The flanking position improved their odds against the Matilda II's heavy armour and just when the Germans needed it they received "good dice" (see below, three out of four Matilda II troops went up in flames and effectively brought the British attack to a sudden stop):


With that came the first German VPs, two for destroying the 7th RTR as an effective fighting force (Germans 2 VP, Allies 5 VP).

Monday, 13 January 2020

Arras 1940 Re-fight (Part 2 of 4) - Hitting the Soft Underbelly

While the Middle of the British Column is being attacked the leading elements (Recon/Scout Carriers - see below, top left in the photograph and middle respectfully) have encountered a juicy soft target, an undefended lorried column of German Infantry (see below, top-middle right in the photograph). This Motorised Infantry Battalion is part of the SS Totenkopt formation that is keeping pace with Rommel's 7th Panzer Division (see below, it has been caught completely unawares by the rapid British advance, two companies are exposed between the two villages):


Carnage ensues, as the lorried infantry are in "the worst case possible scenario" for defence purposes (see below, the passengers suffering the same fate as their transport):


One company of German Infantry is completely destroyed and the other company is routed and loses its transport for game purposes (see below, the British Carriers will follow through and claim the white Victory Hexes off the German baseline):


The final "cut scene" of the aftermath of the "charge of the British Bren Carriers" (see below, OK, technically Scout and Recon Carriers but Bren sounds more BEF 1940 period to me):


Meanwhile back in the middle of the British Column another British Infantry Matilda I troop goes up in smoke under direct fire from the German 105mm artillery (see below, the trouble is that the Matilda I has such a slow speed it has terrible problems disengaging from long range fire and those lorried 8th DLI infantry look terribly exposed to the casual observer):


The most advanced British Carrier discovers a very unpleasant secret in the adjacent village as a German Support Company (Pak 37 and 75mm Infantry Gun) open up at point blank range (see below, the trouble with these mad cavalry charges is that they can end up with a"sticky end"):


The British Bren carrier succumbs to a "sticky end" but it has sold itself very dearly (see below, it still keeps the "white victory" marked as it has sown sufficient disorder and confusion in the ranks of the advancing Germans - who thought they were "as safe as houses"):


Both sides seem to be trading telling blows in different parts of the battlefield. Confusion seems to be mounting on both sides. Urgent messages of recall are being sent to the lead elements of the 7th Panzer Division asking the Panzers to about face and return to "help out". This advocates more British "white" victory markers (one per Panzer battalion is ordered to return - Rommel elects to recall two which means the Allies have earned four victory points already). By way of contrast Rommel gains two VPs if he destroys/mauls the 7RTR, 2 VPS if he destroys the French Char Battalion, one VP if he makes the French Char Battalion retreat and 1 VP for destroying the 8th DLI. The British can attain addition VPs per German Battalion Destroyed (2 per Panzer, 1 per Infantry, 2 per Artillery, 1 per Flak 88 Battery).   

Sunday, 12 January 2020

Arras 1940 Re-fight (Part 1 of 4) Advance to Contact

The Allied set-up (see below, a static French Armoured Force [Composite Tank Force about the size of a battalion] guards the British Right flank [bottom of the photograph], a motorised battalion of British Infantry (8th DLI) are spread out along the Allied baseline [left hand side of the photograph], with an Infantry Tank battalion, the 7th RTR spread out in a armoured spearhead in front [middle of the photograph]):


Looking at the British Right Attack Column (see below, the line of red poker chits delimits the line-of-sight - static infantry in cover [and everything is deemed none table flat and thus can hide infantry  - stationary vehicles would be spotted up to three hexes away, moving vehicles up to eight hexes unless blocked by woods or town]):


The British advance as a closed up armoured column (see below, nothing as yet is revealed, but the British Commander is tensed up in nervous anticipation):


Adverse to closing into a "dangerous close assault from cover" situation British armoured column veers off to its right to bypass the grey village hex which could by hiding Germans (see below, the first turn was a "speeded-up" movement of three times the slowest speed [the Matilda I Infantry Tank]):


They discover to their horror that they have blundered into the "soft but spike " underbelly of Rommel's 7th Armoured (Panzer) Division - The Ghost Division. The soft being the rear echelon Artillery Regiment - the spiky being four batteries of 105mm artillery and a Flak 88mm battery deployed in direct fire mode against the British Armour (see below, yes sadly for the British, the smoke denotes that they are "live" firing):


The result being burning and damaged Matilda I's from the 105mm Howitzers and the revalation that the grey town and its surrounds is infested with German Infantry (see below, first blood to General Rommel):


This is followed by further devastation as the mighty 88mm Flak Gun (directed no doubt by Rommel himself) taking on the lightest of British armour, the Vickers MkVI Light Tank resulting in a predictable second column of burning British ex-tank smoke (see below, the results of a rather unfair fight):


The British Commander looked on in stunned silence pondering his next move.