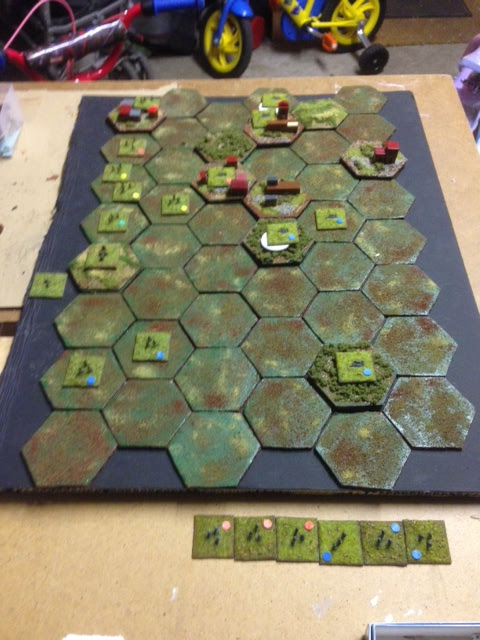
Return to "Battalion Attack" - Fire and Movement project (from Phil Sabin's Simulating War book) got a second outing. See below for the revised terrain board, with the British Infantry Battalion (1943-45) attacking left to right, hits a German defensive line of two companies. This is a hasty attack scenario.
The British start in the left most column (Germans setting up in columns 4,5 and 6). My acquisition of "brownish "Lego (TM) pieces from
a trade with my eldest son has enhanced the look and feel of the "Farm Complexes" terrain sections. A certain familiarity with the board (second time out now) also allows me now to
nickname certain features.
- Top left hand corner, "Little Gibraltar" (the only British held "Farm Complex" at the start of the game)
- Top right hand side corner, "The Alamo" (the German 'retreat' bastion)
- The top centre, "The Iron Crescent" (German held/dominated defensive lynch-pin of this sector, comprising of three farm complexes, one ridge and two sections of woods)
- Bottom right, "Outcast Wood" (home to the German left flank platoon, in a similar role to the 20th Maine at Gettysburg, "You sir are the left flank")
- Bottom left, "Overhang Ridge", (a superb British HMG baseline position situation ideal for 'overhead fire' on "The Iron Crescent")
'Putting the toys on the board' (as per the Simulating War "example of play pp215-219, see below). The book play through was a good training session for the two newcomers (but experienced wargamers and board gamers) I umpired for. They took up where the book left off.
Note: The figures "off table" (in the black non-playing area) are:
- To the left hand side the British off-table three inch mortar support platoon
- To the bottom, the German replacement counters for any platoons that move out of their dug-in status. Also to note all fighting rifle platoons have been given a 'company colour' sticker for ease of identification (which is important in some firing circumstances). The platoon number has been dropped as insignificant to the rules).
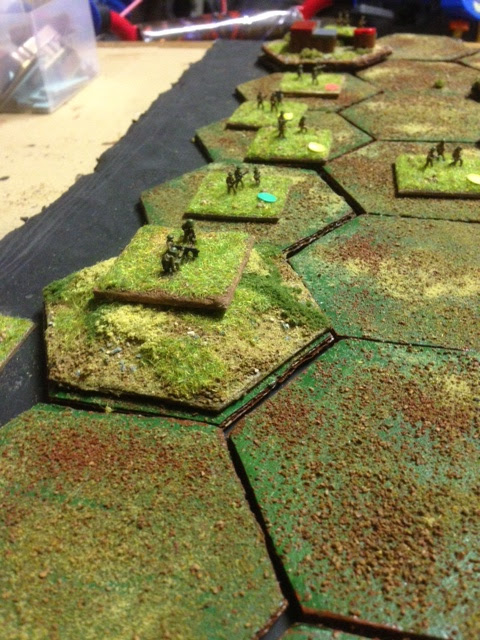
Another 'improvement' to the terrain from last time were the 'new look' ridges. Instead of being another layer cardboard tile I used a magic material called Dufaylite (TM) which is a cardboard honeycomb (think "bees" hexagonal honey cells) used as the filler in a thick cardboard sandwich. The beauty of it is that the material is that it can be cut with a hand saw into hexagon shapes. Then the hexagon sides can be easily sculptured into slopes with a bit of pressing, snipping and gluing (a cheap glue gun helped here) up to a small plateau. Finally painted and flocked (see below for the "Overhang Ridge" HMG position):.
The emphasis I place on styled terrain is intended to 'better' represent the terrains impact on the battlefield. For example when I used the plain brown hexes for "farm complexes" in the first game I felt that it unintentionally mislead the British player into thinking that "the attack prospects" were much easier than they actually were. I thinking by making the terrain look more formidable this important balance should be somewhat redressed.
The Second Replay
Despite Battalion Attack - Fire and Movement being a "short game" we only managed to play eight full turns, filled with wargaming discussion. The situation you see below is at the start of Turn 9 (as in the German player goes next).
Game summary: Coached to a certain degree as regards what had happened in the first (experimental) game, I think the players made a decent stab at playing the game as to how it was intended to be played. It also helped that the fire combat modifiers had been better clarified on the Simulating War YahooGroup. The rules now played correctly (in the first 'experimental' game the Germans benefited from additional defensive modifiers that were from misreading the rules) gave a much more fluid game.
Review of Tactics: The British battalion commander decided to press forward with an infantry close assault on "The Iron Crescent" despite the daunting nature of the task. His slow methodical progress paid off to the extent of clearing the furthest forward "farm complex" and inflicting one German Platoon casualty (the one the Germans had decided to 'advance into during the first two turns of the game). "Outcast Wood" was largely ignored but nevertheless was a bullet magnet as the British commander fell for that old wargame adage of "use what you have got while you have still got it". The result is a cumulative frittering away of assets (every seventh shot eliminates a friendly platoon through ammunition attrition), no one attack being the deadly sin, but the net effect is a poor
"fire discipline". At the end of turn eight the German baseline was still looked a very long way off, the Germans still at five sixths strength and the British down to half half combat effectiveness (six rifle platoons and two support platoons). The defence looked like it might be bent but not broken. The German player "hung tight" and committed his reserve platoons to "strengthen the line" at the moment of crisis and I think he was heading to win as the British commander was gradually "running out of infantry". 3VP to the Germans and only 1VP to the British. Who had the idea of attacking this sector without tanks?
The Rules Re-examined (again):
One feature of the Fire and Movement combat mechanisms (i.e.the ammunition attrition and direct fire casualties) is that the attacker can
"bleed from the back," with more often than not the attacker being able to selectively choose what platoon dies (and not necessarily being the unit being "hit" the most). This allows the attacking player to 'keep the momentum going".
Another rules feature was the
incredible usefulness of the
HMG (especially in
indirect fire mode) and the battalion
mortar in providing covering fire for the infantry attack.. The former is particularly useful as a well sited HMG (on a ridge) can provide some covering fire (albeit with a negative modifier) 'danger close' whereas the mortar has to 'check fire' due to 'adjacent friends'.
One thing that became clearly apparent was that
"dug-in troops" can be
relatively easily suppressed but not KIA'ed. The designer notes this as a deliberate feature, something that a lot of miniature rule sets do not follow, the classic being Squad Leaders 'breaking' broken units on a second hit and the tendency of heavier shells "Verdun'ing" infantry (Command Decision and Spearhead).
Finally, to make any headway the British player has to pay the butcher's bill and get some rifle platoons into a Close Assault position on the German occupied "fortified/covered" hexes (i.e. the farm complexes and troops dug in woods) as it is
the only way to score casualties on the Germans
Addendum:
Wow, bit of a big "brain dump" of a post but I think it was worth it ;)
YahooGroup and this Posting can also be found at:
http://groups.yahoo.com/group/simulatingwar/message/1992