Showing posts with label German Infantry. Show all posts

Tuesday, 2 June 2026

Sunday, 20 February 2022

Connections UK 2019 Fire-Move Game 2

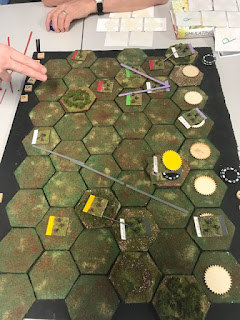
The afternoon/early evening Connections UK 2019 game was played with one defender and three attackers. The attackers being a mixture of old wargaming Grognards (from Wargames Developments) and a newbie DSTL wargamer C-in-C, with the defender being a newly civilianised DSTL military man who clearly knew his way around wargames. You may have guessed that with his astute interlocking defence [without clumping two units adjacent to each other] and good deployment in rather problematic terrain set-up for the defender (see below, the defender it always made to think hard about whether to occupy exposed hills [with the disadvantage of potentially defending too far forward] or sit back in the "lee" [defending on the baseline] risking being overrun, it is always a compromise of sorts. Another sensible choice was a simplicity of choice in that the two German infantry companies defended separate areas of the board and were not "layered" in a confusing manner [that did not help the defender in the first game Connections UK 2019 game]):  


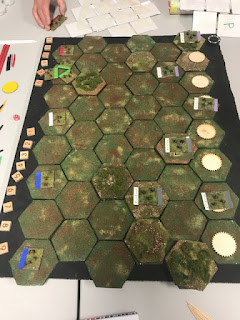
The British came in "across the board", using three out of four companies represented from the get go, plus sticking the Vickers HMG platoon in the first turn [the middle seemed to be a safe bet]. Of note is the use of the cover afforded by the wood on the second row in. The Green company commander was able to place his full company in its "protective lee" outside of German LOS. However, the notion of an overall "plan" seemed to be missing for this set-up, but all players "were on the board," great for playability but the consequences could be somewhat fatal for the troops involved (see below, the question the British player should ask is where do I use my support assets - the Vickers HMG and 3" mortar - to best effect? It looks like they will continuously be "haggled" over, too many cooks perhaps will spoil this broth): 


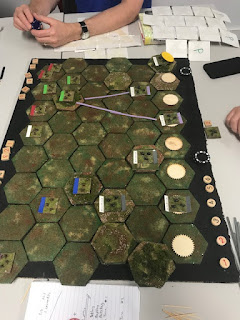
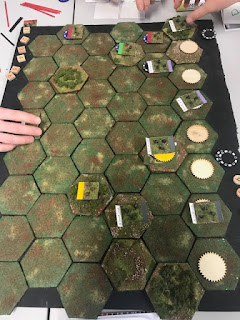
Turn 2: The British Grognards see Blue company advance unsupported by the Vickers HMG because of LOS problems and the mortar was "haggled over" and taken to the other end of the table, to what purpose I am still not exactly sure. The Blue attack looks promising as there is a local British superiority of 3:1 and the potential of an additional 3" mortar support on later rounds that means there is a very good chance of suppressing the defender and getting a close assault in (see below, Red company at the top of table has a covered approach [it will take some long range fire initially], then there is an awful "show yourself over the top" moment at the end): 


Turn 3: The British make a big push or rather two big pushes at two separate ends of the table. The British re-sight their mortar (taking precious time and still leaving Blue company unsupported in its continued attack) and provide the German Purple Company some  "target practice" on Green company's platoon as it enters the woods. Blue company has moved a platoon to a close assault position but has rather rashly has opened itself up to more defensive fire than is healthy for the British assaulting troops liking! All depends on Lady Luck and the dice (see below, Blue company has missed a classic fire-fire-move tactic, with a 50% and 33.3% chance of suppressing the defender - one thing the British have forgotten about LOS is that you don't block LOS if you are in the same friendly hex firing, they have swung their assaulting platoon too far left and got into trouble): 


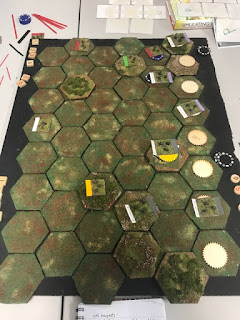
Turn 4: There is a withering hail of German defensive fire with seven "fire for effects" being rolled for. The German defending platoon in peril of being close assaulted is opting to fire for a single hit on two British platoons to make them both "spent" and inactive until their rally phase rather than hurting one with three hits. As it stands with accumulated casualties the British player is very near to withdrawing one for platoon with KIAs and also one platoon for ammunition expenditure (see below, the dice rolls will be "make or break" for the southern British attack):  


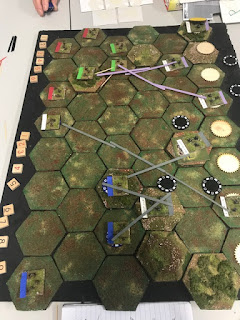
To the horror of the British players, Blue Company evaporates under withering fire and logistic depletion (loosing two platoons, but the Germans gaining only 1 VP  for the KIA platoon). The reserve Yellow company is now thrown on - in the middle of the battlefield, which is literally the teeth of the German defence presenting themselves as bunches targets (a German platoon firing can hit two adjacent hexes, remember also the Germans do not have to worry about ammunition depletion and the only way you can cause hits on an entrenched German platoon is to close assault them). This looks an increasingly hard task for the British players to pull off and now depends on the main attack in the North going well for them - but again it is into well sited German entrenched platoons (see below, the surviving Blue platoon it providing distant covering fire for the Yellow company, which really should have been following like avenging demons in the tracks of their brave Blue infantry compatriots [route one down the middle is "not open"]): 


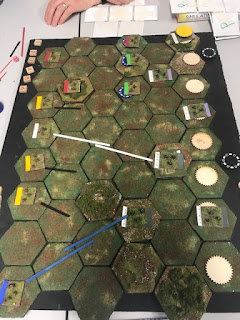
The British again have to pay the butcher's bill from the German defensive fire and again, because they fired so many units - the ammunition depletion rule hurts them. Blue company is no more (ammunition depletion) and both Yellow and Green company have removed KIA platoons. What also does not seem to help the British is the fact that the supporting mortar and Vickers HMG seem to be supporting in the wrong places (see below, the British are now looking very thin on the ground thanks to some costly human wave tactics against entrenched Germans): 


The German defensive fire has left the Northern attack "pinned under the guns" and they are likely to be stuck there for some time. The British Green company loses another assaulting British infantry platoon and the attrition is going to be only one way from point in (see below, the battle is called at this point, the British will not be able to destroy a single German platoon, let alone get to the baseline [therefore zero VPs, whereas the German player has at least 4VP]): 


The British have attacked in what amounted to piecemeal "Human Waves" (I don't think alternative "all-in-charge" would have done any better though) and have been comprehensively beaten. I believe in the South they did have an "in" [an isolated German platoon] with Blue company but mismanaged it, but could have reworked it with Yellow following it up, In the North there was a terrain problem to work out, domination of the ridgeline which would have been a protracted firefight (with correct positioning of "supports" - keeping a company off table would have pinned the German platoons "in position" in the middle as the flanks were attacked. This one was a hard nut to crack, in fact a win in VP terms needed very patient play (see below, the Grognards did use it very much as a "learning the rules2 experience and game away thinking how they would do it next time, after many games the nuisances of the rules only come out after several play-throughs): 


The laurels for this play-test definitely lay with the defender, but with terrain generated randomly it means that any two games are highly unlikely to ever play the same. 

Saturday, 19 February 2022

Connections UK 2019 Fire-Move Game 1

The Connections UK 2019 Conference allowed me the opportunity to run two games of Fire Move, one in the morning and one in the afternoon. The morning game had one defender and two attacking players, all of which had never played the game before. Interestingly this meant that a few new wrinkles came to light as the players discovered important aspects of the rules, which as we all know is an invaluable and the critical part of playing the game in the first place (see below, we are several turns into the game - the German player has elected to keep a platoon in reserve off table [a sound tactic], but he has "stacked heavy" [concentrated] in the centre in order to try and dominate the centre and the German right flank. However the terrain to the German also left disrupts "his line of sight" which has isolated his far left platoon. In the centre a single British platoon firing can hit two German platoons simultaneously, so note the positioning of the Vickers HMG platoon allows the British a good chance to suppress two German platoons each turn):  


The problem on the German left is an awkward hill that lies three rows in from the British side, which means the German cannot set up on it. Three waves of British infantry are now in the process of assaulting the German left flank [8:3 in the British favour ], so the German player hastily calls forth his platoon out of reserve and ponders the use of his valuable mortar ammunition (see below, the yellow "sun" marker is the landing point for the British 3" mortar, note also the British players have pounced on this avenue of attack, to the almost the point of ignoring attacking the German right flank. remember the black cocktail sticks denote movement - the blue coffee stirrer denotes firing): 


The British player starts to crowd and concentrate multiple platoons into single hexes [a potentially dangerous tactic if in clear LOS to an enemy "fresh/active" platoon or if the German player can conduct a mortar attack on the hex in question - however it could pay off in close assault and allows a better chance of supporting fire by clearing LOS hexes]. The key thing here is to suppress the Germans in the British "fire phase" so they cannot return fire in their "fire turn" - it is all a balance of risk and probabilities (see below, suppression and poor LOS are very frustrating to the German player):  


The British "Yellow Company" conducts a classic and very successful close combat that destroys a German platoon, note "close assault" being the only way in the rules an entrenched infantry platoon can take damage (all other hits simply supress and is a design feature of the rules). The platoon in question takes six hits and is removed from play - excess hits would not carry over to other platoon, they are simply lost (see below, the risk in this case payed off with handsome rewards - the barn door is now swinging open, the deployed reserve platoon is looking very vulnerable in the "open"): 


The Fire/Move battlefield looks very good from a British point of view, fifty percent of the German forces are effectively "out of play" because they cannot interfere with the streams of British infantry flanking to their left threatening to roll up the German baseline. The Vickers HMG is causing extra pain by consistently pinning them in place to stop the German platoons reinforcing the German left (see below, the British have performed a very good attack exploiting the weaknesses of the German set-up): 


Despite the outstanding success the British players were hit by the "cunningly clever" logistics rule of Fire-Move, again a purposely designed subsystem in the game which means that after a certain amount of firing [set IIRC at eight or nine fires - note this is a factor that can be calibrated as a game parameter] the British have a "depleted ammunition platoon removal". No victory points awarded to the Germans but there is one less manoeuvre element for the British Battalion Commander to use (see below, if you look closely there are now only two not three "yellow company" British infantry platoons - and note to fulfil this logistics requirement you have to take a platoon off that has been actively firing that turn [cheesy play is always possible - which platoon you take, but the temperament of the players is arbitrated by the umpire's oversight (or overrule - aka final word) to be "simulation" and not "competition" play (aka avoid unrealism's)]): 
 

The German reserve platoon (in the open) was mercilessly gunned down. The Germans had suffered 50% casualties and could not stop the British advance. The game was called as a comprehensive British victory, well played to the two young players from DSTL who had not played a wargame before! The German player took away some valuable lessons learned. 

Thursday, 17 February 2022

Connections 2019 Fire/Move Components

In hindsight perhaps I should have showed this post first as this was in preparation for the 2019 Connection UK Fire-Move games. I decided to take the same terrain as I did for Connections UK 2016 when I first did Fire-Move, but upgrade the infantry models from Skytrex Action 200 to Pendrakon 10mm figures (see below, the basic British OoB for the game [as per the book], comprising of an infantry battalion, four companies [red, yellow, green, blue] of three infantry platoons, plus a Vickers HMG support platoon [white] and a 3" mortar platoon [top right hand corner, off-table left with basic flocking]): 


The similarity to a Spearhead or Command Decision order of battle (OoB) is somewhat striking (and reassuring) - so I now can field a British infantry battalion for those rulesets too, which is a bonus. These are also the playing pieces that can appear on table top - note the Vickers HMG can support all the other companies with direct fire, but once placed on the baseline cannot move other than to retire out of the game for good. The other thing to remember about the Vickers is a -1 DRM applies when danger close, as in a friendly unit is adjacent to an enemy unit it is firing at. The distinct colour banding is also to act as a aide memoir to help supporting direct fire and close assault respect the "same" company restriction (see below, I have also colour coded fire and assault markers [painted cocktail stick and coffee stirrers] for the combat phase, so a simple "same colour" visual check can be applied): 


The Germans can in theory operate in two modes, the common static defence position, as shown below with a colour coded company (as per the British because the same fire restrictions apply to the Germans)  and a crude "barbed wire" representation to their front (X-X-X). This slip of paper could be detached or folded under the figure base if it was moved in the course of the game (see below, a simple system that worked well in practice, although it is noted that the Germans hardly ever elected to move .. note in the London Exiles game, the only German movement was to move [retreat] off table): 


With that the game components were complete ready to "meet the players". Going back to reference the Spearhead and Command Decision rulesets again, in Fire-Move there is no reference to a Battalion Command Stand, so there is no limitation to the number of orders that could be given in a turn, either in the number of or distance from the battalion. Command Decision drops a level further down to Company Command Infantry stands [Nationalities like the Americans and German can actually elect to have a separate Company Command Stand]. One last difference is the provision of the Battalion Carrier Platoon, often used in a fighting Reece function or a very valuable Admin helper moving munitions and stores around, even evacuating casualties. That element is ignored for Fire-Move and assumed to be on "other duties".

Wednesday, 16 February 2022

Connections 2019 - FireMove and Exiles' Party (Part 2 of 2)

Phase II: The attack is going in hard on the German right flank. "Bags of smoke and flank left" as I think the British Army expression goes, plus a huge concentration of the British PBI force, three infantry companies attacking to one defending certainly helps. 75% of the British battalion are hitting at this point here .. ouch .. (see below, top of photo, another close combat goes in against the middle German platoon): 


The advance is merciless and methodical ... although momentarily stalled. FireMove does not always produce fluid flowing play as the defenders can with the roll of the dice can produce an unexpected roadblock (see below, the heavy British pressure is held for at least one more turn and time is a factor in this game as there is an implicit fatigue and exhaustion point):  


Note how the British green company has been reduced under the withering fire of the "other" German company and logistics "firing out one platoon". Attacking entrenched infantry at 1:1 of odds, even with two HMG Platoons, does not bode well for the attacker. Meanwhile at the north/top end of the photograph an infantry assault clears another German platoon from table (see below, that is 2VPs for the British and 2VPs for the German in infantry KIA):  


The British infantry advance on towards the German baseline, pressing on, heeding the ancient axiom of "not fighting where you do not have to". One consequence of this headlong rush forwards is the awful intermingling of platoons from different British companies which hinders both suppressive supporting fire and close assault execution. Different coloured companies cannot fire in mutual support or perform mutual assaults together, although a "white" Vickers HMG could - subtle but effective rules (see below, the German baseline is a feast of additional or rather potential VP that are up for grabs):  


A line of VP markers are placed along the German baseline that are "up for grabs" - which serves to emphasise the plight of the German defenders. The German turn is rather quick as the British have done a good job in suppressing them so the only action left open to then is to rally and recover - becoming fresh again (see below, please note the third white platoon on the British baseline is the British scout stand which has chosen to retire, its job): 


For who the dice rolls! In this case a terrible "one", for the Germans. No hits are automatic so a "one" can mean a failure at the most critical of times (see below, I think the roll was probably defensive fire or a German close assault that went horribly wrong, with the action probably fat away from this safe German platoon): 


British Turn (Reinforcement Call - burning 3VPs to bring on some tanks, but risking them [minus 1 VP for any lost] on the assumption in the time remaining they can be driven off the board from 2VPs each): With an opening created and a safe zone cleared by the British Infantry Battalion asks for (as yet unallocated by Brigade) armour support to exploit this opportunity. A favourable dice roll - possibly influenced by imbibed strong beer, sees two |75mm Sherman tanks and a 17 pounder Firefly Sherman appear ominously on the British baseline. Note, also the use of black painted cocktail sticks that denote movement - so a unit cannot fire if it has a black stick on, this was a very useful aide memoire (see below, this really looks like curtains for the German right flank, time perhaps for the German to ask for armour support (?) as he sees this threat develop - see how those movement markers imply the final German platoon in the north is about to be surrounded.):  


The last German platoon in the north is becoming an awkward embarrassment to the British. With clock ticking and the British player burning VPs to bring on his armour "en masse". This turn seems to be stetting the German player up for the kill next turn (see below, the 3" mortar and Vickers HMG's do not have to "pay" the logistic tax, so the southern half of the battlefield seems to be semi-permanently supressed to the German player): 


Discretion can sometimes be the better part of valour, true the German player could possible make a brutal close assault on an adjacent British platoon, but in all probability he would be pinned and lost on following turns (see below, instead he elects to retire while he s able to and also in so doing removes a potential VP from the British coffers): 


Seen from the German perspective the final brake out with an intact British armoured formation being released to wreck havoc in the German rear area, on reflection is a rather depressing viewpoint (see below, all the British armour will have exited in two turns or be in place to try and shoot up his Stug III if he chose to bring it on - which would be on a friendly German baseline hex, not adjacent to an enemy unit. It cannot fire on the turn of its entry so would receive incoming fire. The danger is deemed too great, the gain is too little and the opportunity passed [Note: The German armour could be asked for on the turn after British armour was spotted]): 


Breakout as seen from the British side (see below, four VPs from the German Baseline hexes and six VPs for the British armour exiting off table make a swing of ten VPs which is a crushing victory - a token defending British infantry force in the newly captured farm house [which offers protection as good as entrenchments] can hold off any German counter attack as they would have to leave the protection of their entrenched positions):


Called convincingly for the British. Well played, a gentleman's ending to a fittingly good game between friends, and we are the last ones in the house to boot  (see below, it is not a good sign when your opponent has to move from his side of the table to your right flank to move his troops along your baseline): 


A good end to a great night old in Old London Town! That was a good run out for FireMove and some extended rules, once again thanks goes to teh Exiles for being such great sports.

Monday, 14 February 2022

Connections 2019 - FireMove and Exiles' Party (Part 1 of 2)

Can I set the scene correctly? It is so long ago now. Late at night, in a Gaming Café in South London, underneath Waterloo [I believe, as I did get a little disorientated as we traversed all those London back lanes] in pre-Covid times (2019), four people did meet and bring their own game to a rather special venue. The game was a miniatures table-top version of "Fire Move" by Professor Phil Sabin of Simulating War fame, or at least should I say this was "The London Exiles" variant - as I met up with two of the 'newer' members of the Exiles (my old London Wargames Club), a club who IMHO represent the finest of the Old Guard of the wargaming fraternity (see below, an epic venue, strain your eyes to see some nicely painted 10mm WWII Pendrakon Figures on the table if you can, a scenic flocked battle board, but most importantly of all - the finest of company, good strong beer and beautiful gourmet burgers to boot - had I died and gone to some form of wargaming heaven?): 


The bar, the food and waitress service were exceptional and the "the gaming crew" certainly took an avid interest in our table's game [partly as it did not come out of one of their stable "off the shelf" boxes - in fact I literally wheeled in the components in a suitcase, they were intrigued]. The game had already had two outings that day at the Connections UK 2019 Professional Wargaming Conference held at KCL, but here "Fire Move" was going to be put to its most serious test as yet in my eyes, this being the measure of the respect I have for the Exiles as arbiters of wargames taste (see below, friendly staff and a buzzing atmosphere): 


One final shot of the whole crew and the first dice of the night are ready to be rolled (see below, British attacking from the left with the Germans defending on the right, a standard probing battalion attack at a sector "believed" to be thinly held by a couple of "under strength" German infantry companies):


A first departure from the basic Fire Move game and Connections UK script was the introduction of the "Fog of War" hidden placement and spotting rule - rather than just laying the German defenders out, the British had to find them. They could do this by getting close enough to spot stationary infantry or enticing the Germans to reveal their position by firing on them (see below, the German player was given ten red poker chip tokens that represented "places where the Germans could be in clear LOS" to the British baseline - note the wood below is in a contested "no-man's land"): 


The British player deploys troops from three out of four of his companies (blue[A]-white[B]-green[C]), five platoons in total, in a left-middle-right attack formation with the fourth company (yellow[D]) held back in reserve. The British white counter in the middle of the left baseline is a "recon counter" that can flush out red hidden German "poker counters" - it cannot assault but it can spot, this is in difference to Frank Chadwick's "patrol counter" and is another experimental element (see below, note no pre-game artillery bombardment was opted for, rather and again going away from the basic book version of the game it was going to be available "on call" during the game): 


Turn 1: Nothing spotted or heard from the Germans as yet [are they really there?] so the British infantry move gingerly forwards. The phycological sight of the row upon row of hidden "possible" concealed enemy positions gives a much heavier level of caution to the British plater, a trepidation of the unknown (see below, it was getting a little bit tense at this moment, "I don't like it Sarge! It's too quiet!"): 


On the German turn [3] there is "contact" as three German platoons are revealed, two from the "purple" company [top of photograph - the white piece of card to the front has a series of crosses drawn on it to denotes it is dug-in, something that is not really captured in the photograph well] and one from the "grey" company [bottom of photograph] - as they "open up" on the advancing Tommies. We played if you come within two hexes of a "red poker" counter you can "roll for a reveal" - same odds as shooting but just determining if anything is there or not (see below, the "grey" company platoon attracting the attention of the 3" British off-table mortar for his troubles):  


Again deviating slightly from the book, as I allowed the British to call down a 25 pounder smoke barrage to conceal their advance from direct fire. This was a LOS impediment which saved the British from withering fire - one shot spans two hexes rather than a point-to-point attack. I like the diverse nature of this spread of fire as opposed to most miniature game systems. Works best with hexes for sure. Chain of Command in effect does something similar by spreading casualties across a group in LOS, albeit with a different mechanic (see below, the beer is being drunk as casualty chits mount up, from strained memory we played every eighth casualty a platoon was removed, likewise the British had an ammo restriction which removed platoons to get replenished - so they could not be over zealous in their shooting. The above two rules make it a very different game from the normal WW2 tactical game experience):


From various cheap "number and word" games you can find in the high street shops that sell budget games for kids (Sudoku, Bingo and the like) I cannibalised "number chits" (see markers to the left and right of the board). These are used as casualty as logistics counters for the British and (decreasing) mortar allocation points. Also note - the new white British counter that has appeared on the baseline is the Vickers HMG platoon that has come down from a higher echelon for the attack to complement the organic battalion 3" mortars as support weaponry, once placed it cannot move (see below, the attack has reached a critical "reveal" stage, over half the British forces are on the table and most, but not all the German forces are shown - the British player can now choose his "main point of attack):   


The British player commits his last company (yellow [D]) to attack in the North (top), therefore reinforcing the success of blue company but still continuing the pressure in the South (green company). The British player has taken losses but not had to remove a platoon to date - logistical or by enemy fire (see below, note the German player has lost one platoon from an infantry assault, the only way the Fire-Move rules allow an entrenched platoon to be removed from play - it can be hit and suppressed [so it cannot fire back] any number of times): 


The British attack progresses and the final German counter is revealed. Two infantry assaults are prepped to "go in" on the next British turn unless the German suppressive fire can register hits this turn - making the British spent and unable to go in. Just off camera, a second Vickers HMG platoon has appeared. The infantry advance in the North is complemented by intense suppressive fire in the South, it is starting to look grim for the German (see below, nothing is guaranteed until an assault or fire hits .. a one is always a miss and it is so suppressing how many times a one comes up when statistically unexpected on a d6 .. Lady Luck is a cruel mistress):


Useful playing aides: Caught on camera are the "painted long stem coffee stirrers" which I used to help the players "get the rules right". In particular direct fire and assaults can only be supported by friendly stands from the same company (or the British HMG stand). Without remembering in a semi-permanent form (as in lasting over the turn) this is easily muddled up in the heat of "game play" (see below, I also think it gives the player an aide for forming his "fire plan" rather than letting organically grow, and be wasteful of ammunition, which does play a significant part in this game): 


To be continued ... the second half as the attack is pressed home.

Sunday, 19 April 2020

Undaunted WWII France 1944 Normandy Combat System - Boardgame

This one definitely needs "time in the sun", or rather on the game table (see below, from the vaunted Osprey publisher no less):


I am especially interested in this as it seems very comparative scale in scale to Chain of Command platoon sized action. It also places emphasis on scouting and reconnaissance.

Coming next a North African variant: https://ospreypublishing.com/blog/cat/osprey-games/post/announcement_undaunted_north_africa/

Friday, 7 February 2020

Finishing Off those Blitzkrieg Germans

Taking a cue from a friend (Renko) I procures a second box of Warlord Games Early War Germans but this time opted for the German Pioneer set (see below, flamethrowers, satchel charges galore and what looked like to my eyes a "combat bricklayer" to which I was later told was an extremely powerful demolition charge):


This should allow me now to build the fourth squad (the early war 1940 German Platoons sure are big) and a few supports!

Thursday, 30 January 2020

Blitzkrieg Germans .. an Unexpected Project

I remember swearing blind that I was not going to deviate from WWII 20mm collection, that was hard enough to "cover" (and I literally meant cover in all nationalities 1939-45) and this resulted in a huge pile of plastic I admittedly enjoy making - more modelling than wargaming battles, although this is something I wish to change. I want all of my models to in effect fulfil their wargaming destiny and fight across the tabletop, even if in only the merest of skirmishes. I gave into scale creep madness many years ago and now sighed despondently as I found myself buying a set of 28mm Biltzkrieg Germans from Warlord Games (see below, beautiful artwork, beautiful models and a dream to put together - although I have sore hands after the end the assembly process):


So thinking that the early war Germans conformed to the later war formations I sketched out my platoon order of battle (OoB). No that seemed I could almost get a platoon out of a single box (see below, what could possibly go wrong?):


So I started assembly the Germans conscious that I would need a lot of rifles and few few SMGs (see below, the first one is just an experiment to get the rhythm of the factory process):


These Germans were "justified" in my mind's eye as "good opposition" for my Stalingrad Germans .. although the real reason was that everyone else [four unnamed people] who was wanting to play a 1940 Blitzkrieg Chain of Command Campaign wanted to be Belgians, French or BEF. At this point I have collected and painted a 1942 Stalingrad Russian force, I had some boxes of late war Brits and Yanks, but as of yet .. no Huns. So the time seemed right (see below, half a squad, or should I say the first sprue, one MG34 gunner and five rifles; I am consciously ignoring the sexy SMGs for the German NCOs): 


Then comes the sting in the tail, I discover to my horror that there seemed to be no manpower shortage in the 1940 Heer organisations as that every platoon [unless you were designated "Second Wave"] had four squads (see below, I had to re-sketch my OoB - only to discover I needed another box of figures):


My first squad was complete (as in assembled) but instead of being a third the way hone I was only a quarter - akin to running a marathon uphill (see below, I am happy with the look and feel of these guys - even though there will be quite a lot of them):


The completed box almost got me three squads but I was two figures short in the end. This did give me artistic license in putting together the Platoon Command (see below, note the Platoon Command gave me an officer with pistol [Luger of course] and a senior NCO with "machine pistol"):


I have ordered and am now awaiting a second box ;)